Story
A few years before when I was contemplating adding an extra room to our
house, I had rough designs on re-doing the wooden decks around the
house (see the
New Room Design
Project). With the demise of our hot tub in 2012, and the
deterioration of the decks, it became time to revist redesigning and
rebuilding the decks.
I contemplated paying a designer/builder to do everything, and I
contemplated doing it all myself. In the end, I did not have time to
do this project and all the other projects on my list, so I decided I
would design it and have a general contractor help me with the
construction part. Early onwards, I was fixated on having built-in
furniture, but eventually decided to have stand-alone furniture, I had
the contractor make the deck structure, planking and fences while I
would build stand-alone furniture for the decks and also build the
"deck screen" where a privacy fence used to be. More details on the
furniture can be found on the
Deck Furniture Project
Page and more details on the privacy fence can be found on the
Deck Screen Project Page.
I would also be the one adding lights to the deck, which is described
in more detail on the
Deck Lighting
Project Page. There is also the
Deck Perimeter Project Page that shows
some followon work around the adjacent areas to the deck.
The Landscape
Though this is all bundled under the "New Deck" project, there are a
lot of projects wrapped up in this effort. They are all related and
somewhat intertwined. The major things that need to be addressed:
- Drainage Problem - When it rains heavy (as it likes to do
in Central Texas) there is a river that runs along the back of my
house. A 4 foot wide, 6 inch deep river. I live on a sloped lot, so
the water does flows alright, but there is a problematic area around
the den and kitchen where the water comes into the flow faster than
it exits, so on a prolonged heavy rain it can start to approach
entering the house. There are famous songs about the Texas Floods,
so it is best that I actually solve this problem than resorting to
wishful thinking.
- Side Fence - The side fence on the east side of my
property is long past due for replacement. I am not really sure what
is keeping it up at this point and it has plenty of holes in it.
- Front Fence - The front facing fence, especially the gate
have their 4x4 support posts so loose that the gate is barely
functional. Additionally, at some point in the next year or two, the
electric company will need to get some machinery into
the back of my yard to replace the telephone pole that is 10 years
beyond its rated lifetime. Stabilizing the front fence will
incorporate a new double gate to allow wider access to the
backyard for the equipment they will be bringing.
- Deck Demolition - The old decks will need to be demolished
before new ones can be built.
- Spa Removal - The old decks cannot be demolished until the
old (broken) spa is removed. How does one get rid of a dead beast
like this?
- Tree Removal - Of the 3 trees that currently stick out of
the decks, two are very nice, 18 inch trees. The third is a mangey 8
inch, malformed tree that is nothing but an obstace and has very
little redeeming value. This is the tree that will be removed to
create more useable deck area.
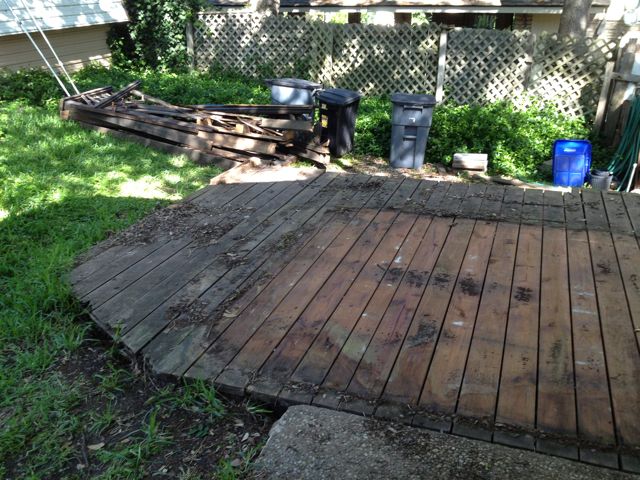
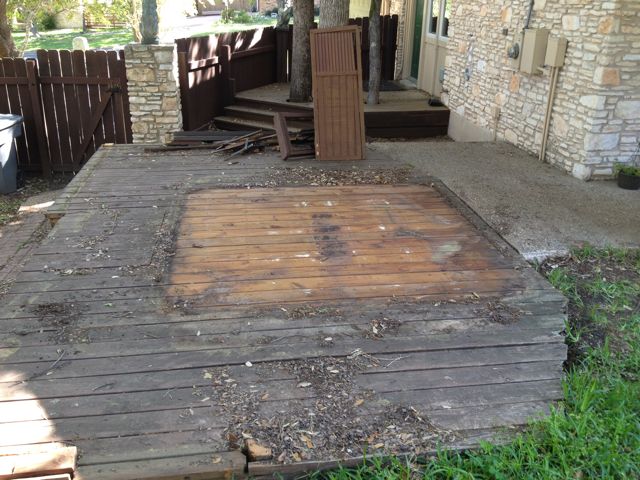
- New Deck - There are currently 3 sections of deck. One is
way back along the rear property line that is so far away we rarely
use it. The other was devoted entirely to the spa. The third is a
small area with two trees growing out of it, one being the problem
tree previously referred to. In between the spa deck and the small,
tree deck are steps down and then steps back up, which means a
complete waste of space and time going down and then back up to get
to the same level you started on: not very efficient.
The plan for the decks is:
- Remove the unused deck along the back of the property.
- Span the two other decks to create more useable, continuous deck
space (removal of the spa also helps create space).
- Build a new deck along the back of the house where a river runs
through it. The drainage solution will be to excavate down to
effectively create a riverbed which will allow a better water flow
and ensure no water backs up into the house. Rather than have to
step across this dug out channel, we'll put a deck over it to reclaim
it as useful living space.
Preliminary Work and Requirements
I put some preliminary though into this a couple years ago and wound up
with a list of desired features including:
- Bench seating, tables and planters.
- Built in lighting.
- Non-slip treads on stairs.
- Privacy wall. We have one already and want to reproduce something
like this, though hopefully slightly nicer.
- Ipe or composite decking. I want the deck to last a long time
with a minimum amount of maintenance. Ipe is the only real wood that
fits this requirement, but composites have a lot of advantages
too.
- Small gap near base of privacy wall and deck surface. A leaf
blower trying to operate with the three current walls winds up with a
cyclone of leaves that just go round in cicrcles and never leave the
deck area. This was we can easily blow or sweep leaves off the
deck.
- Access to under the deck. We had a possum die under one of our
decks once and it was a pain to have to get rid of it.
Being a very visual person, my plan was to build a 3D model of the
area, and play around with ideas. I wound up getting a little carried
away with the 3D modeling though. Instead of modeling the house around
the decks, I continued to model just about everything on the property,
which then bled over into modeling the interior of the house. After a
fair number of modeling diversions, I finally got to the actual design
of the new decks.
An Unexpected Demolition
Broken Spa and Privacy Fence
Once I had a rough design, I began the conversation with a general
contractor about the slew of interconnected projects. I had looked
around on the web for companies that would remove the broken spa. I
found the going rate to be about $300, maybe more. My general
contractor made the suggestion of listing it on Craigslist to see if
someone would take it away from me for free. Like so many things on
Craigslist, I would never had thought anyone would be out there looking
for something like this.
I took his advice though, and wouldn't you know: I got a bunch of
replies. Some seemed to not appreciate that it was broken despite how
clear I tried to be, and some seemed to not have any idea what kind of
project and equipment would be needed to move this beast. However, I
got one reply from a guy named Jim, who very clearly stated he had a
truck, a trailer, moving equipment and a few friends he could round up
to help. He was not the first to reply (I usually like to adhere to
order when I list things), but he seemed the most serious and had the
most plausible plan for taking it.
Existing deck, post spa removal
Existing deck, post spa removal
I gave Jim a call, made sure he fully appreciated that it was not
operable, but nothing deterred him. A couple days later he shows up
with a couple friends and the necessary equipment. I had already
measured my back gate to ensure it would fit (standing on end) and
diconnected the electric. Problem number one was getting it off the
deck. The only place to move it was across a steep grade of grass,
which would not do. However, if we removed the privacy fence, we could
dump it over the side of the deck and onto the dolly on some concrete
paving stones. They were more than willing to do the demolition work
if I would give the consent to trash the deck wall. I thought for a
couple minutes and gave the go ahead. I brought out my crow bars and
sawz-all and the wall did not last too long after that.
The spa was much, much heavier than I would have thought. The 4 of us
could just about coax it into going in the direction we wanted (but not
always) and all 4 of us could barely even lift one end of it. I am not
sure where the weight comes from. It took a lot of ingenuiuty and
brute force from Jim and his friends, but they had clearly done things
like this many times before. After a few hours of working, they finally
got it secured on the trailer and drove off. At each obstacle, I kept
expecting Jim to back out, but nothing made him even remotely hestitate
about taking it. I sure hope he can get it going and enjoys it.
Decisions and Modeling
The unplanned demolition work served as a forcing function and resulted
in a new spark of effort into getting more detailed and specific about
the deck design. With this inspiration, I spent some time nailing down
the details and making the decisions on exactly how it will get
executed. It was during this period where I decided on the exact
separation on what I would contract out and what I would do myself.
Instead of built-in furniture, I would make the deck furniture (see the
Deck Furniture
Project). I will also be adding the lighting and finer details
(non-slip deck treads, etc.)
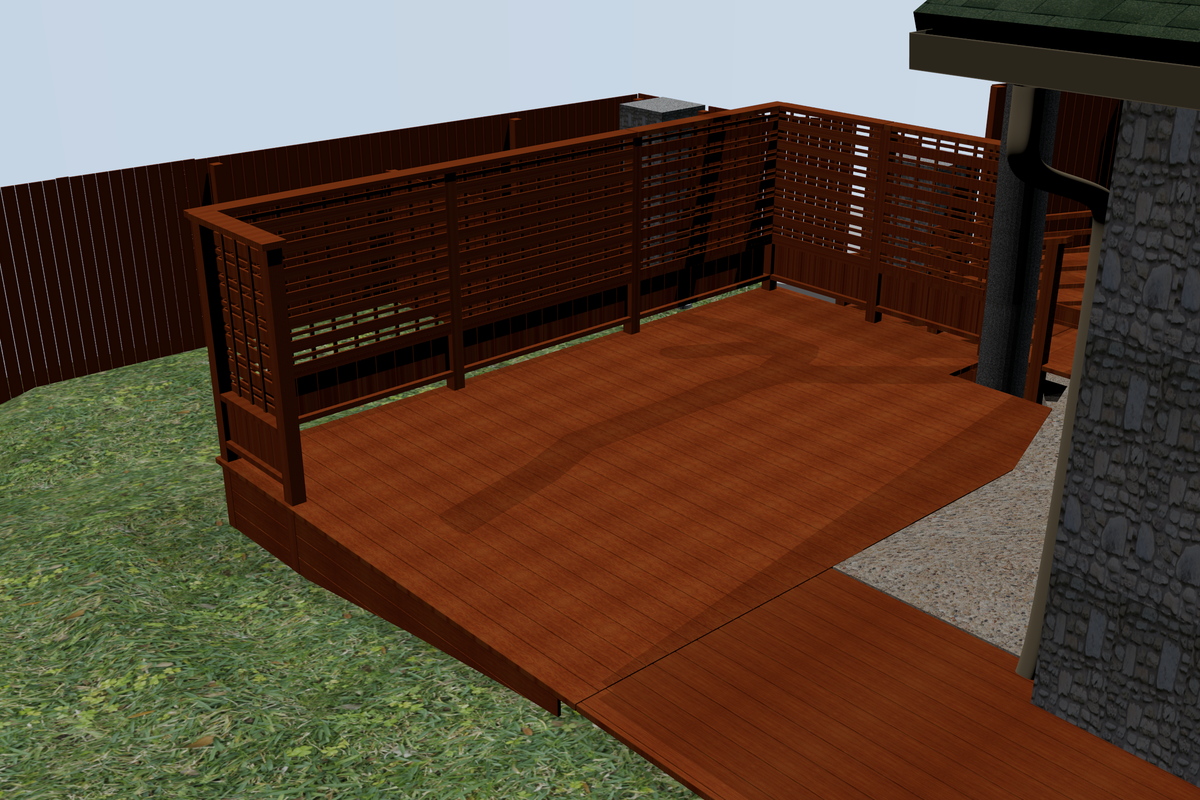
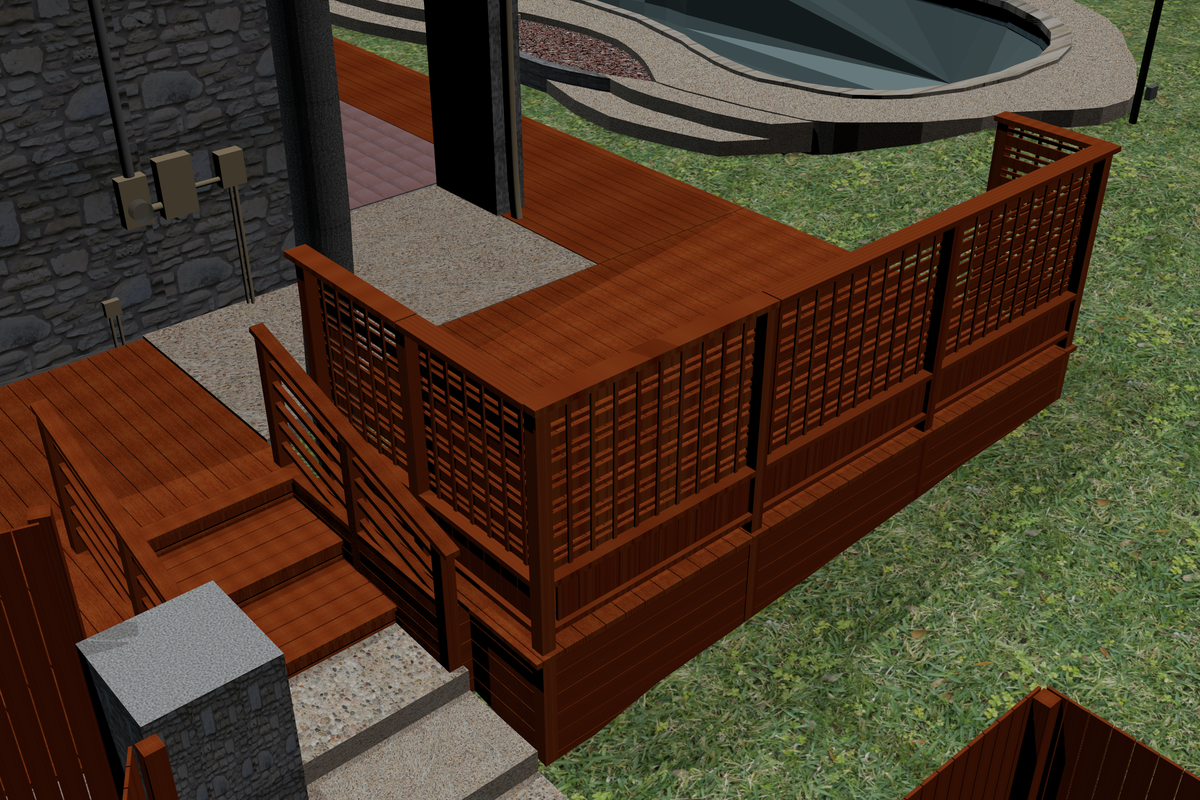
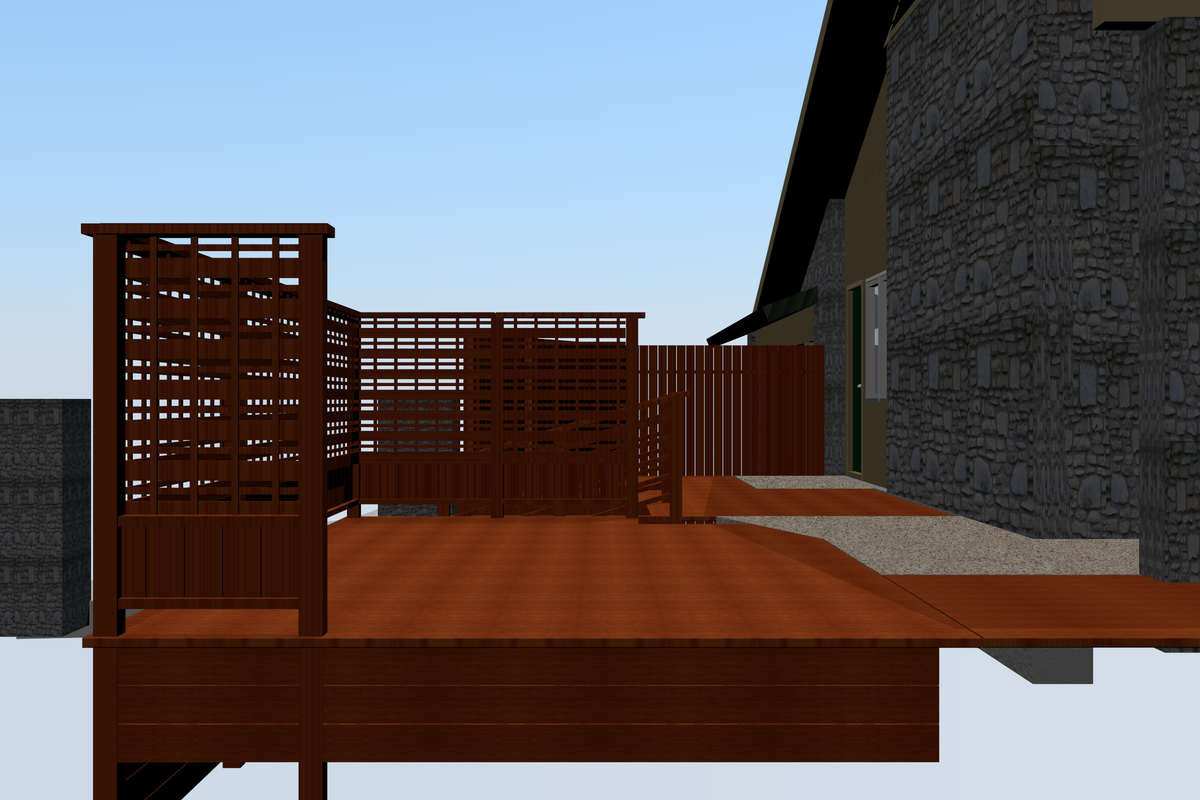
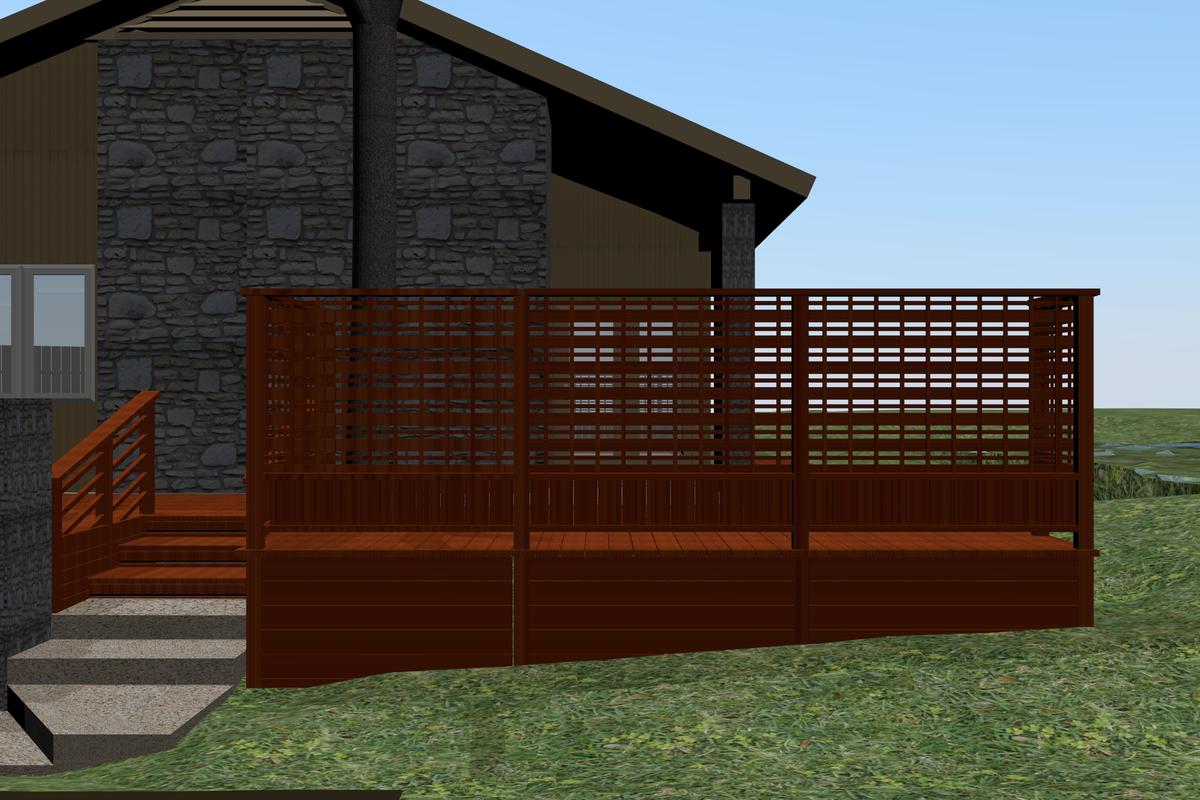
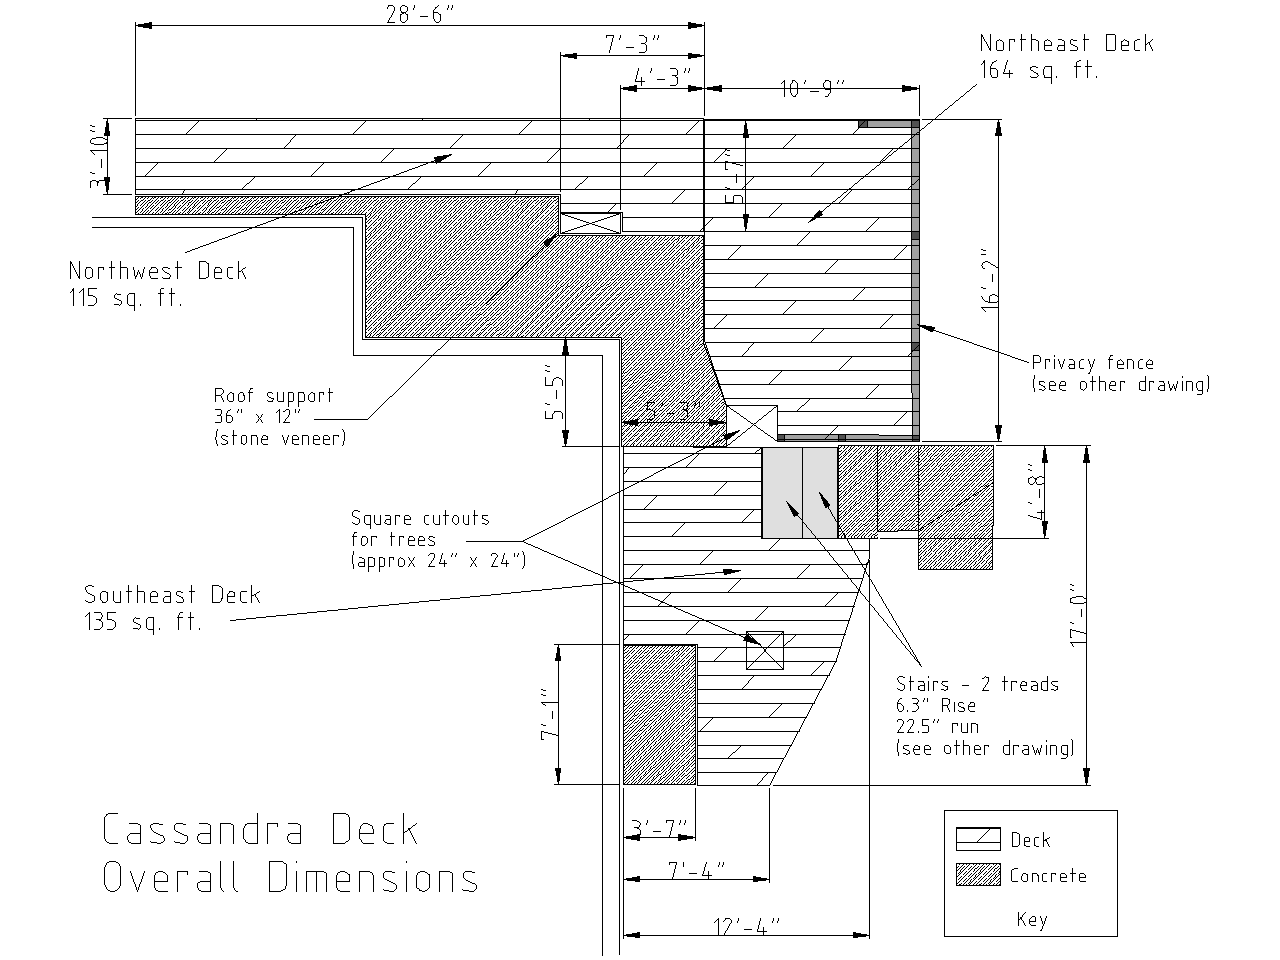
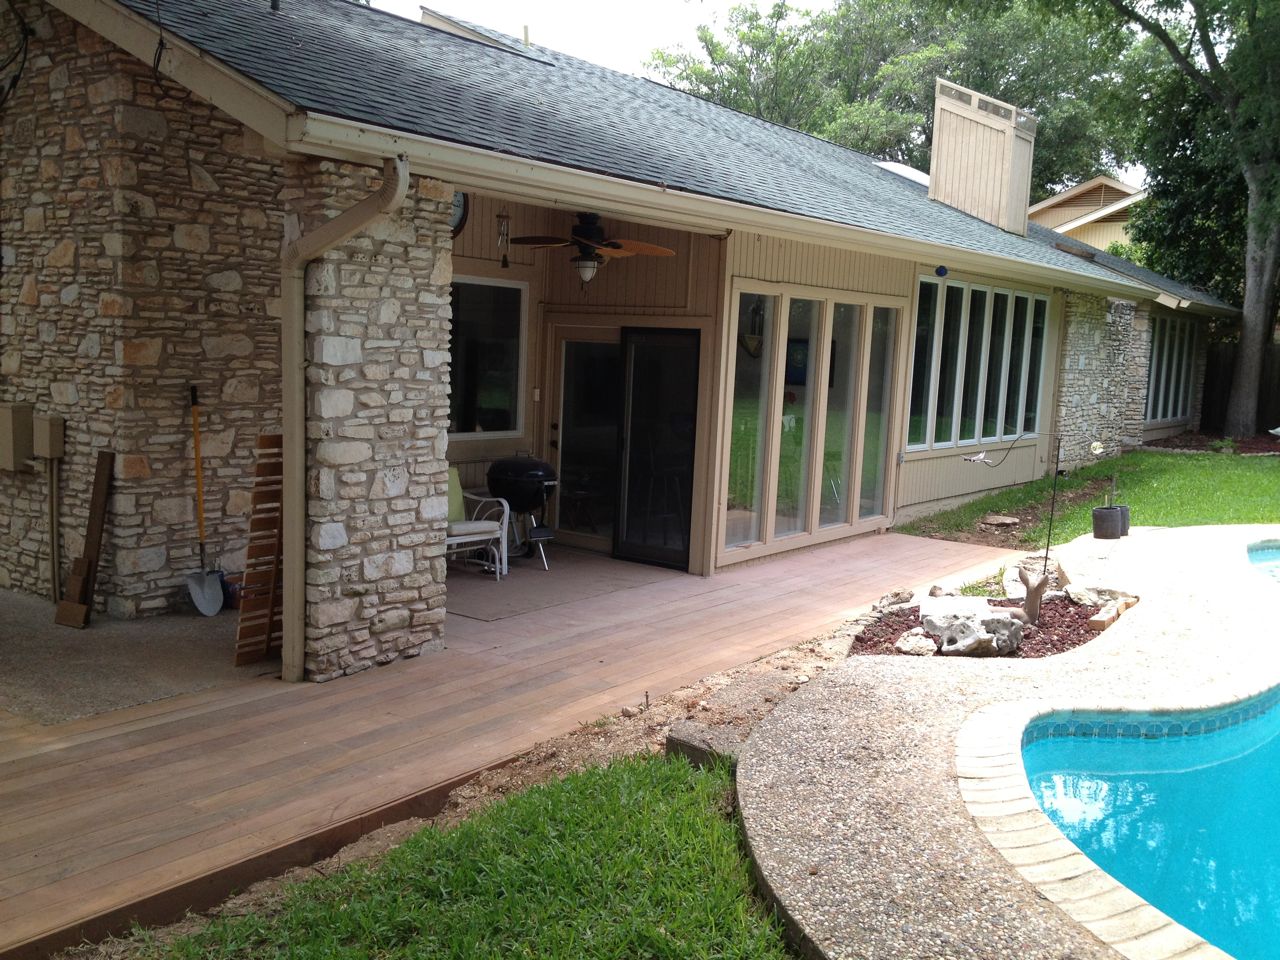
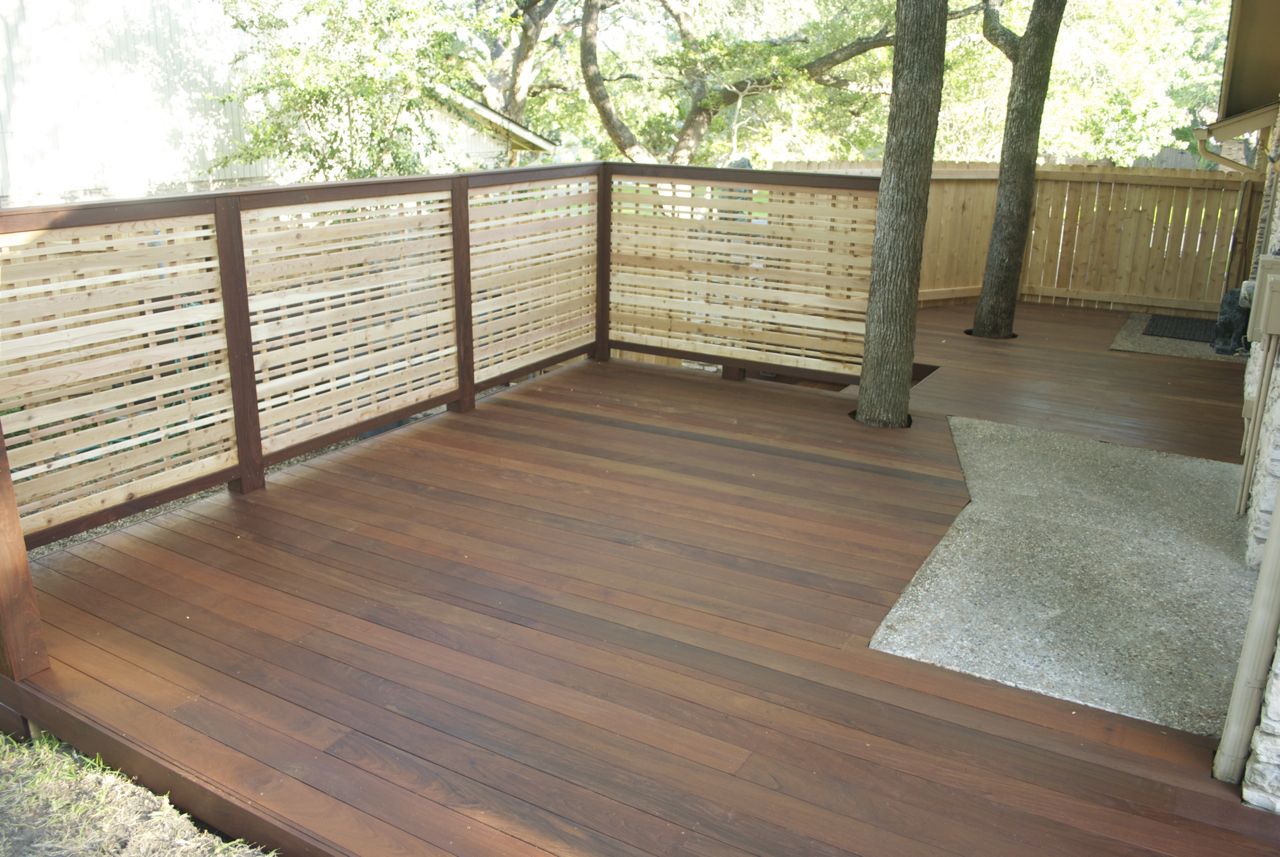
The deck design consists of three main areas that are more or less
separate decks, though they are adjacent to each other. I refer to
each based on their general compass orientation in relatioon to one
another.
Northeast deck from the northwest
Northeast deck from the southeast
Northeast deck from the north
Northeast deck from the east
Northwest deck from northeast
Northwest deck from the west
Preparing for Contractors
After notifying the general contractor that I now had made decisions
and have a design, he brought his carpenter out to survey and discuss
the deck and fences. I wanted to be clear that I had a specific vision
in mind, rather than getting some generic deck solution, so based on
that we left off that I would produce some detailed blueprints for my
design. Not wanting to be the bottleneck in moving this along, I then
spent the next day solid working on translating then 3D model into some
2D, easier to read blueprints and sent them along. I also provided the
3D renderings (above) to help visualize things as well as the following
blueprints.
After delivering the blueprints to the general contractor and going
over the details, the general contractor brought up the suggestion of
my doing the privacy fence (what I later refer to as the "deck
screen"). His reason was that he would have to get a very expensive
"trim" guy to do this work. This suggestion was actually perfect for
me. I had only put that as work for the contractors to do because I
thought it might be too complicated to coordinate partial work on this.
Thus, I agreed to this right away and began planning the work. You can
read more about this work on the
Deck Screen Project Page
Drainage Improvements
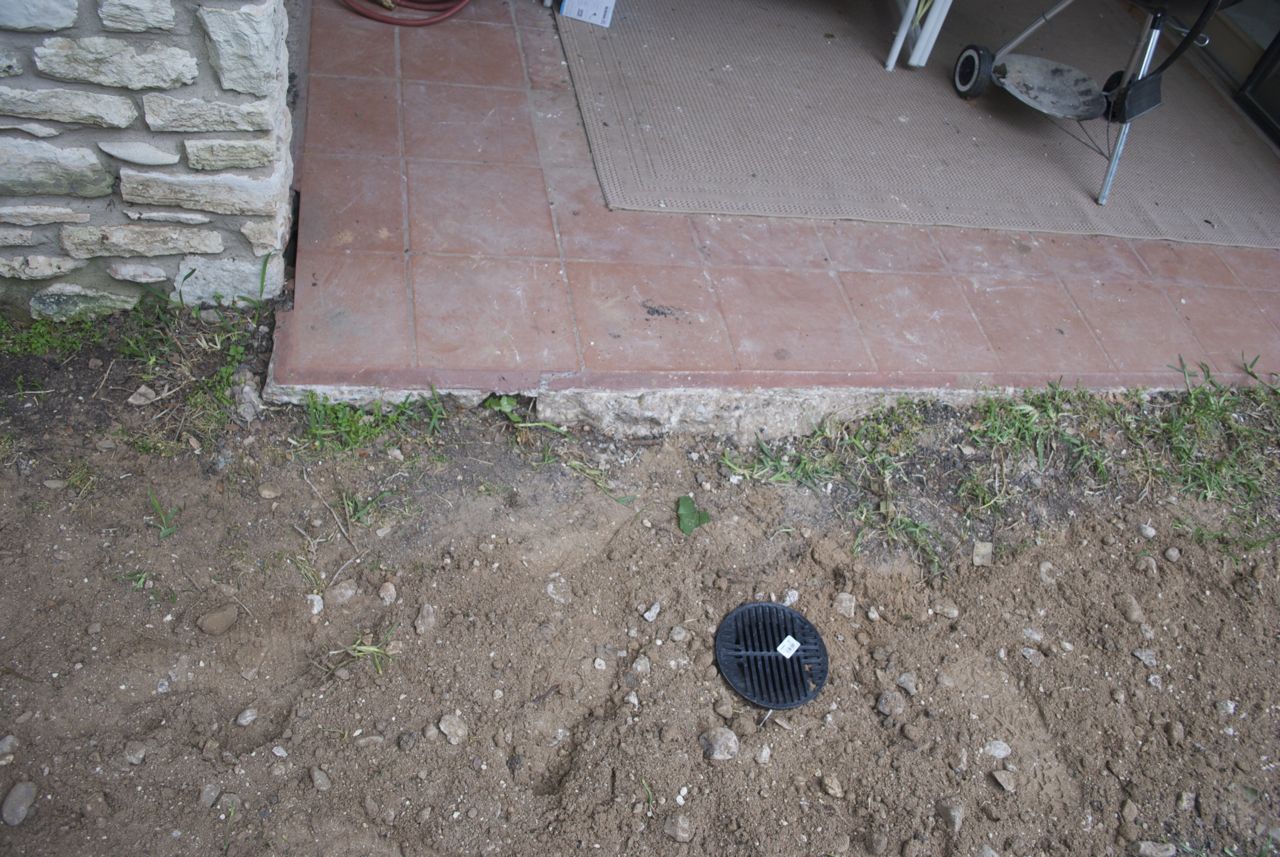
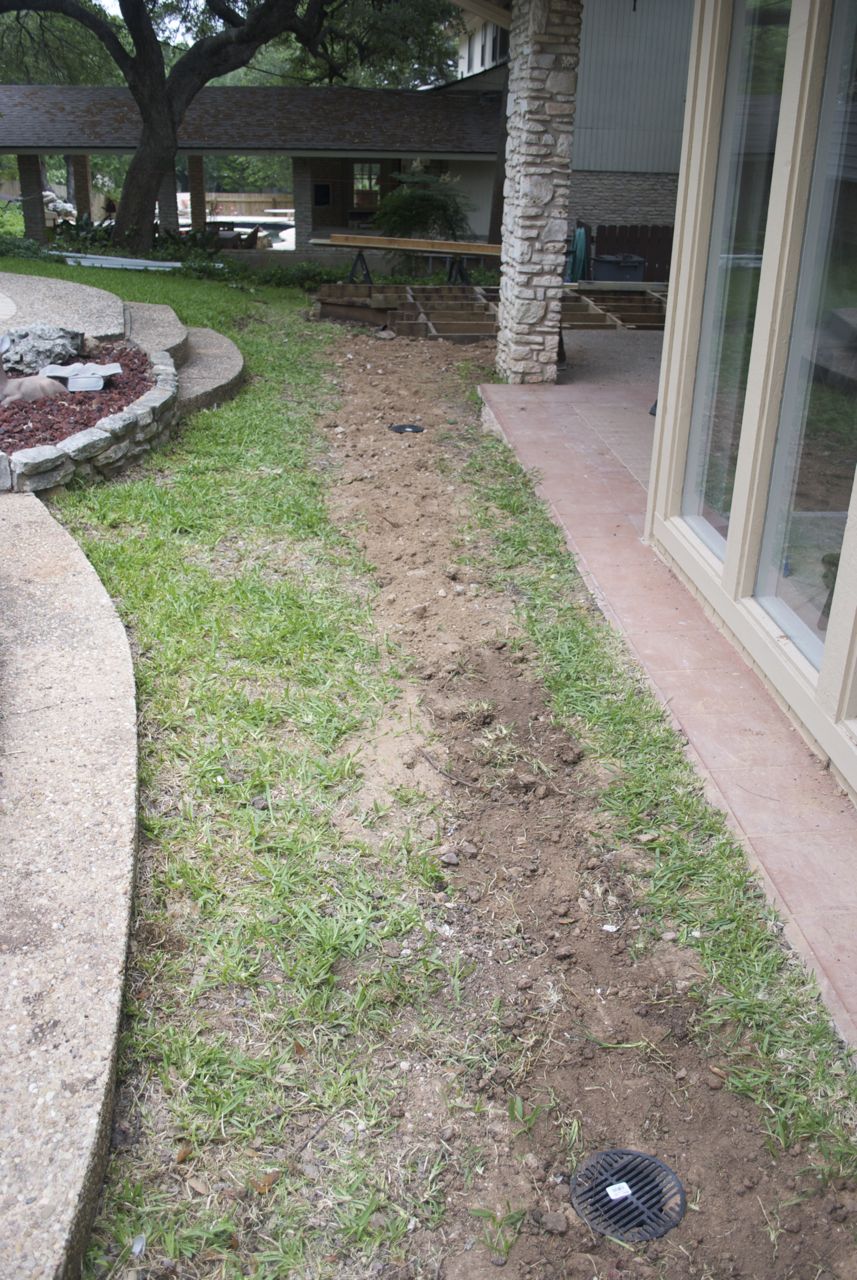
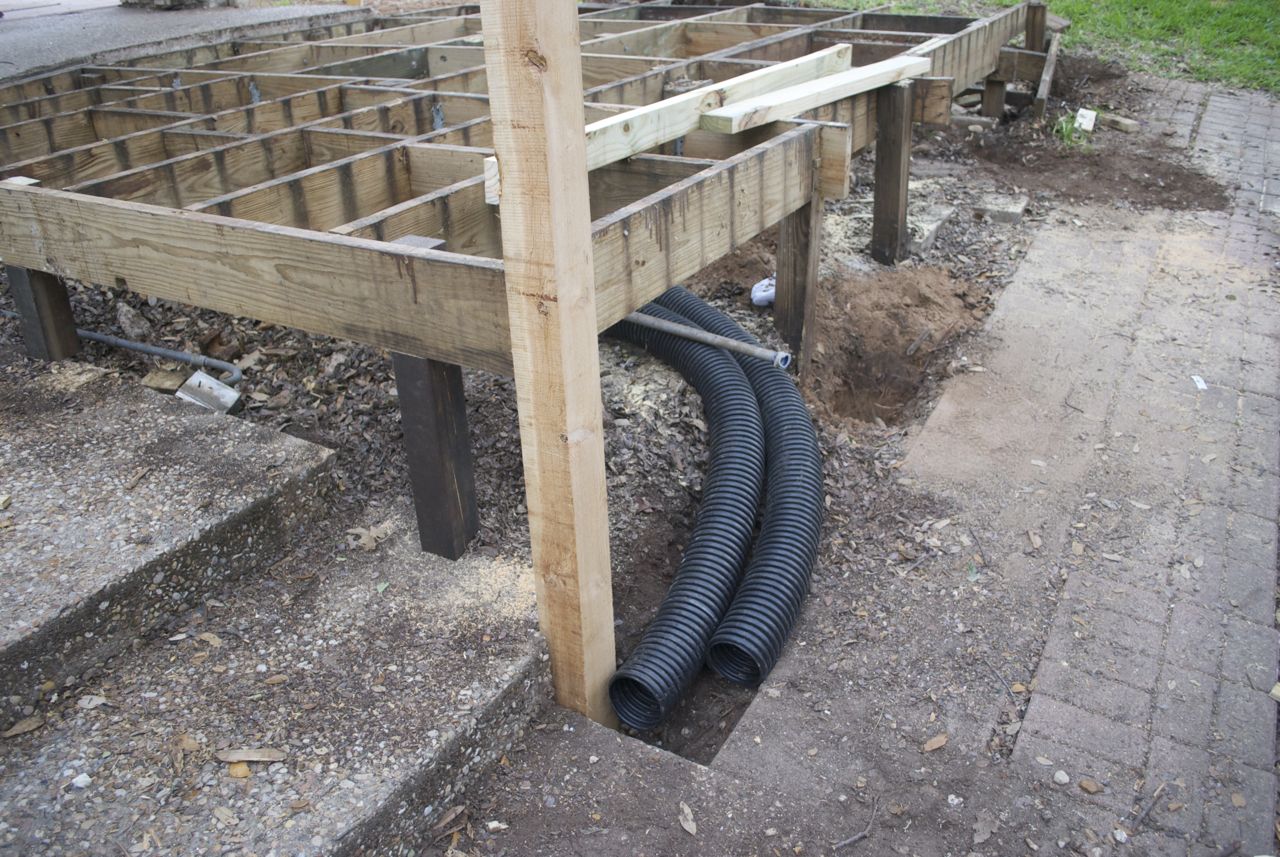
Initial level of new drain inlet
Initial burial of new drainage pipes
The first day of contractor work was just about fixing the drainage
problems since the carpenters were not available until the next day.
The drainage solution consisted of burying a couple 4 inch pipe and
having the gutter downspouts and two ground surface intakes feeding
into them. Unfortunately, the burying of the pipes first done would
have to be undone and dug deeper, but that was not realized until a
week later when the carpenters began to think about the details for the
new section fo deck that was to be above where the drain pipes were.
Another part of the drainage improvements was to add a new downspout to
a very long gutter run I have along the back. This would tie into one
of the pipes, whilem the other, existing downspout would feed directly
inot the other pipe. This extra downspout wound up being among the
last things add, which was a few week after the project began.
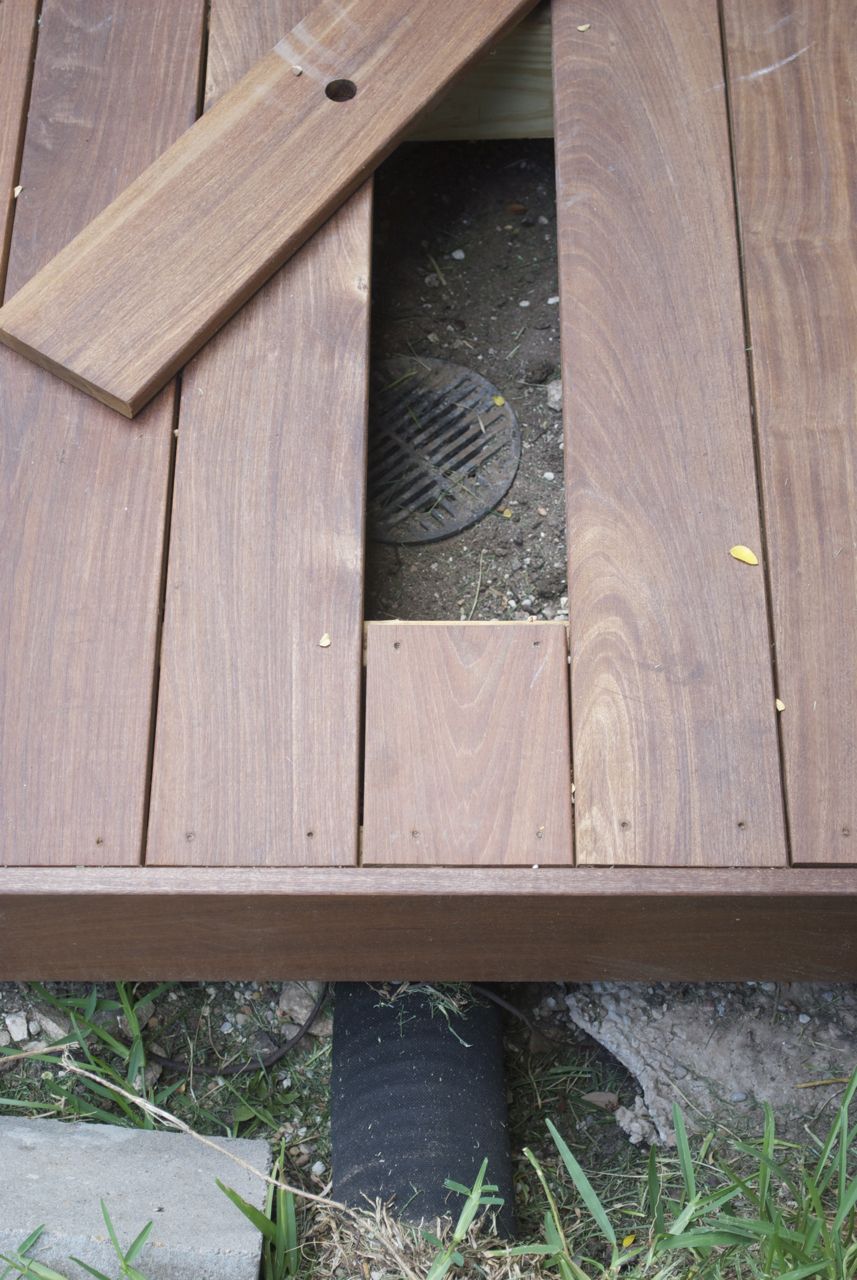
Final drain and access panel
Drain intake access panel
With the drain pipes later needing to be buried even deeper so there
was room for the deck and its support structure, there was a need to be
able to access the drain intakes since they need to be cleaned
periodically to prevent debris build-up. This was all very much and
on-the-fly solution, but the carpenters came up with a simple solution.
They just made a small board with a finger hole in it. Since there are
two intakes, there are two of these boards on the deck.
These two new, underground drain pipes would run under the deck and out
toward the front of my property, since that is where the water current
flows. I wanted to be extra sure that I did not change the main flow
direction of the water as this could just result in new problems for my
downstream neighbor. I suspect that part of the drainage problem I
have is due to changes people have done to their property further
upstream.
River as it exits the deck, under fence.
River as it enters under the deck.
About 2 months after the main deck work was completed we had a rain
storm that dumped about 4 inches in a single hour. This was the type
of event that was a true test if things had improved, and everything
seemed to work as planned. This also afforded me to get some pictures
of the fast moving river that forms in my backyard when a heavy rain
occurs. Note that the fence where the water exits the deck was
deliberately a co-uple inches off the ground to allow the water to flow
out to the front and off to the storm sewer nearby.
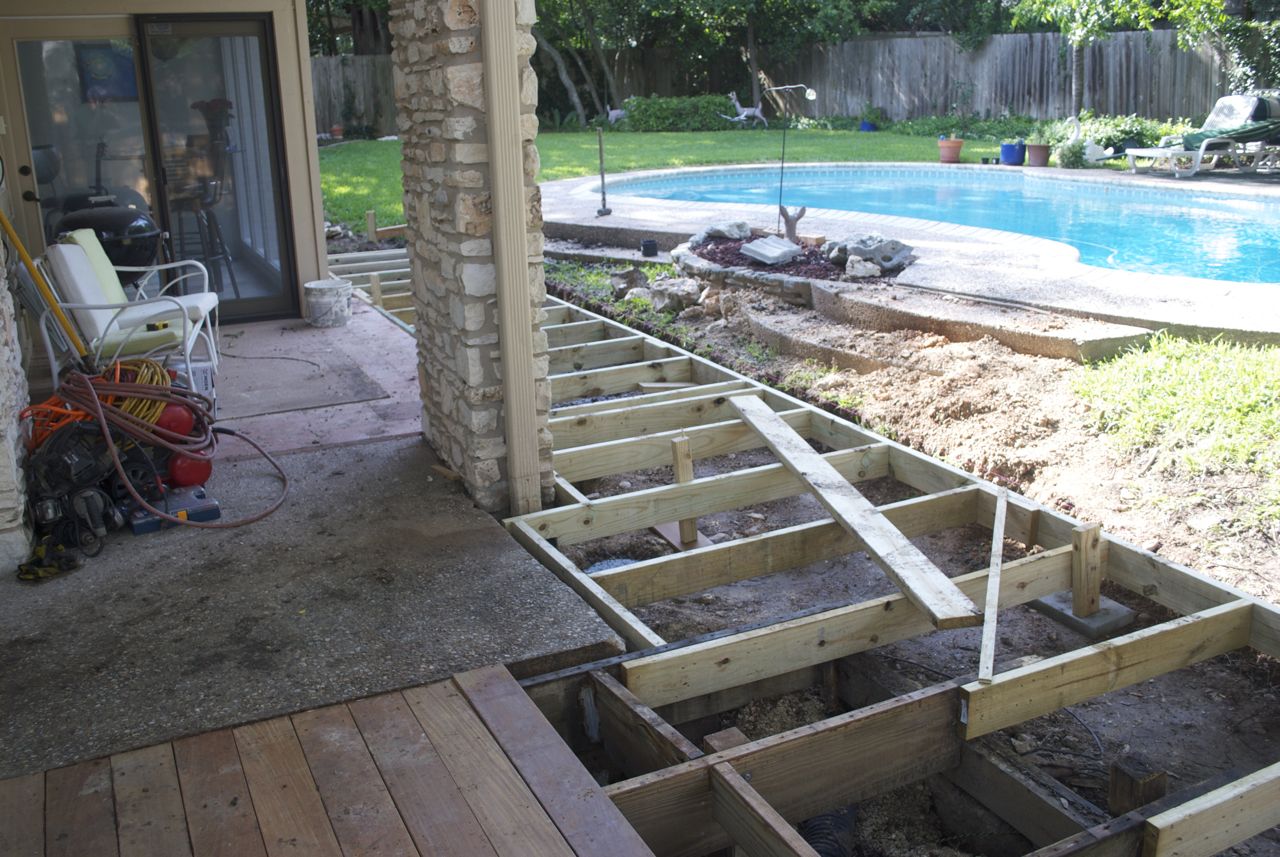
The Planned Demolition
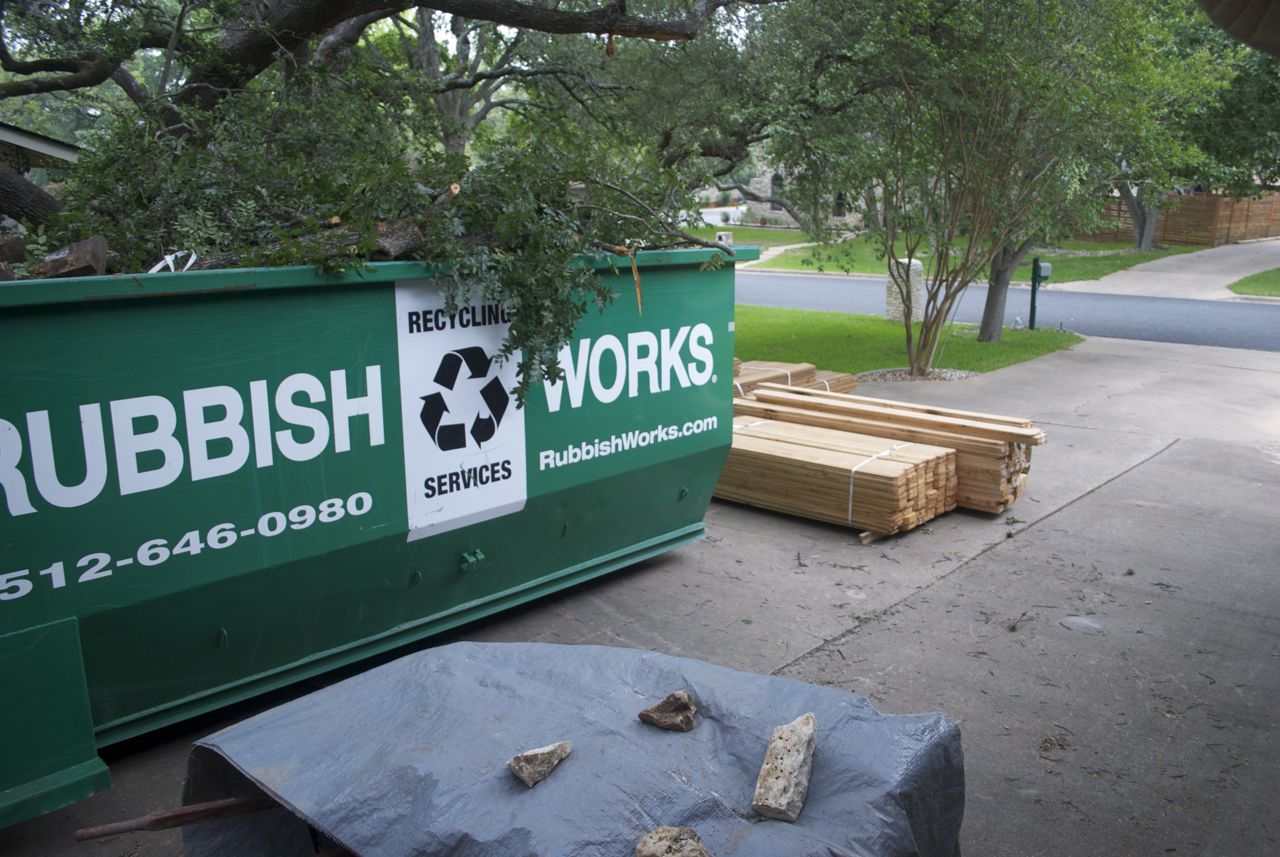
Debris in dumpster and lumber
On Day 2 of the contractor work, the carpenters showed up and began
demolition of the fences and the existing deck boards. In all, the
following things needed to be dismantled:
- side fence;
- front-facing fence;
- southeast deck boards;
- northeast deck boards; and
- back, north deck.
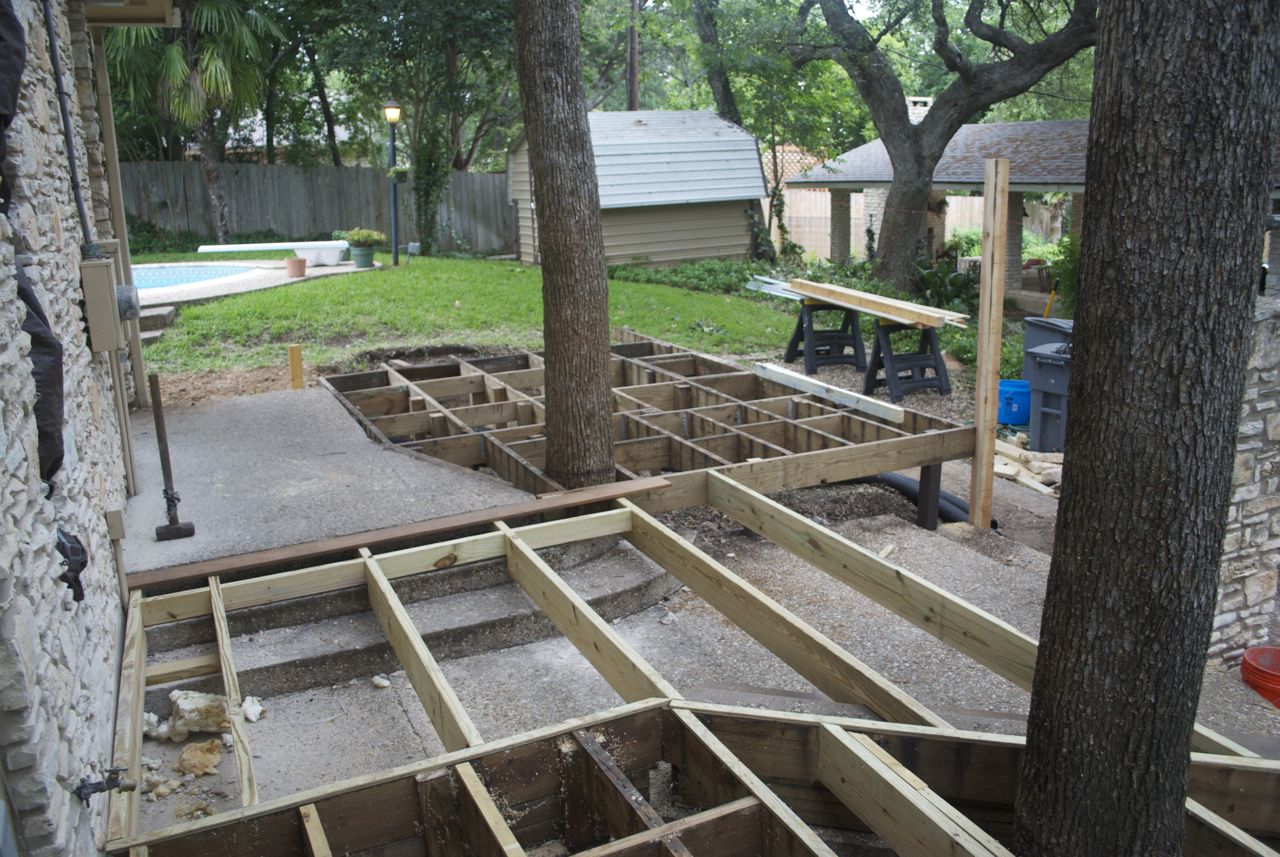
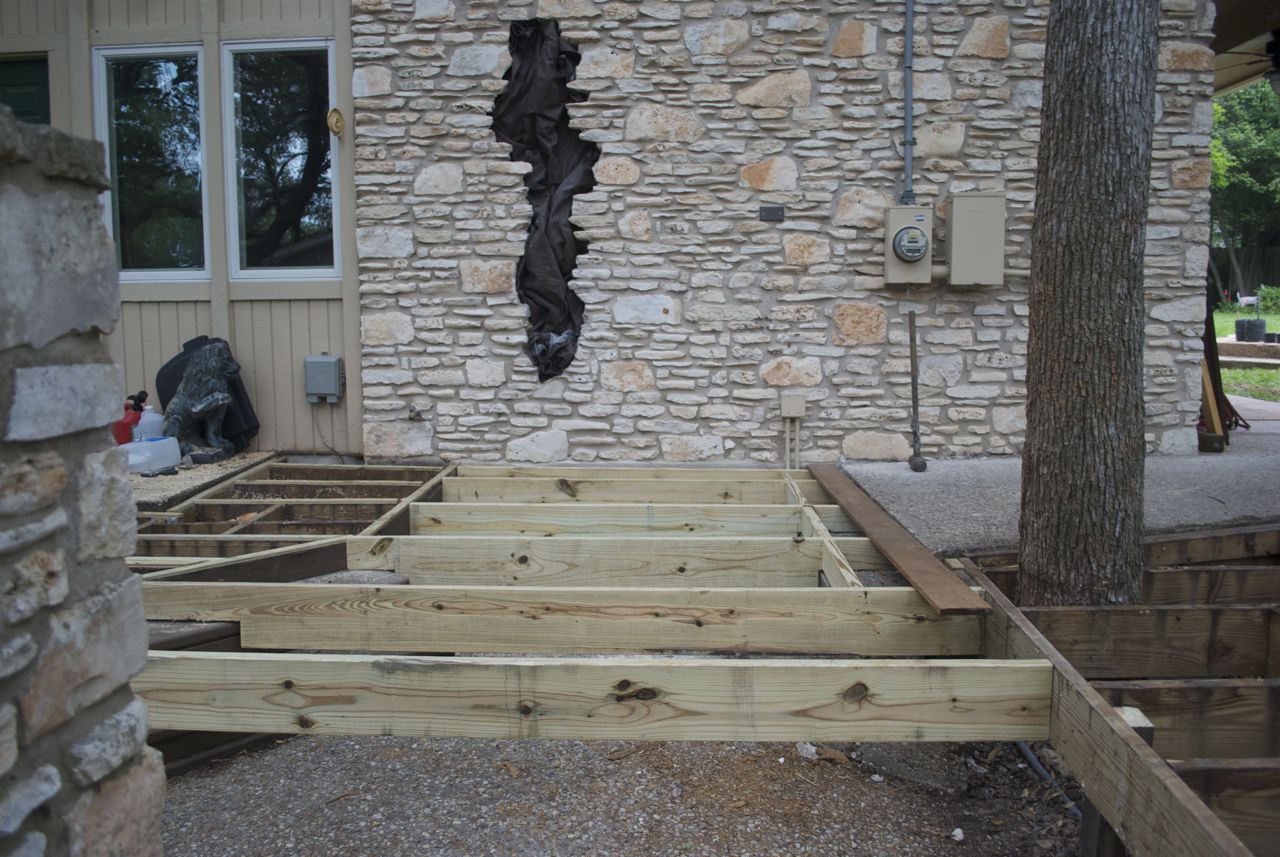
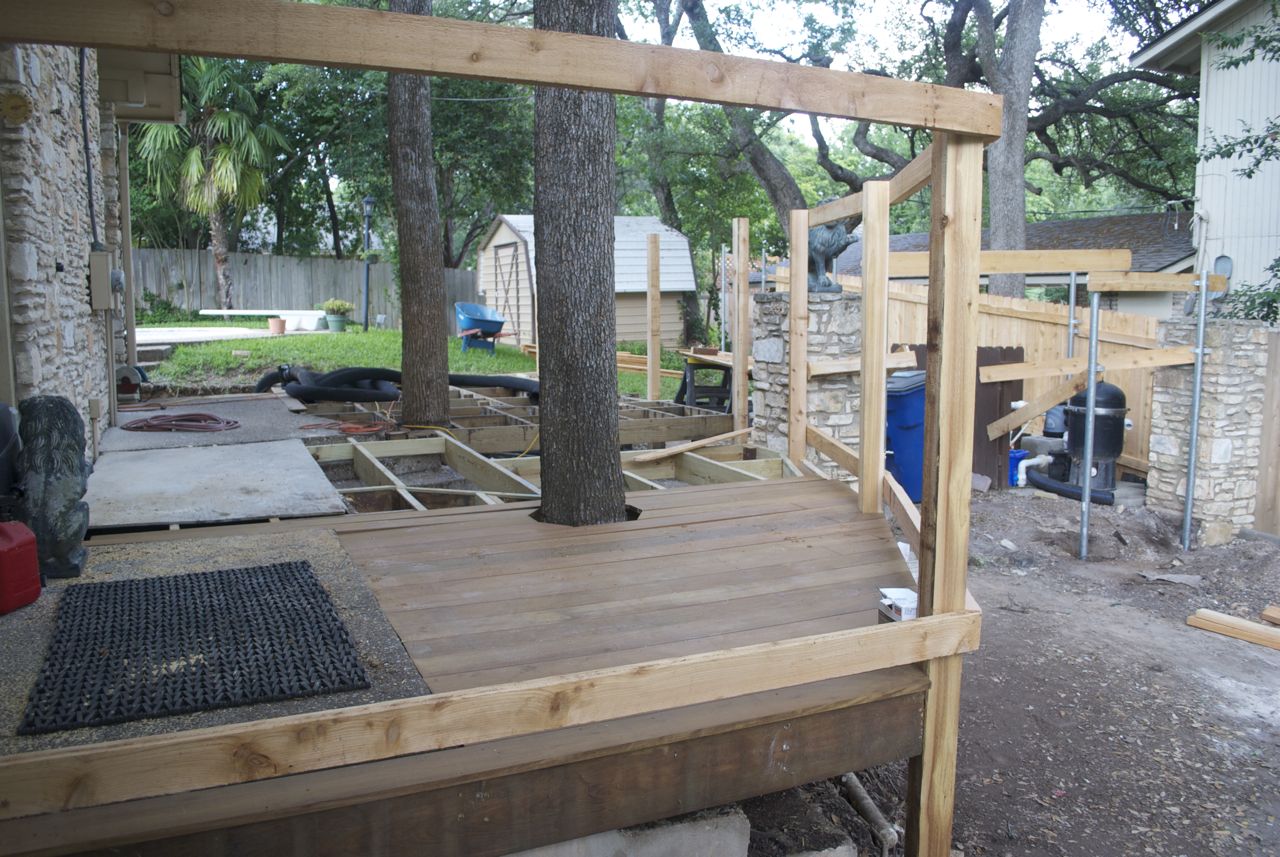
At this point, it was not clear how much of the existing deck structure
was salvagable, so the deckboards were removed first so the carpenters
could acess the situation. Either way, there were at least two new
sections of deck structure needed where no decks were before:
- span between northeast and southeast deck; and
- new deck along back of house (northwest deck).
It turned out that a good amount of the existing deck structure could
be used, though there needed to be adjustments for a few rotted pieces
and to accomodate trees that were now much larger than when the decks
were first built.
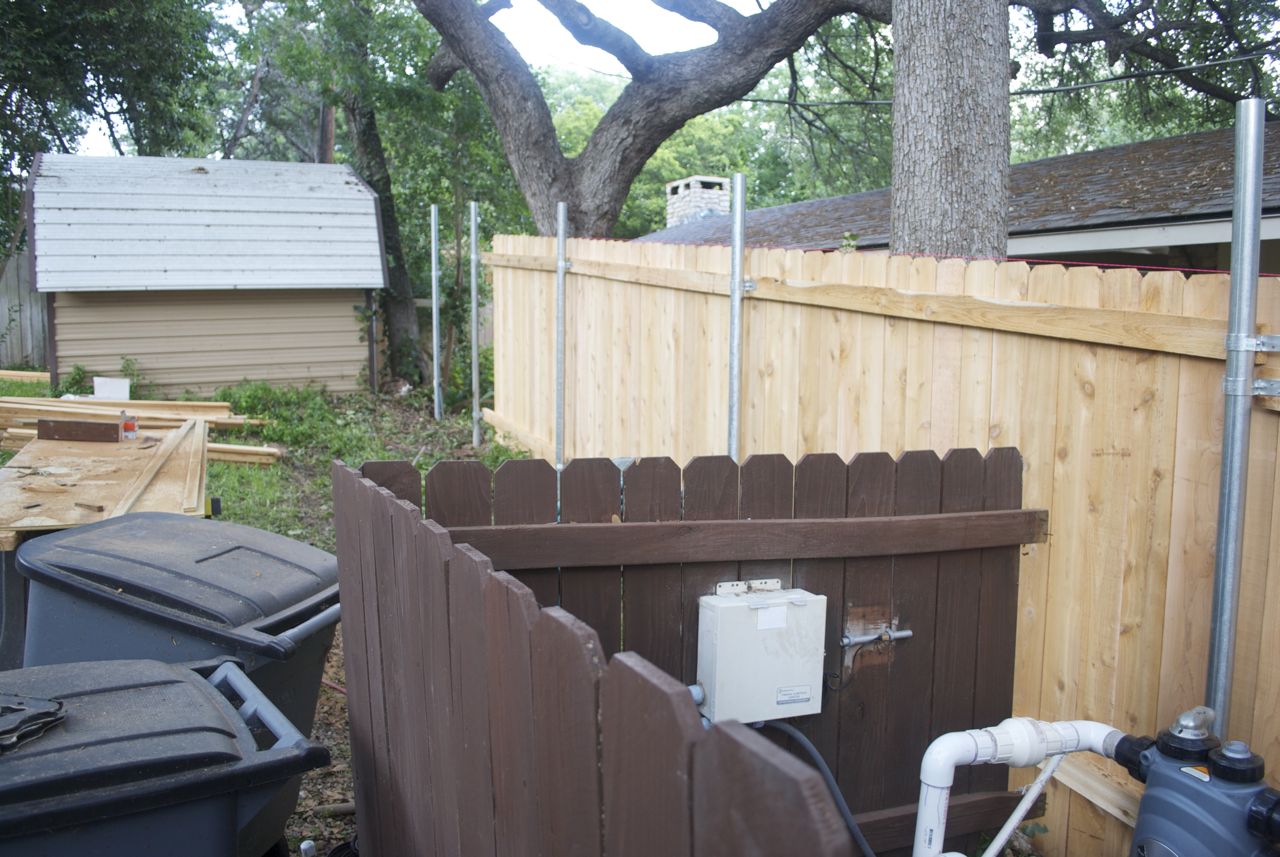
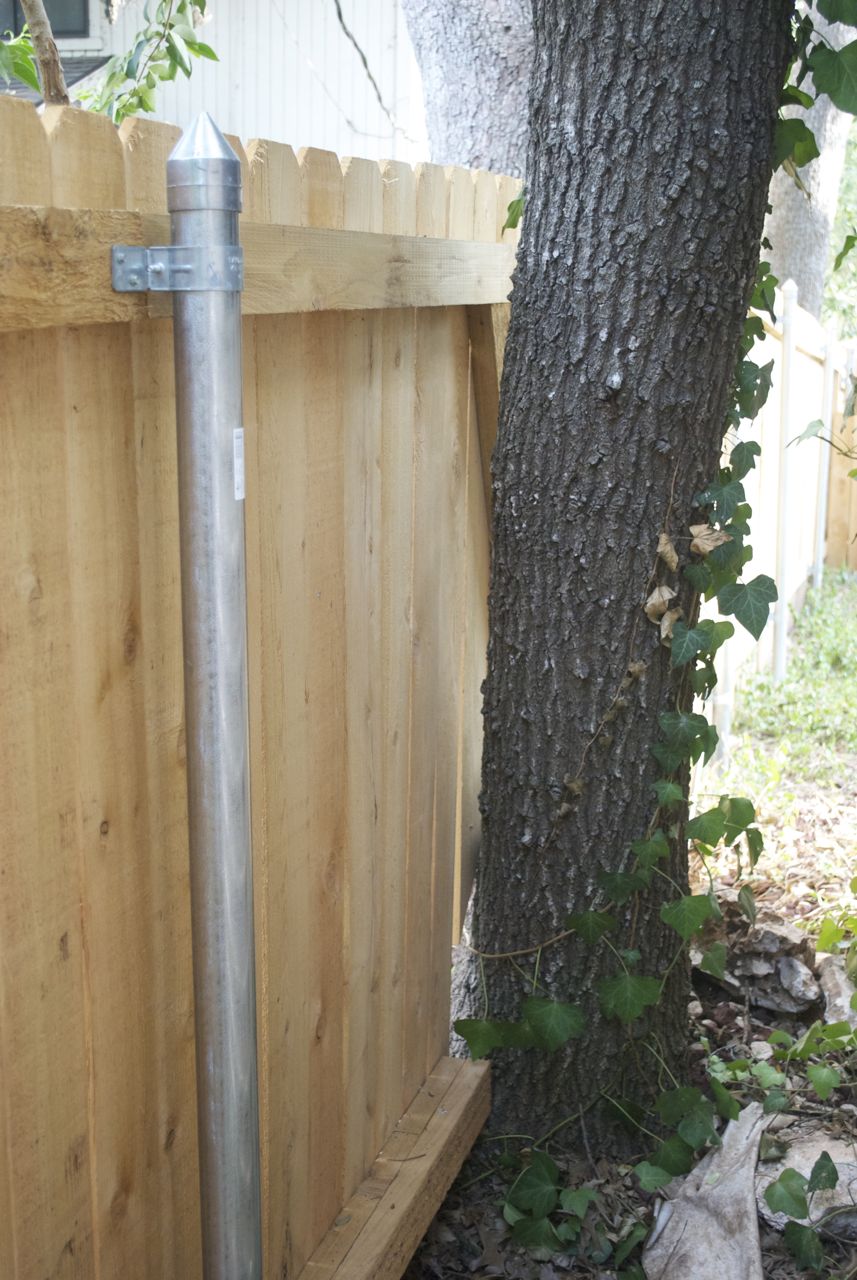
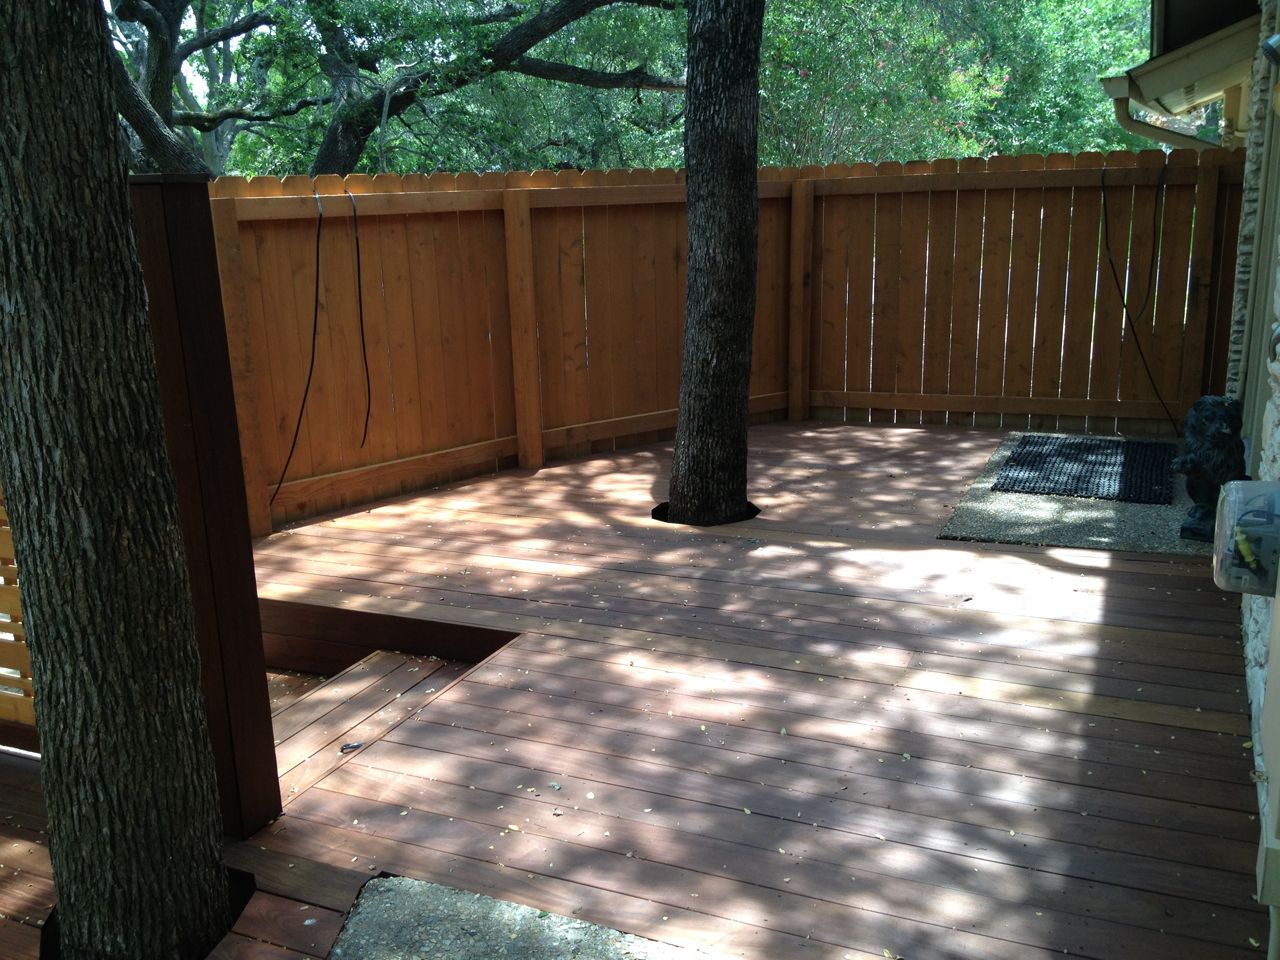
Side Fence
Extra fence section added due to straightened fence
Side fence under construction
The side fence we had pretty much crumbled and was mostly being held up
by some vines. My neighbor and I had discussed replacing this a few
years before, but that went nowhere. I wanted to replace the wooden
posts with metal posts so that it would be easier to replace the fence
the next time it rotted away. The old fence curiously took a right hand
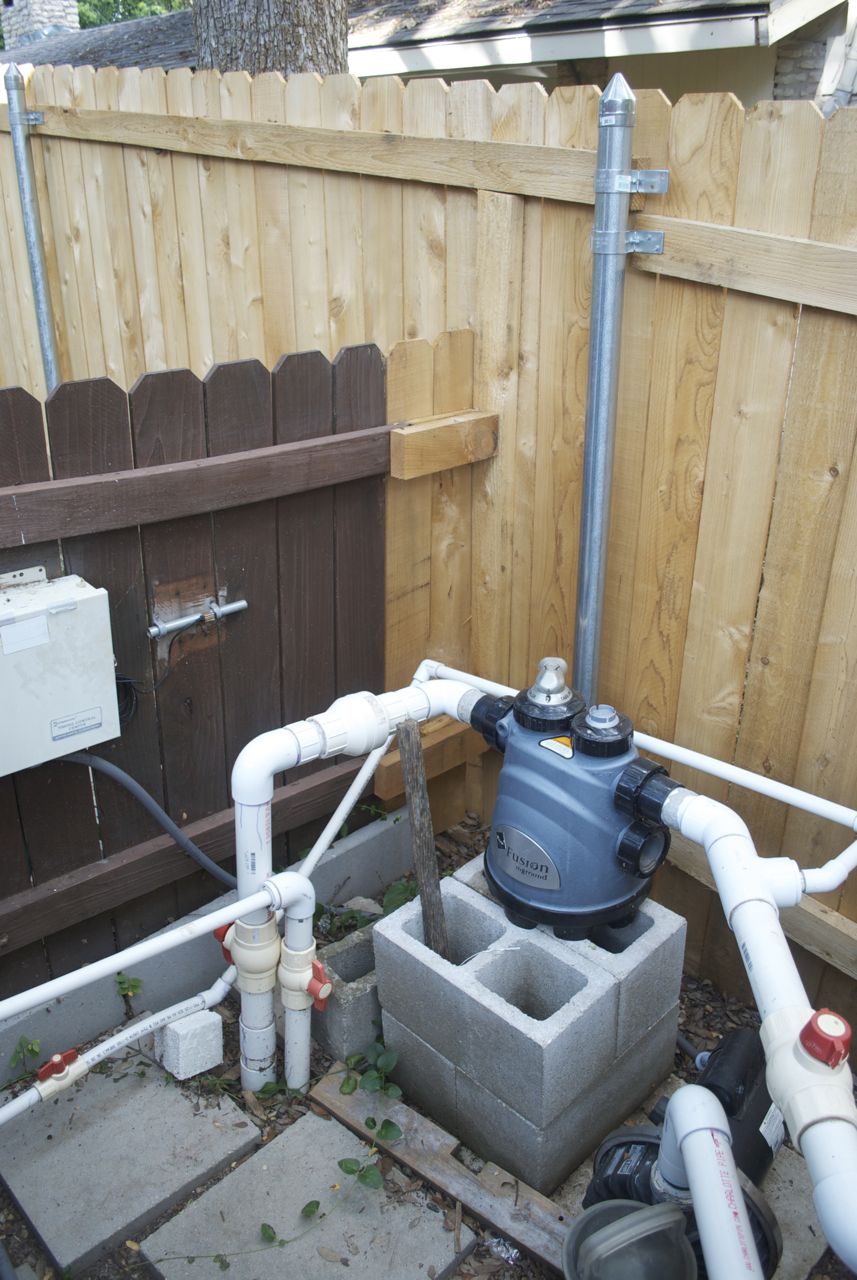
turn near where my
pool equipment was,
toward my property and then resumed its run about 12 inches closer to
my house. The plat map for my property shows this side border to be a
straight line, so it must be that someone (me or my neighbor) has some
property on the wrong side of the fence. I was not thinking about this
when the fence was going up and they seemed to install the new fence in
a single straight line. The end result was that I gained 12 inches
around my pool equipment area. My best guess from measurements and
looking at the plat map is that this property probably always was mine,
so I didn't worry too much about it. My neighbor was pretty easygoing
about it as well, so thankfully no unnecessary dispute arose. The
contractor had to add a couple extra boards to the little fence I have
around the pool equipment.
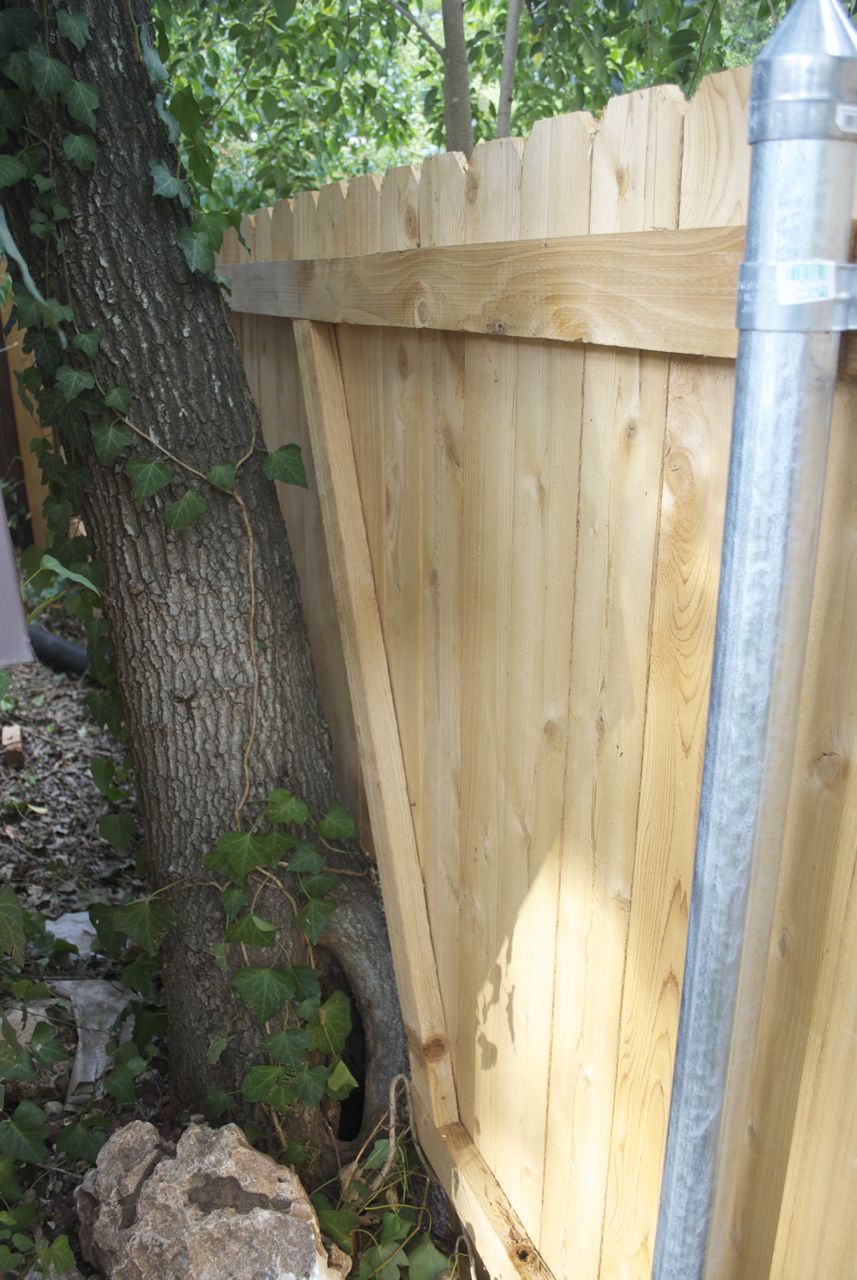
Other view of tree obstacle
Angled brace to compensate for tree obstacle
The fence also intersected a tree toward the back of my property, which
used to be entirely on my side of the fence. Thus, I might have lost
some area near the back, so maybe it al-l evened out. This tree did
cause the contractors some temporary problems until they figured out a
funky way to do the fence structure around it.
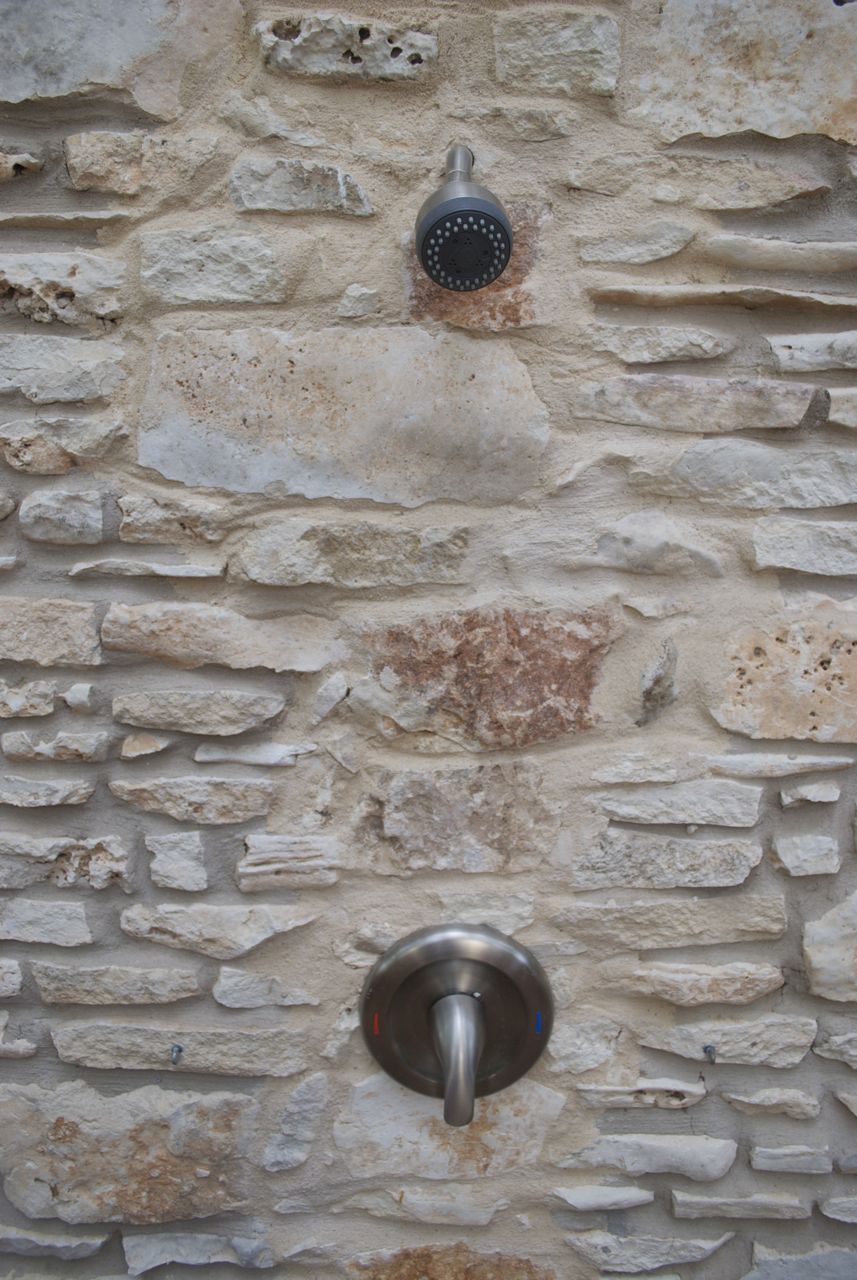
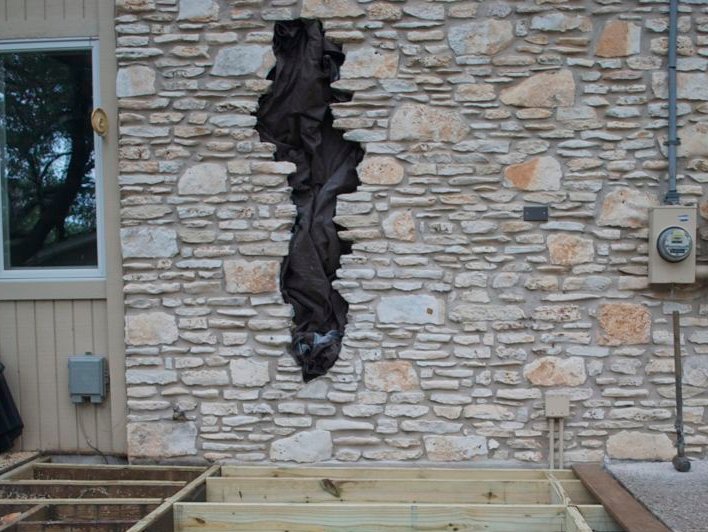
Outdoor Shower Work
Wall opened to access shower plumbing
We had an outdoor shower, which had hot and cold water: very nice. A
couple years ago, it sprung a leak somewhere, so we were afraid to use
it for fear of water getting into the wall. The shower is located
between the northeast and southeast decks, which is the area where I
was going to span with a new deck structure. The existing shower head
was a bnit low and now with raising the level up to the decks, the
current shower height would not due. Opening the wall to raise the
shower would serve the double purpose of figuring out what was causing
the leak. It turned out to be a burst pipe, which must have happened
during one of the winter freezes. Luckily, this burst was after the
valve, so it only leaked when you used it.
The main complexity was that the wall that the shower was on was a
masony wall. This mean an expensive work to rebuild the wall. THe
other side of the wall inside the house is where the oven is, so that
was not easily accessible either. There was not much choice here, and
I really liked having the shower, especially after doing some dirty
yard work.
Tree Removal
The existing decks had three trees that protruded through the deck
surface. Two of them are very nice live oak trees of significant size.
I did not want to remove them, and it would have required a city permit
given their diameters. k However, the third tree was a big undesirable.
It was small and took a hard turn toward horizontal only 5 feet off the
ground. It went over the driveway and provided very little in the way
of shade. Additionally, since this was near where you exit the side of
the house, it was mighty inconvenient as far as being an obstacle and
breaking up what would otherwise be a nice deck space. Thus, it had no
redeeming values and would be removed.
I was somewhat dissapointed that the tree was not cut further down, but
I guess due to the deck frame and the concrete patio next to it,
getting a chainsaw in there was a bit tricky. The general contractor
did drill some holes in it and treat it with chemicals, but since the
deck soon covered it, I do not really know whether this was effective
or not. I was also a little afraid of the chemicals affecting the
nearby tree.
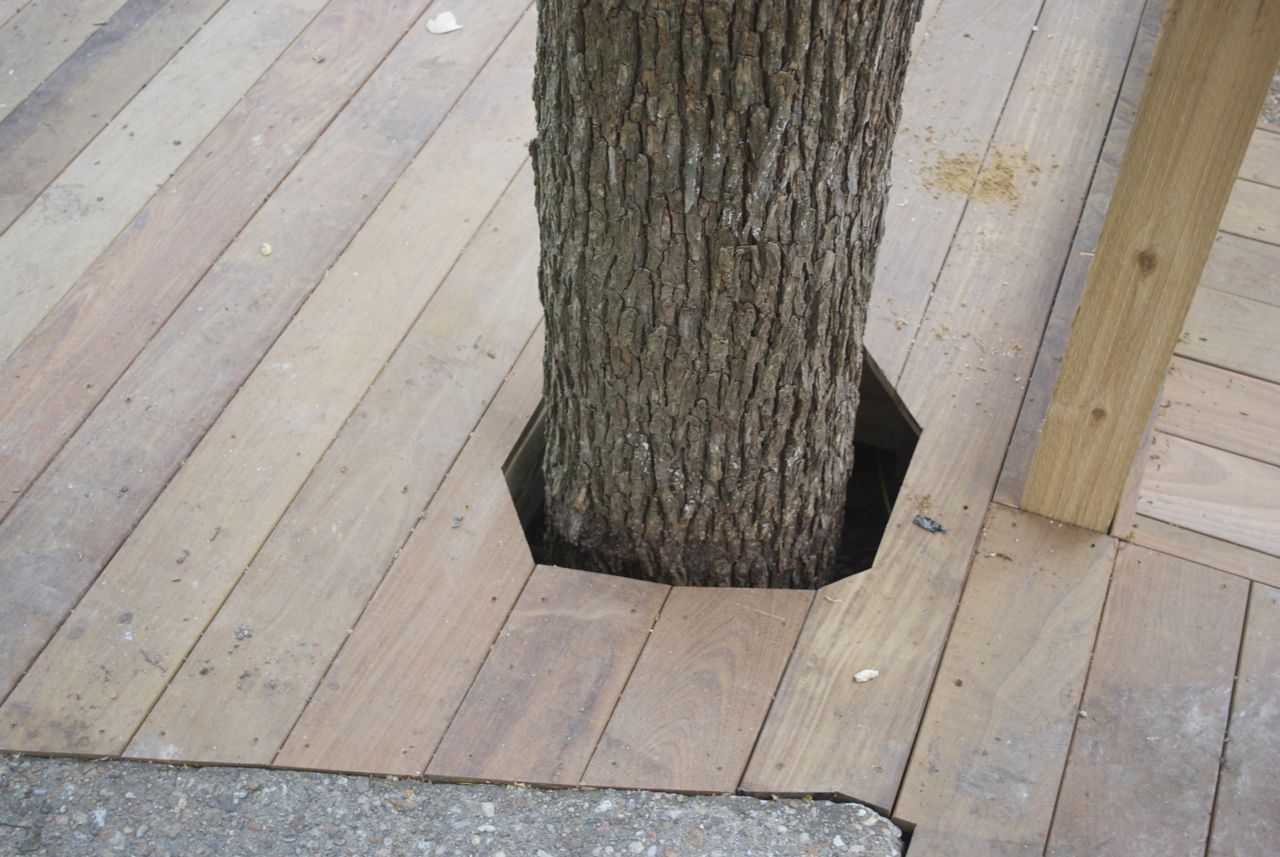
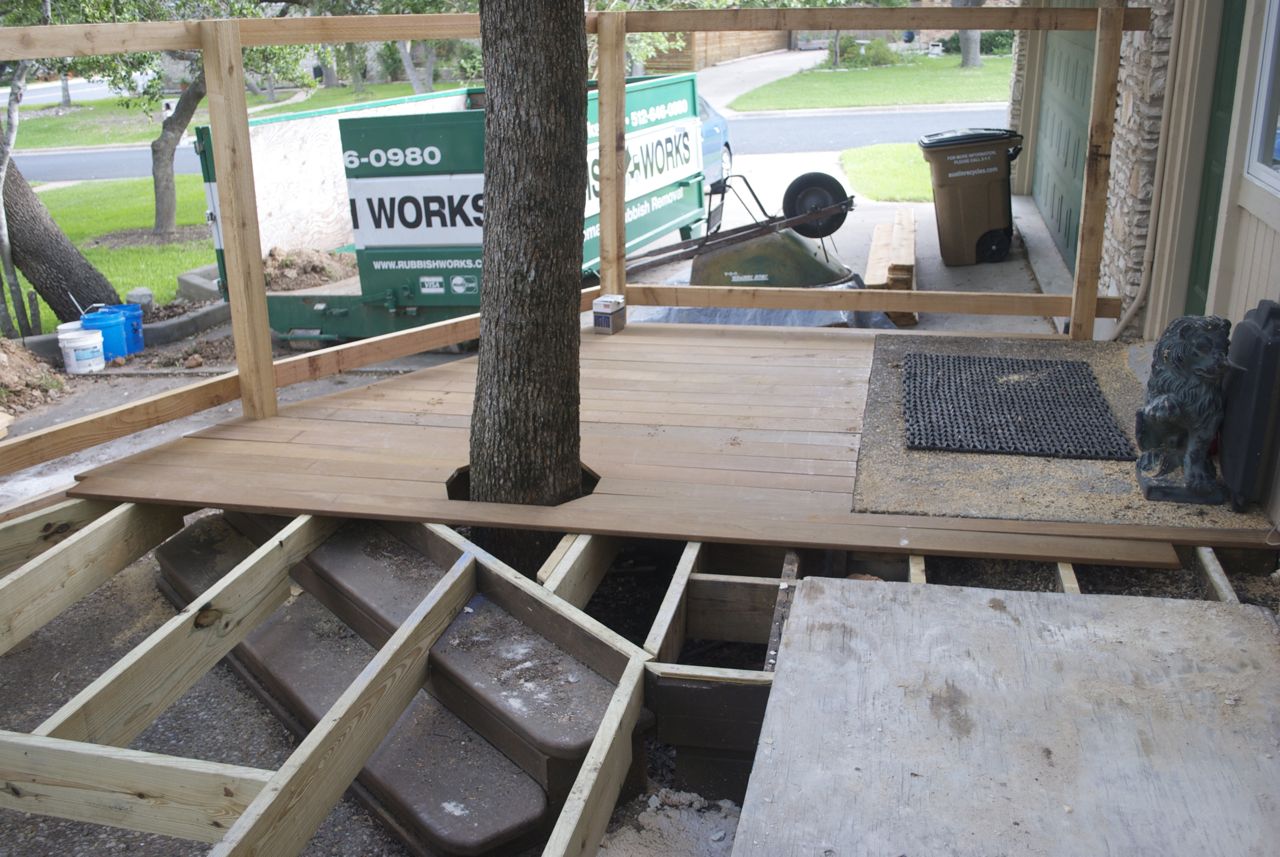
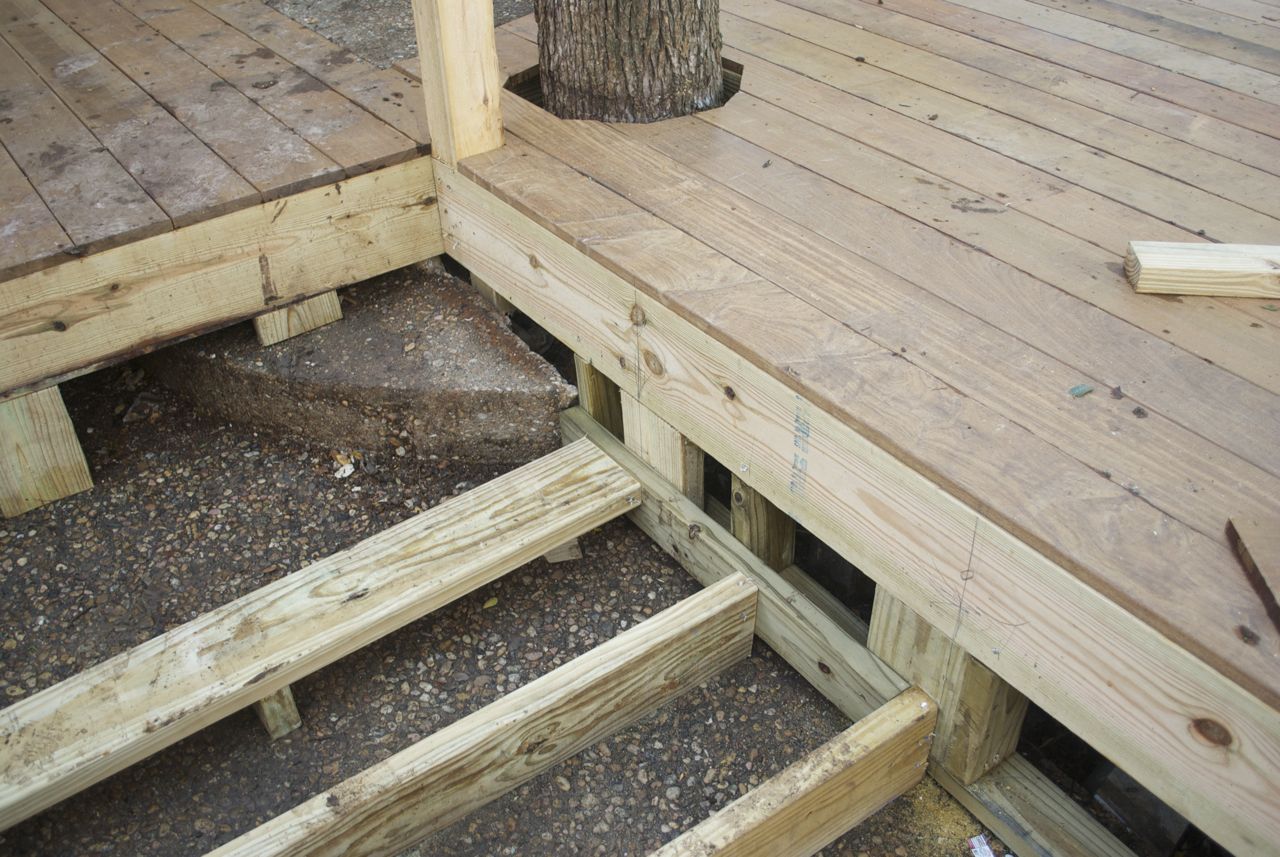
Deck cutout - northeast tree
Deck cutout - southeast tree
Many years ago, I had to do a lot of work cutting the deck boards and
adjusting the deck frame due to the two large trees having grown so
much. The tree was growing deformed due to it hitting the deck. This
was neither good for the tree, nor good for the deck. Since that time,
the tree have not stopped growing, so the frame needed to be adjusted
yet again, and with this new deck, it was the ideal time to give the
trees more room to breath. My original plan had j9ust a large square
cutout for the trees, since I figured that wo-uld simplify the cuts the
carpenters had to make. Turns out that without asking, they did a much
more elegant solution for the trees.
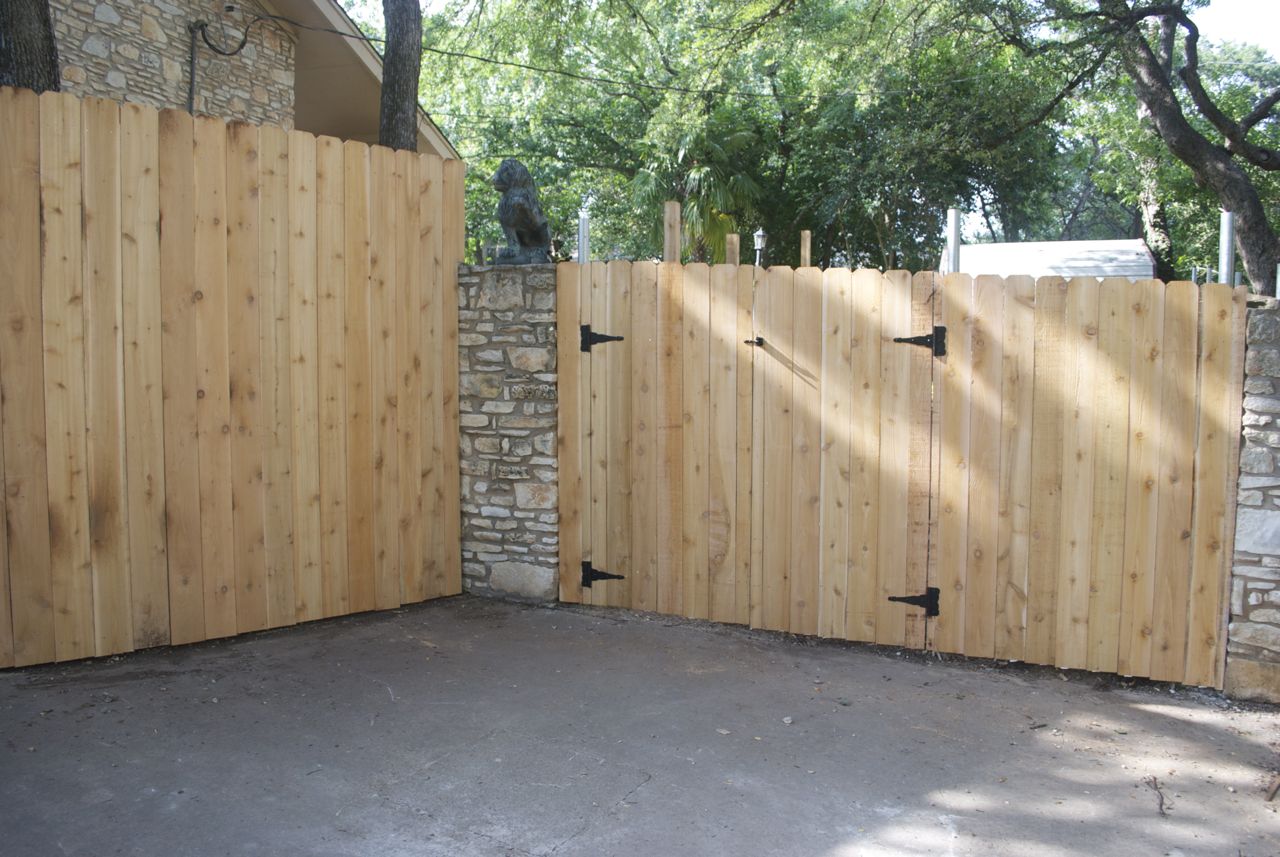
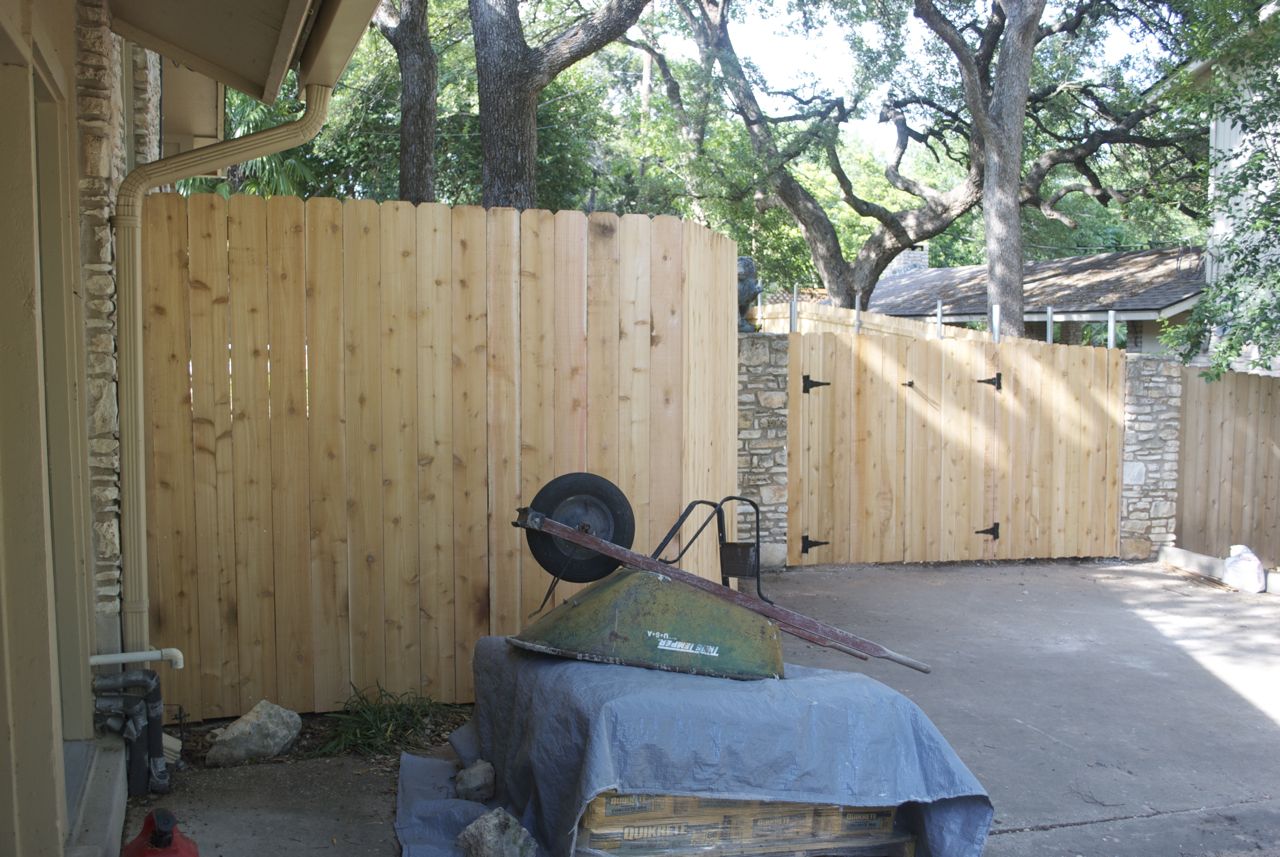
Front-facing Fence
Front fence and double gate
Finished front-facing fence
The existing front facing fence separates the driveway from the
backyard and part of it is adjacent to the decks. The fence itself was
in good shape, but the gate on the fence was problematic due to the
support posts being very loose. Additionally, if or when the utility
company needs to replace the pole in my backyard, the gate is not wide
enough to accomodate their machinery. They technically do not have an
easement other than along the back of the property, but if they did
that, my neighbors would have a lot of grief. It would be much easier
to access this from my backyard. Thus, with all these considerations,
I decided to replace the entire fence and add a double gate that would
allow wider access.
The city codes do not allow a fence higher than 6 feet, but this only
pertains to along the property line. Since I wanted the deck to have a
5 foot fence for privacy reasons, and since the deck is a couple feet
off the ground, from the front, the fence would be over 6 feet high.
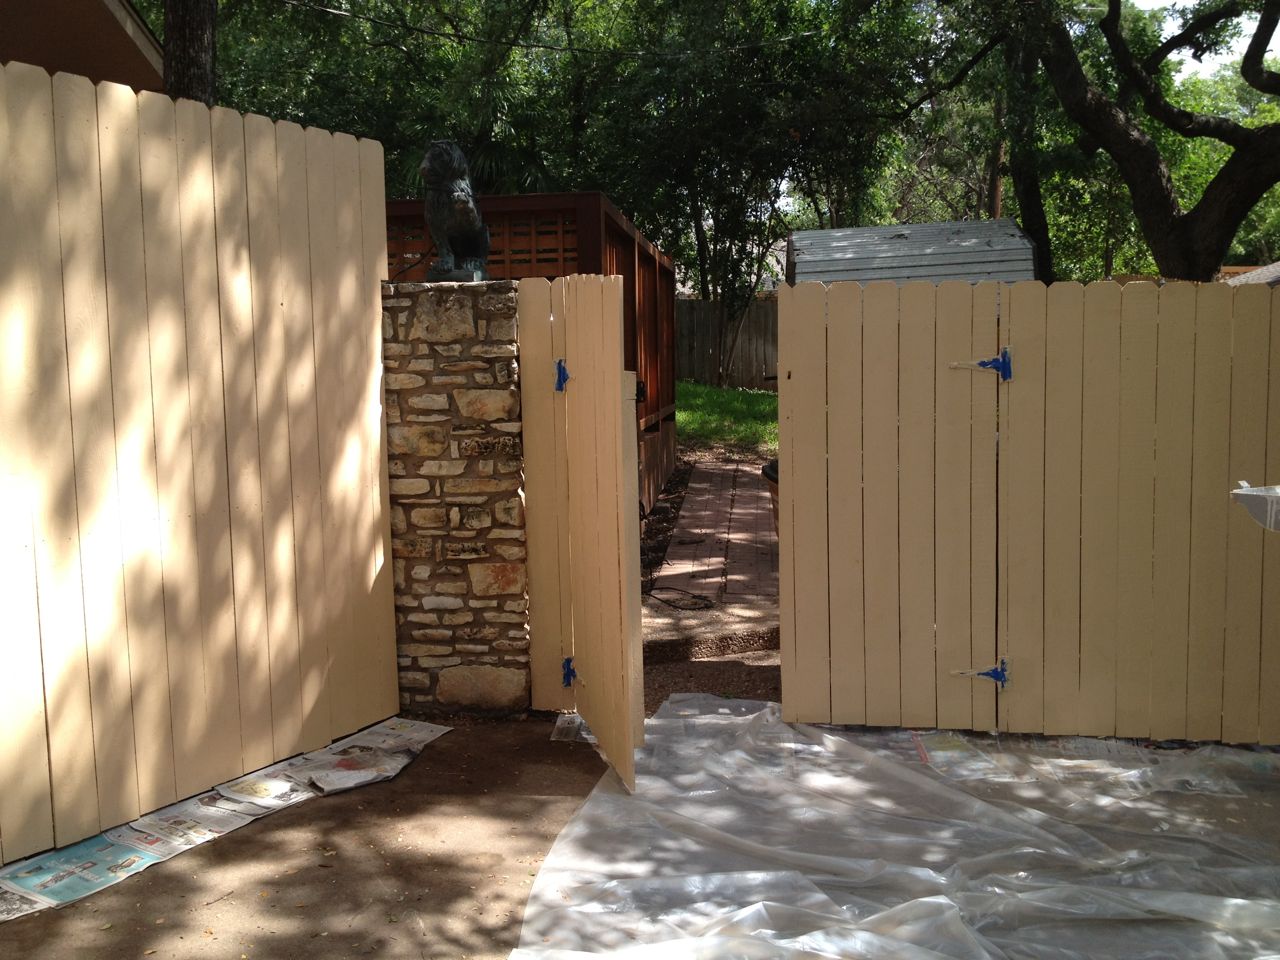
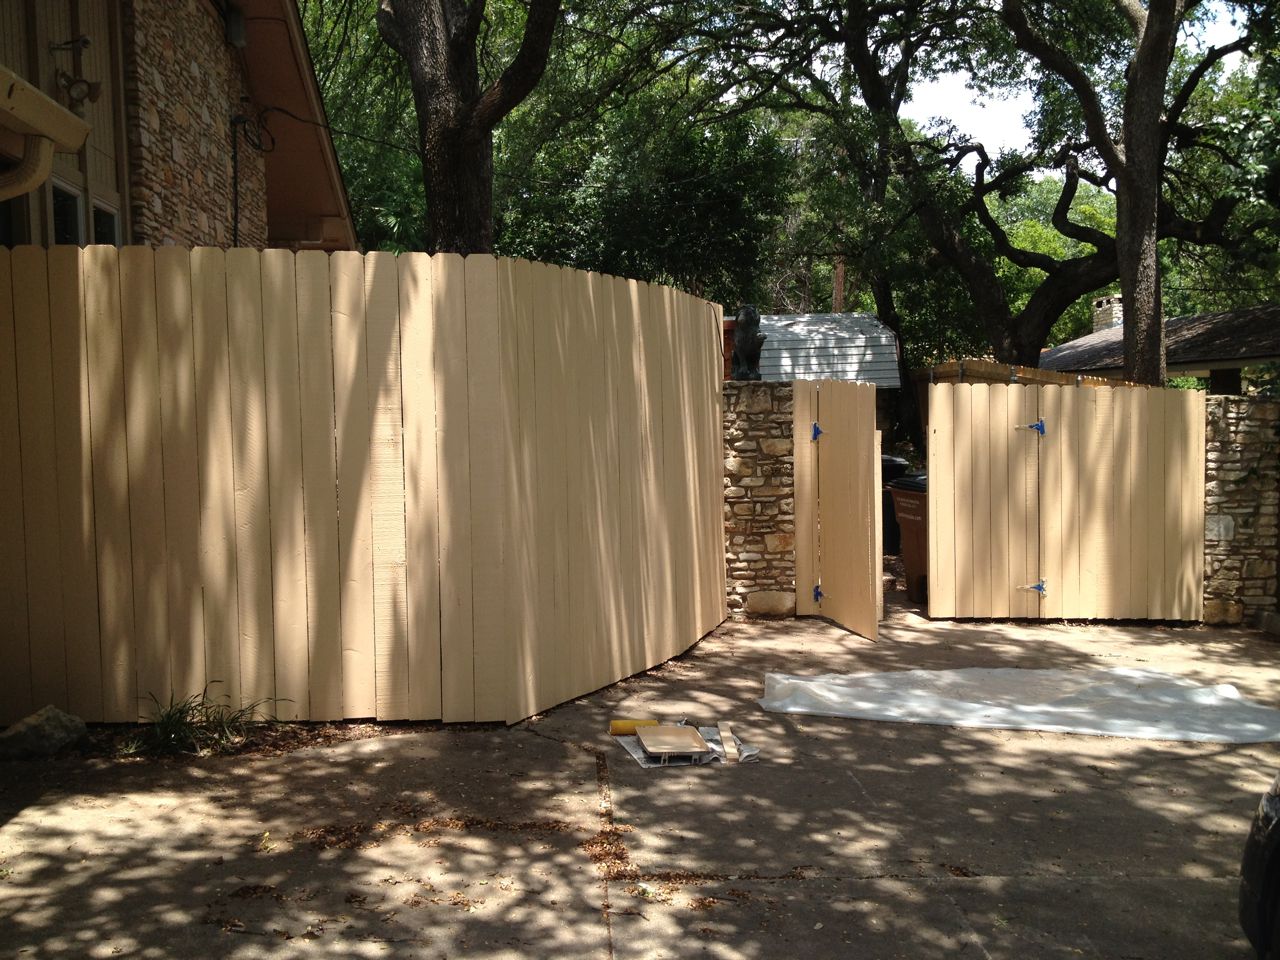
Front fence with tan paint
Front fence and gate after painting
The previous fence was painted the same color tan as the trim on our
house and there was some debate whether we should paint the new fence
the same way. We did decide to paint it, though it was over two months
later before we finally got around to painting it. This was just a low
priority given all the other deck-related projects going on at the
time. For some reason, we had a brand new 5 gallon bucket of this tan
paint. It had been sitting in the garage for probably 6 or more
years. I was not sure whether we could use it, but after about 45
minutes of mixing it with a power drill attachment, I was about to coax
it back to a form that resembled paint.
Deck Structure Decisions
The demolition and some preliminary side fence work were the first
things the carpenters worked/ Once they were ready to begin work on the
deck proper and started thinking about the structure of it, they told
mem it was not possible to have all the decks at the same level as I
had hoped. I did not like stairs, since they are a trip hazard and
they reduce or limit the options for utilizing the space. The decks
are adjacent to some concrete slabs that more or less are extension of
the deck. The concrete slabs (properly) are not level in any direction,
since they are contoured to allow drainage away from the
house. Additionally, the southeast and northeast decks that I wanted to
add a span between were not the same level. Mix all this uneveness
together, and they said it would not be possible to have a single
level deck.
I spent 20 minutes mostly just thinking about how the design would have
to change to account for this. I cannot say I was surprised to arrive
at such an obstacle, something like this was inevitable. What was most
stressful was my having to come up with a solution and make a decision
on the spot. Failure to do so and the carpenters would have nothing to
do and I had to make this decision in the presence of the carpenters to
make sure any proposal was feasible. I finally came to the conclusion
to lower the southeast deck and raise the northeast deck. This would
imply that the new northwest deck would have to be up one step as well,
which was not ideal.
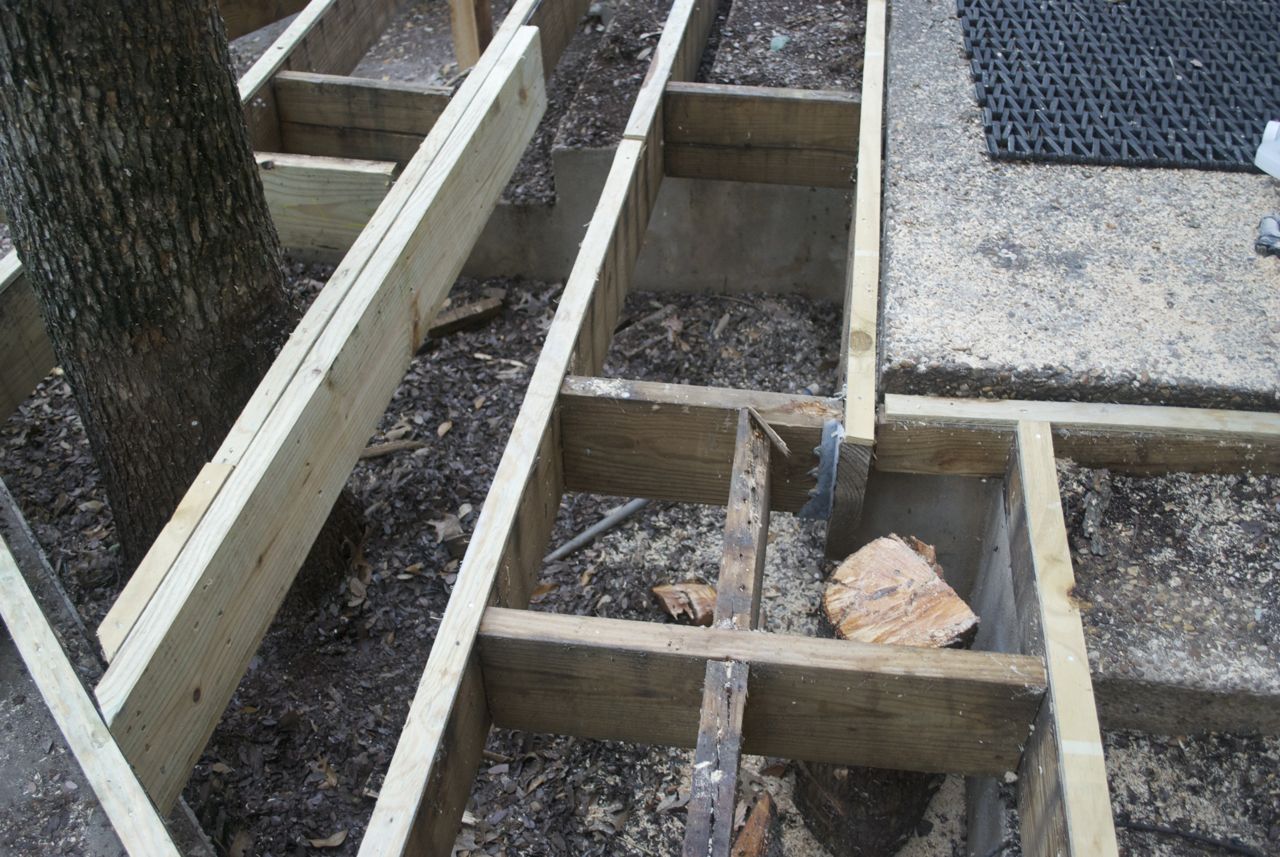
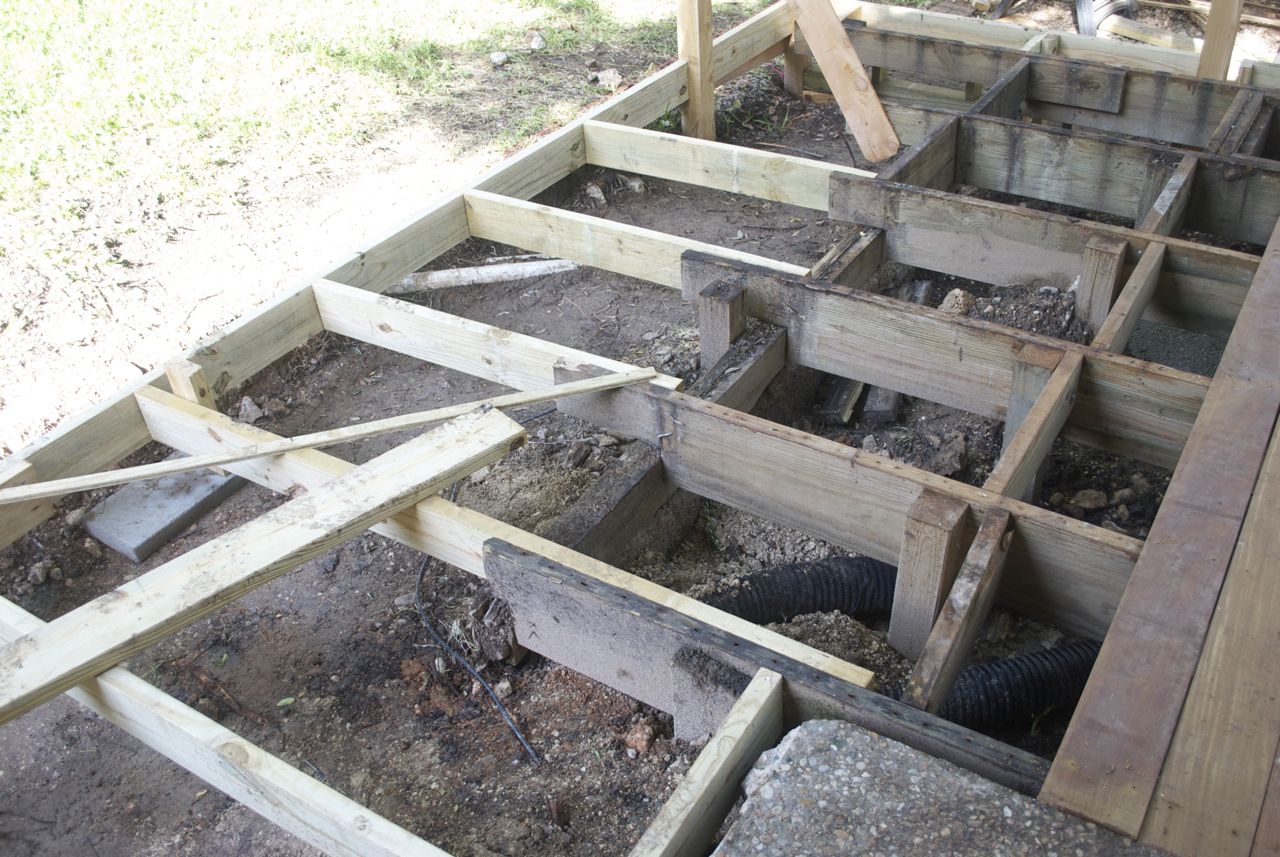
Framing and spacers for inter-deck leveling
New framing for span between old decks
With the unhappy decision made (it was the morning), I went back inside
to work on some other things. About midday, I went out to talk to the
carpenter again to see how things were going. He informed me that he'd
figured out a way to make the decks all the same level. He did so
almost matter of factly like it was something I probably was not all
that interested in. Anyway, I was very, very pleased he was able to
work it out.
In fact, they were already adding some spacing strips to level out all
the existing frames and had built part of the span between the
deck. Thus, they were well on the way. There would be some small
height transitions between the deck and concrete, but they were all
small enough not to pose a trip hazard (unless you are a real foot
dragger).
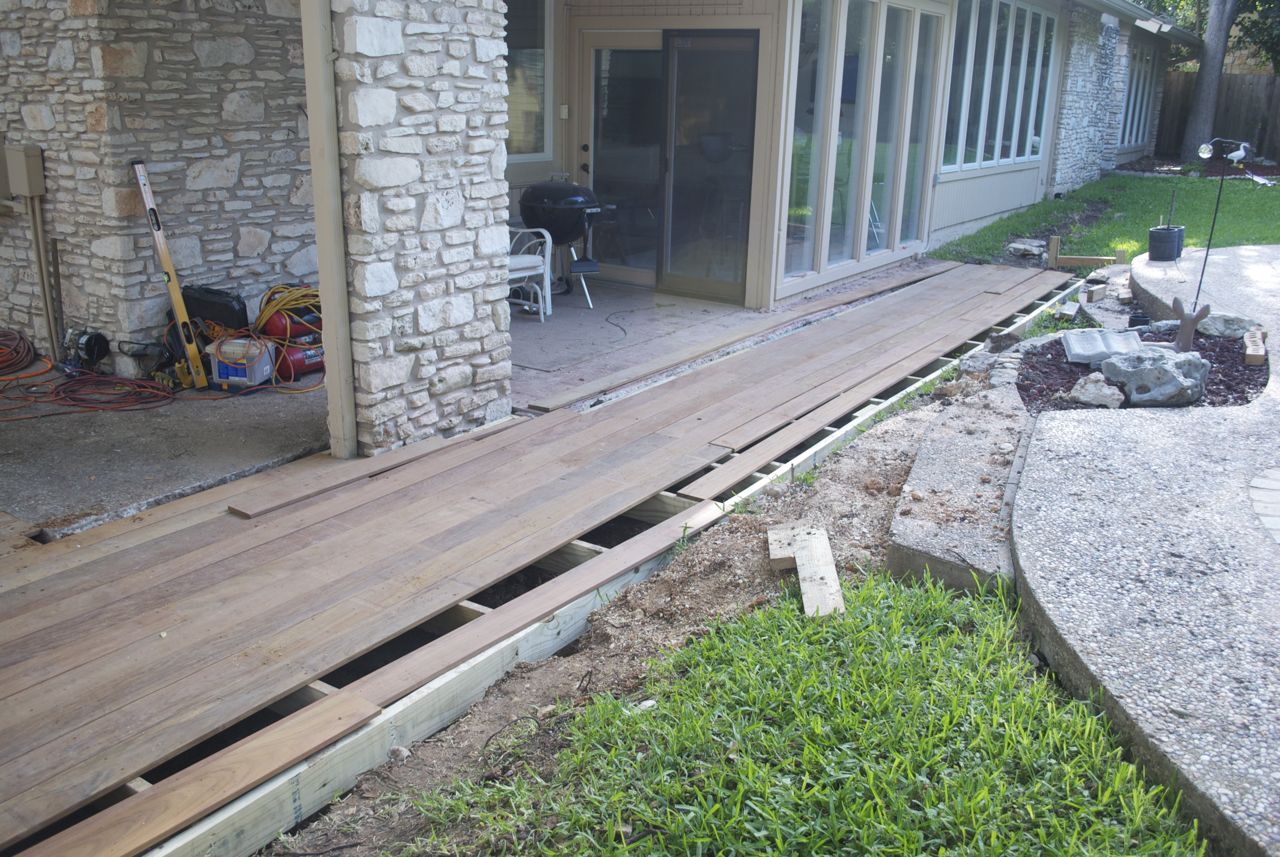
Southeast Deck
Initial deck boards on southeast deck
The first deckboards were put on the southeast deck. They did this at
atime that I thought was very premature. There were still structural
issues to resolve and other work to do in the area around the
front-facing fence. Maybe they had a good reason, but something made
me think they just wanted to throw down some boards to make me feel
better. Maybe the average customer likes to see deck boards to make
them feel like progress is being made.
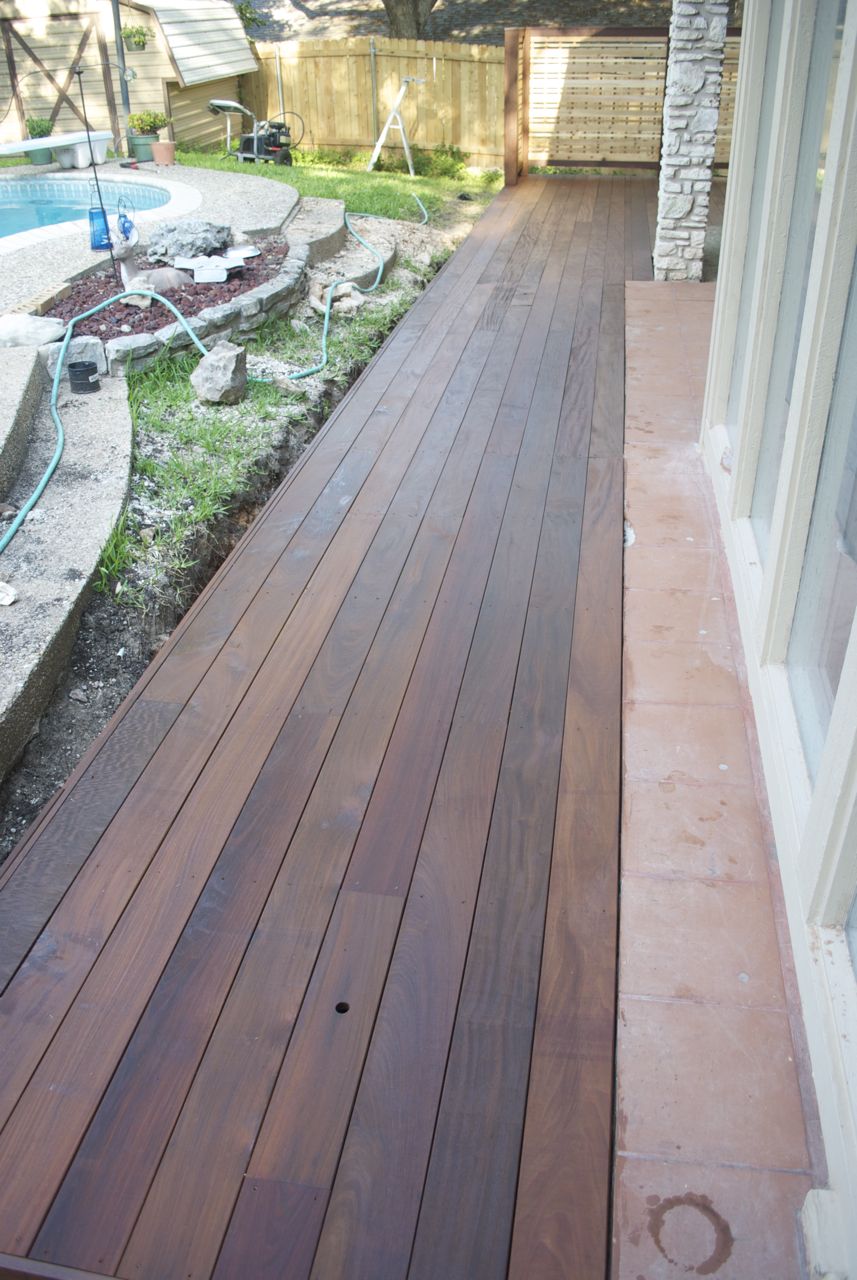
Completed southeast deck with new span section
The southeast deck was the first to have all the deckboards installed
and gave us the first real view for how this was going to look: it was
fantastic. I was very pleased with the result. At this point, no work
was done on the new stairs, but they did have the plan for it all
worked out.
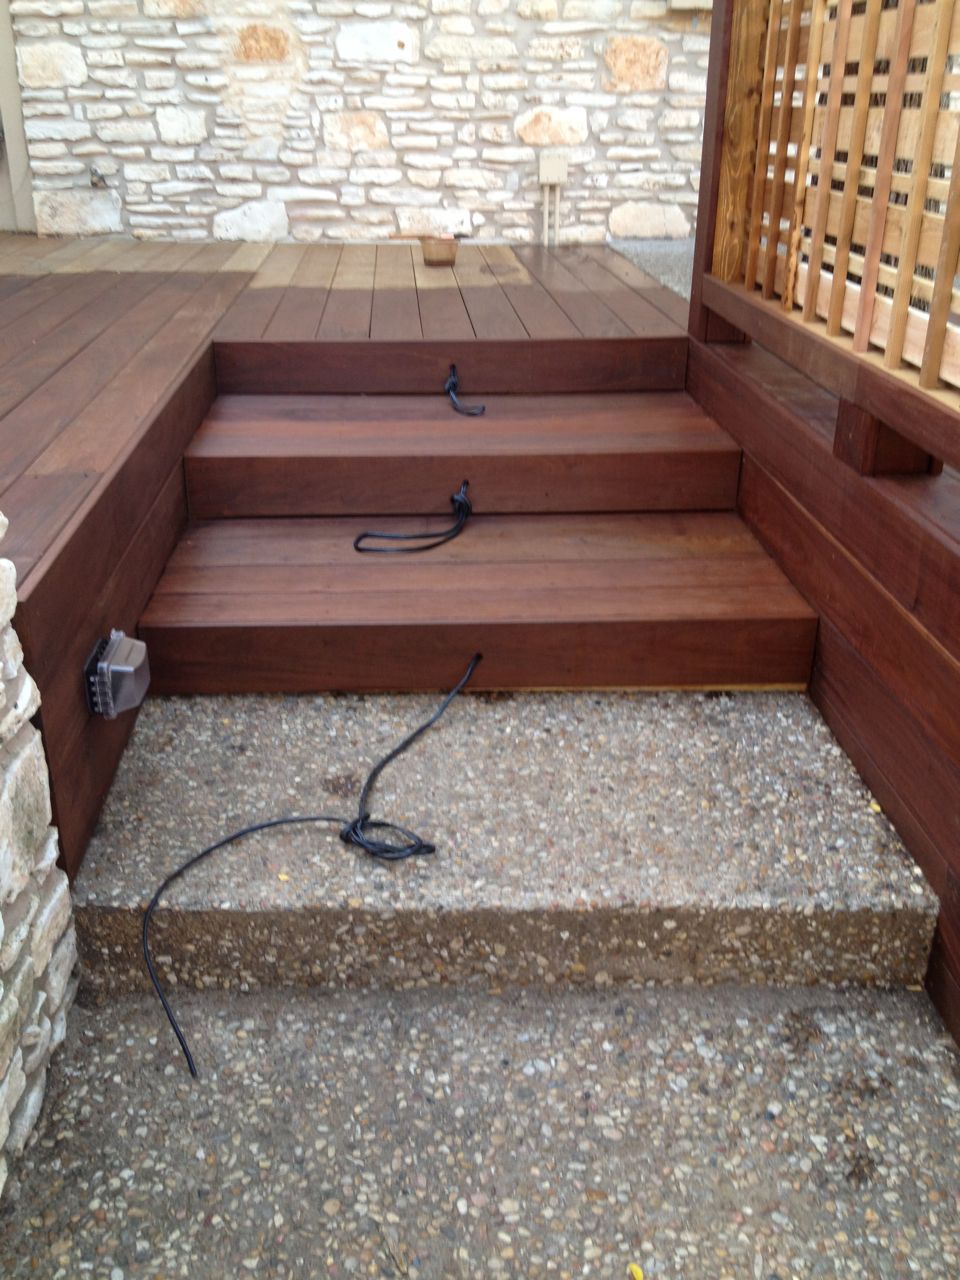
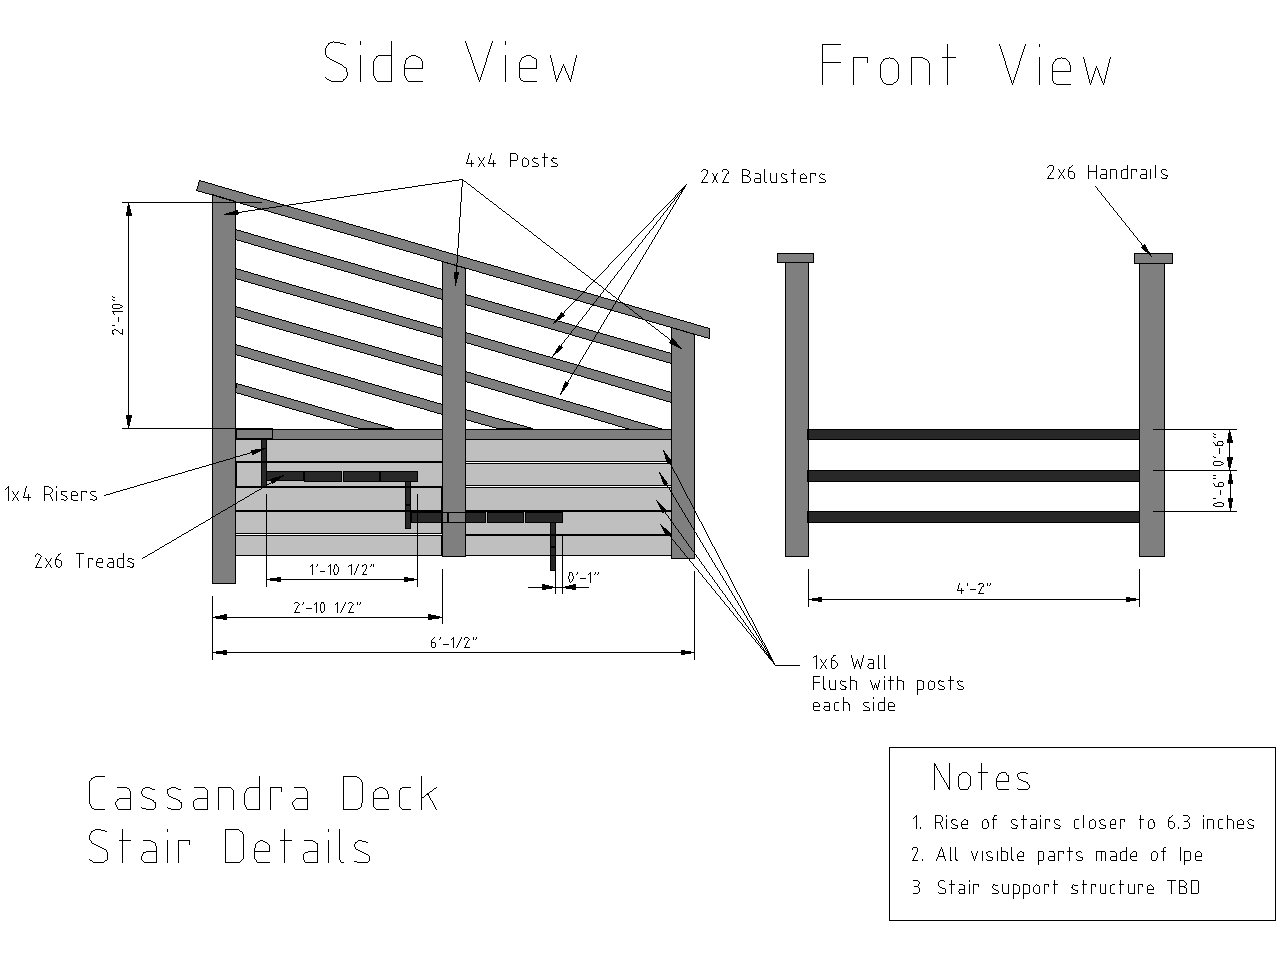
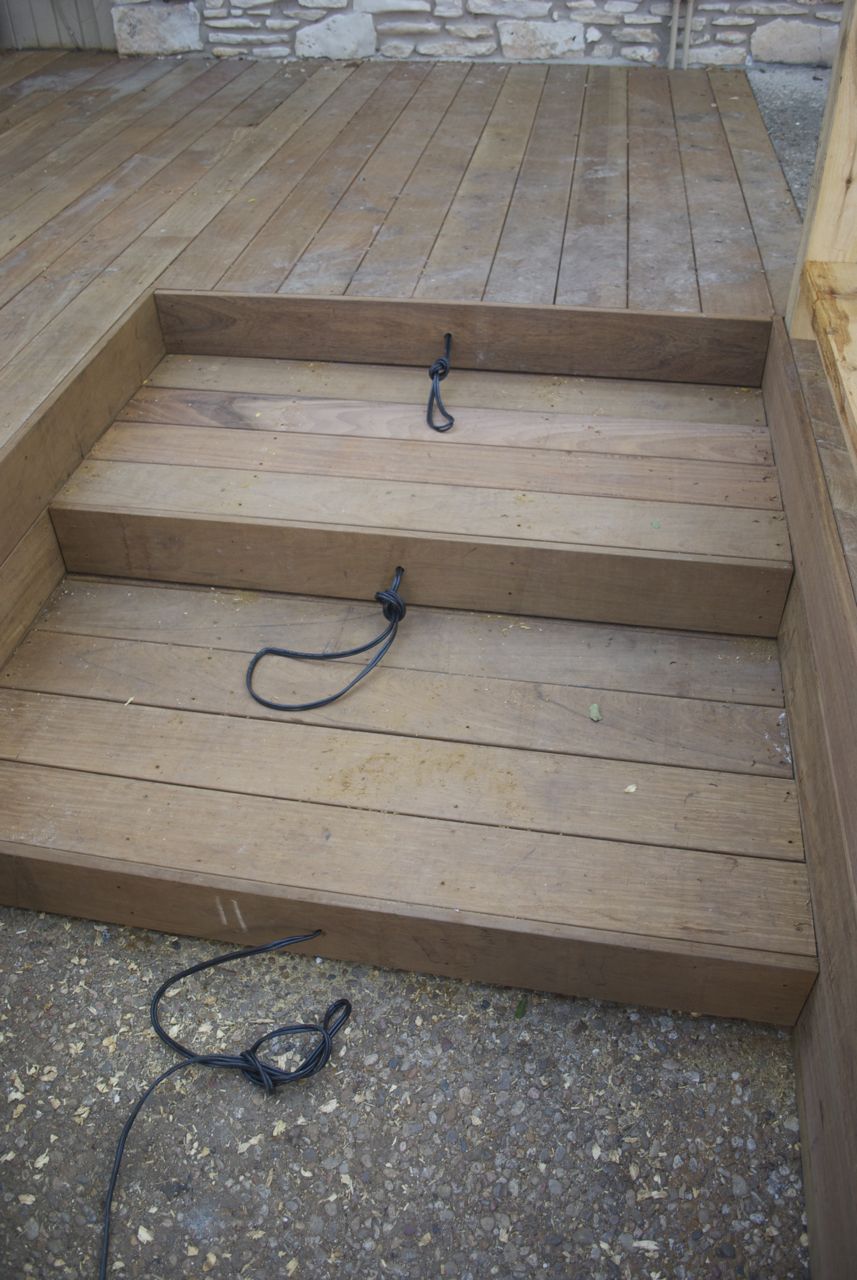
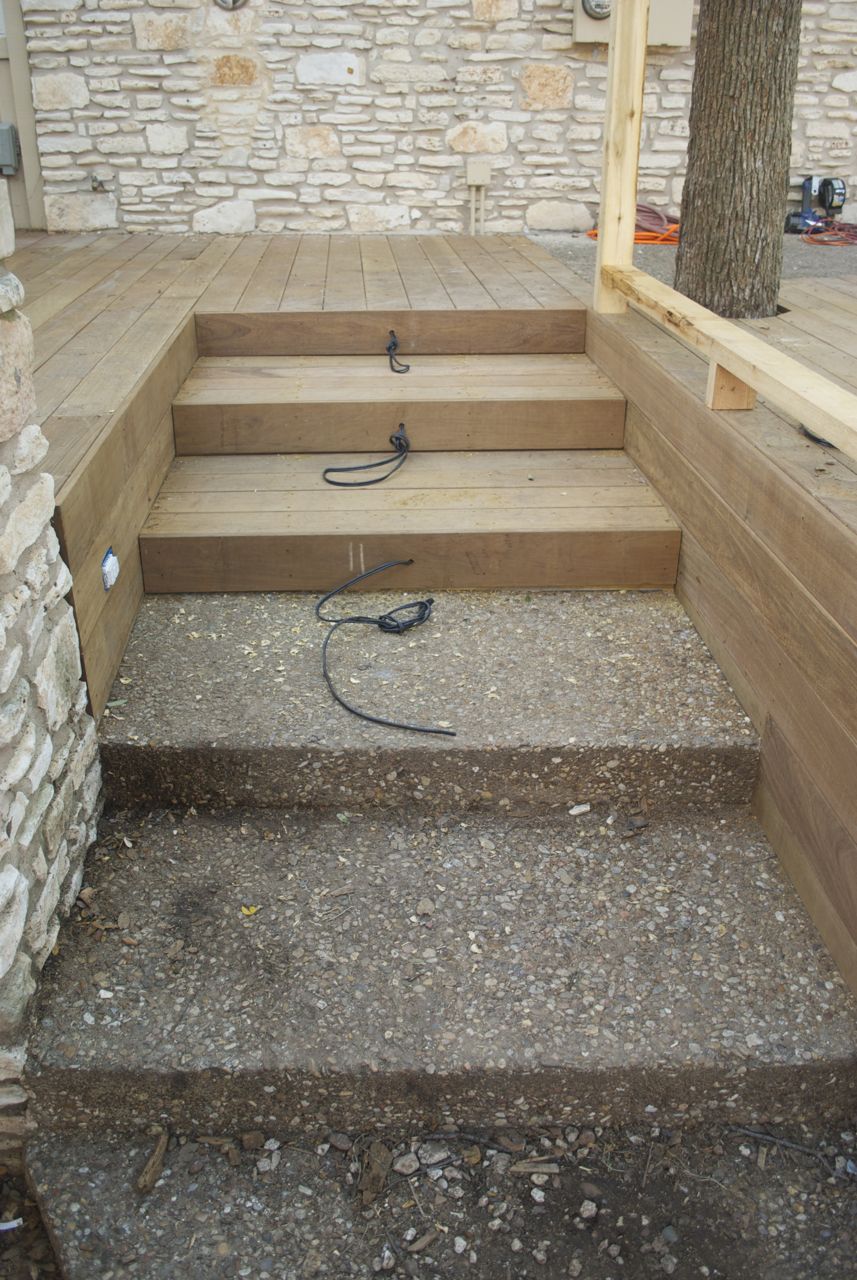
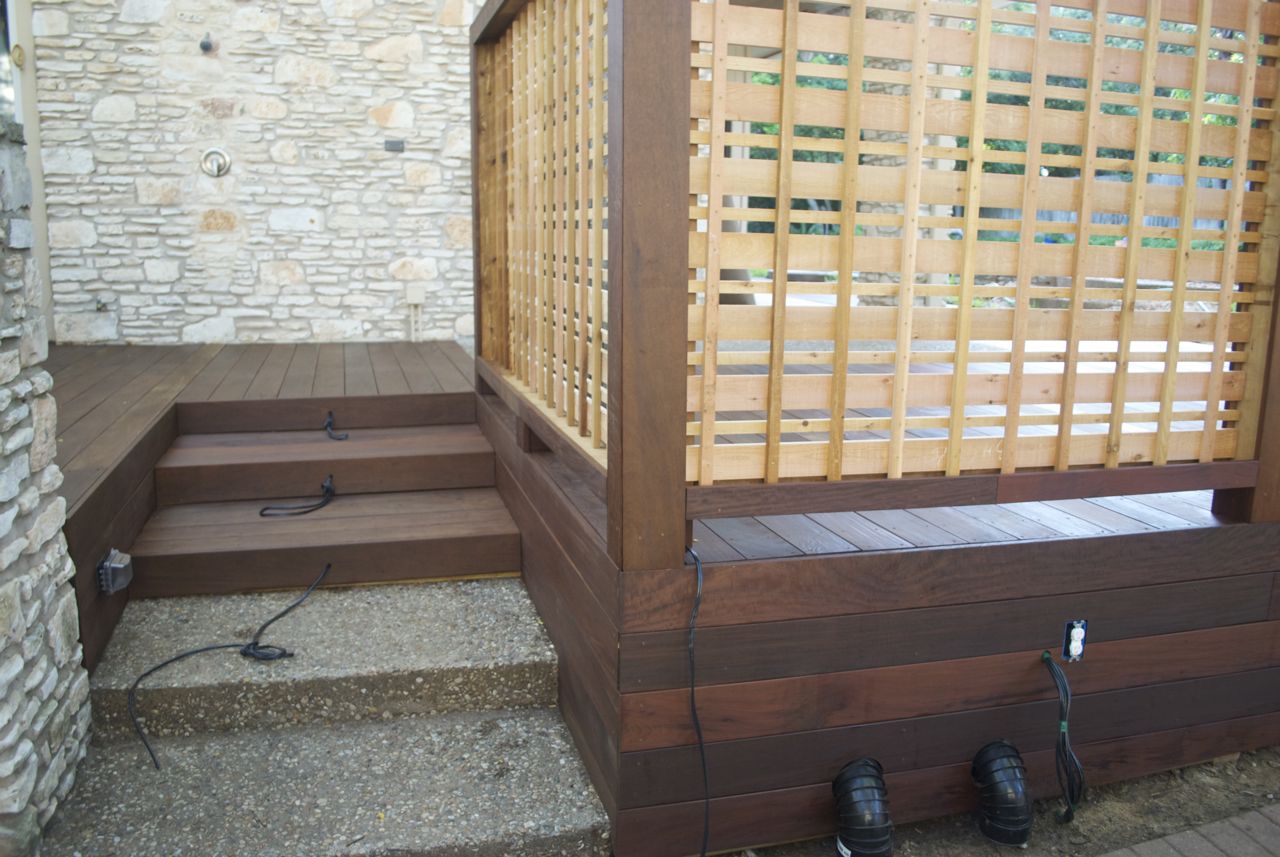
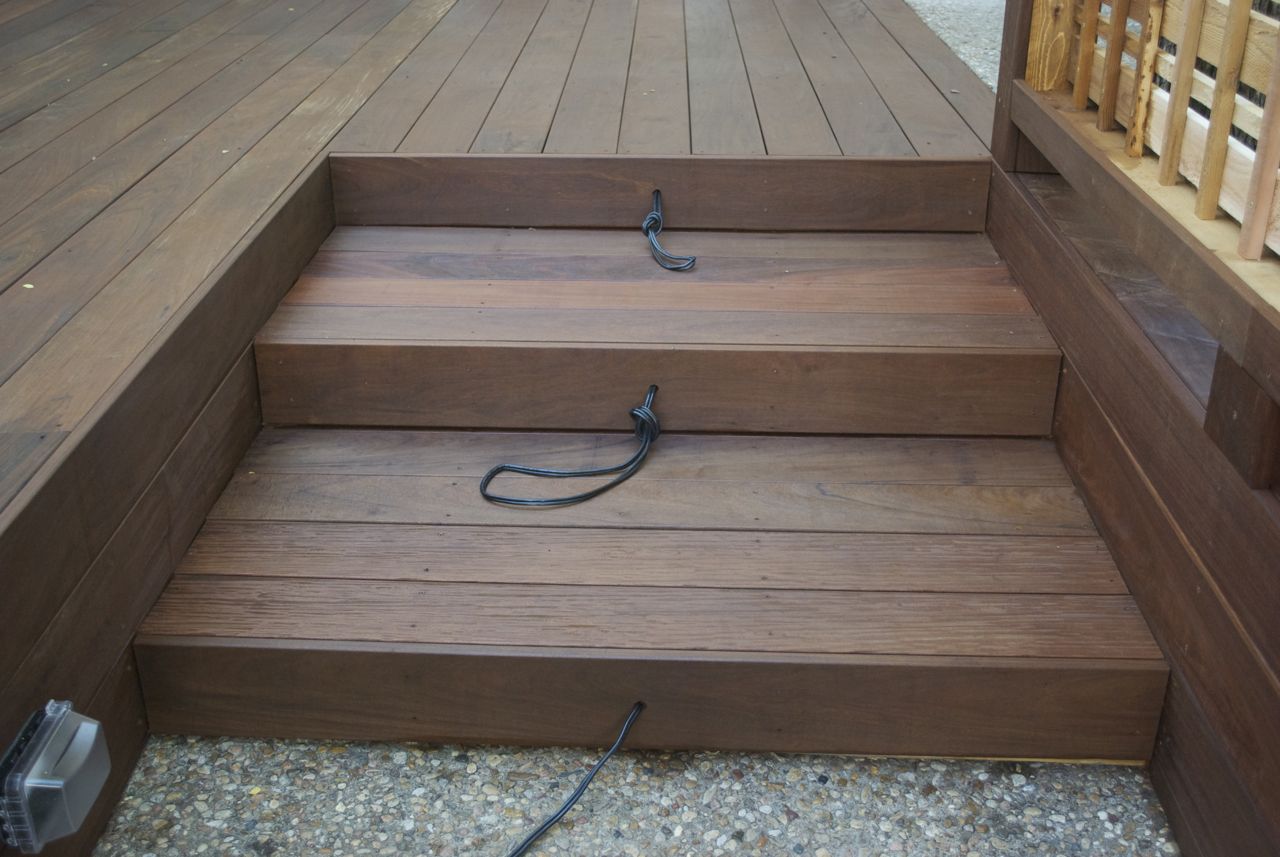
New Stairs
Southeast deck completed but without stairs
I generally do not like steep and/or high stairs. I got a great
appreciation for how the rise/run of stairs matters when I toured
Frank
Lloyd Wright's Darwin House in Buffalo while I was in college.
Going up to the second floor, I only felt like I went up a half level,
and it was a pleasant climb at that, with a more natural gait. Thus,
for the deck stairs, I wanted them to be at most 6 inches high, and I
wanted them to be a full stride in length. This full stride length
also would match an existing concrete step. I wanted the deck stairs
and these concrete stairs to flow smoothly together.
Finished stairs with wiring
My initial design had hand rails for the stairs. I did this because I
thought the city code would require it. I did a lot of research on
stair railing codes to come up with the dimensions. However, since the
deck is not that high where the stairs are, it was not necessary (and
my old deck stairs did not have railings either. This was good news
for many reasons:
- opened up more space for more deck surface area;
- less of an obstacle as you take things up and down; and
- would be a lot cheaper.
The end result looked very, very slick: the carpenters did a great job
on this.
The biggest conundrum with the stairs is that I had not decided exactly
what the lighting solution would be. I knew I wanted the stairs
illuminated, and preferred something on the staor risers, but the exact
size and such was not decided. However, before they built the stairs,
they would need to run the wiring I needed for the stairs. I had
decided on a low voltage (12V DC) solution for the deck, and the use of
LEDs, but I was very unhappy with the local selection of lights I found.
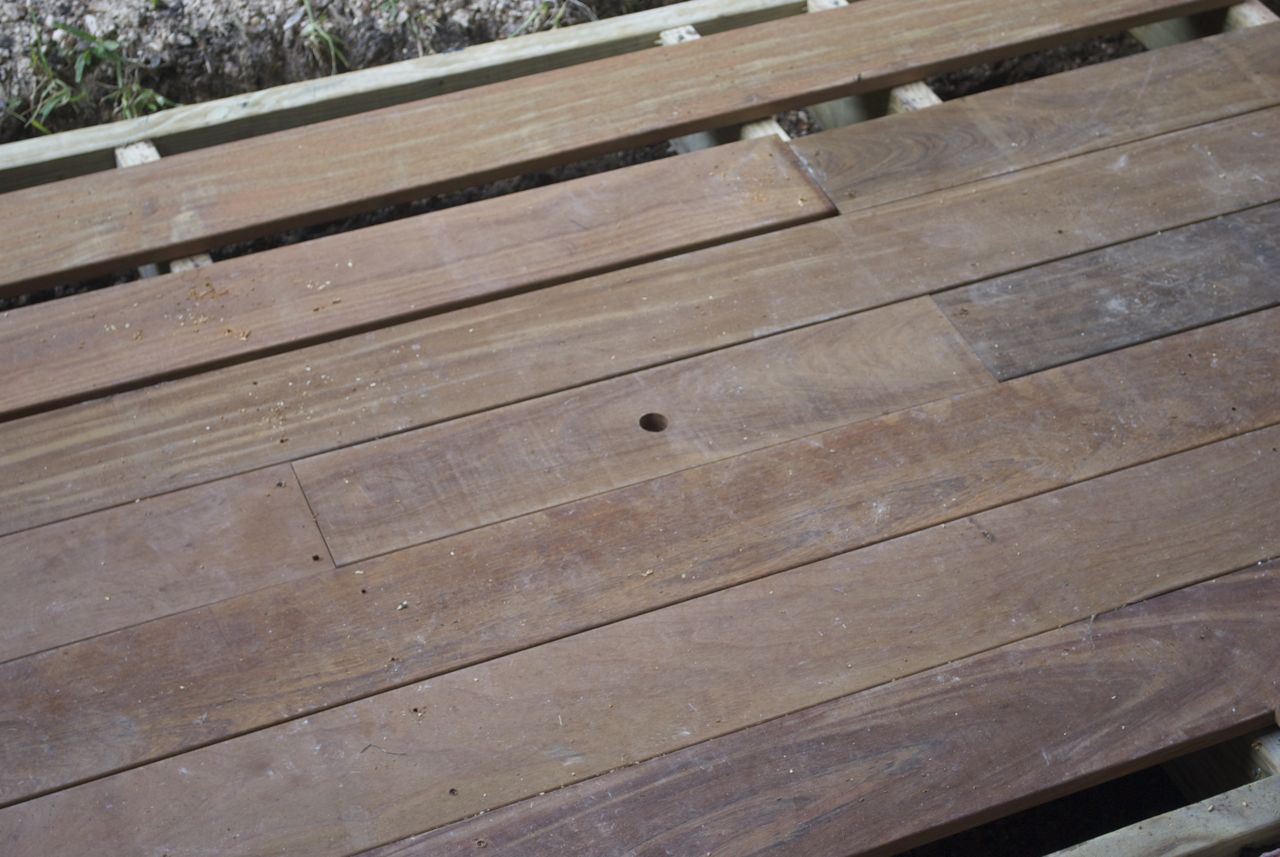
I had to make a decision, so I hedged my bets a bit and had them drill
a small circular hole in the middle of the stair risers with a wire
coming through. Once I decided, I could expand this hole or add other
ones if needed. In the worst case, I could even replace the boards if
I decided a light on the risers was not preferred.
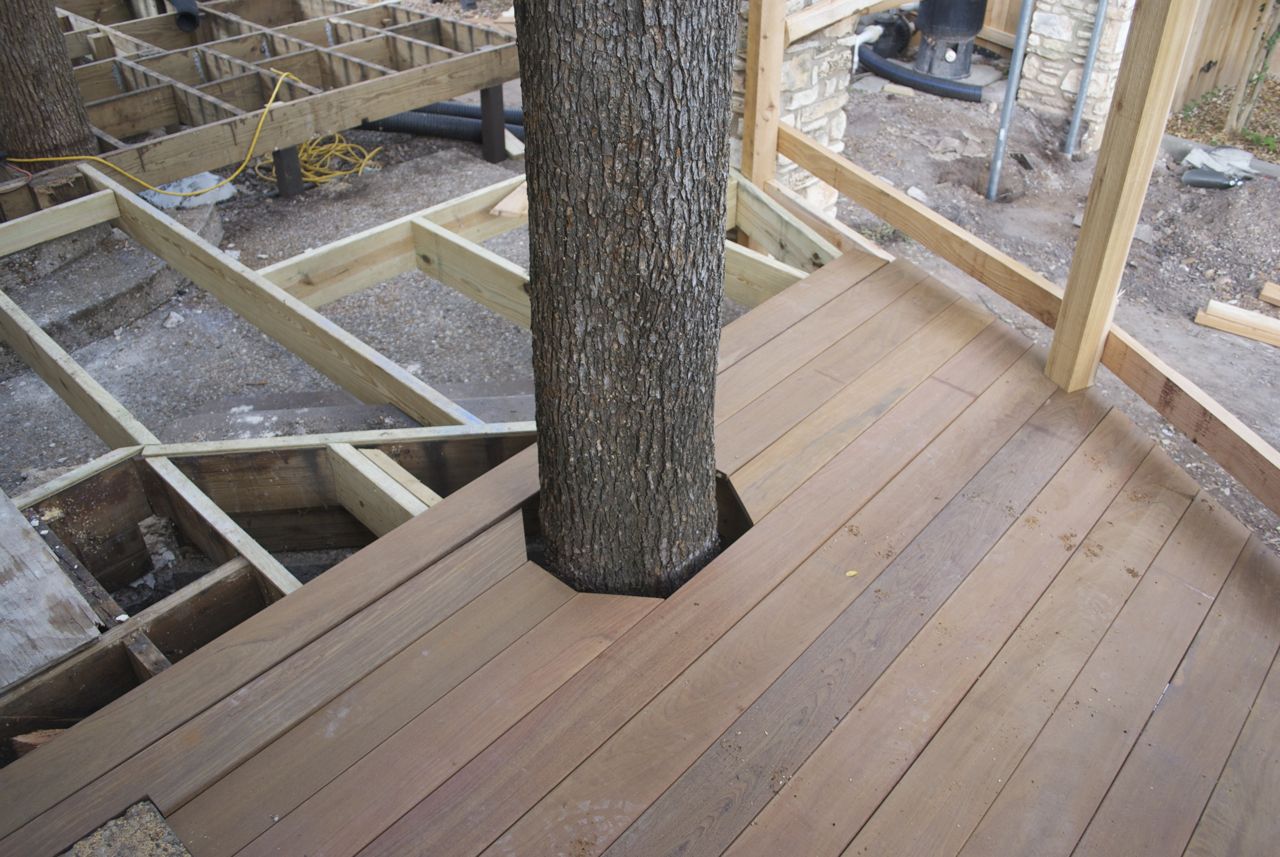
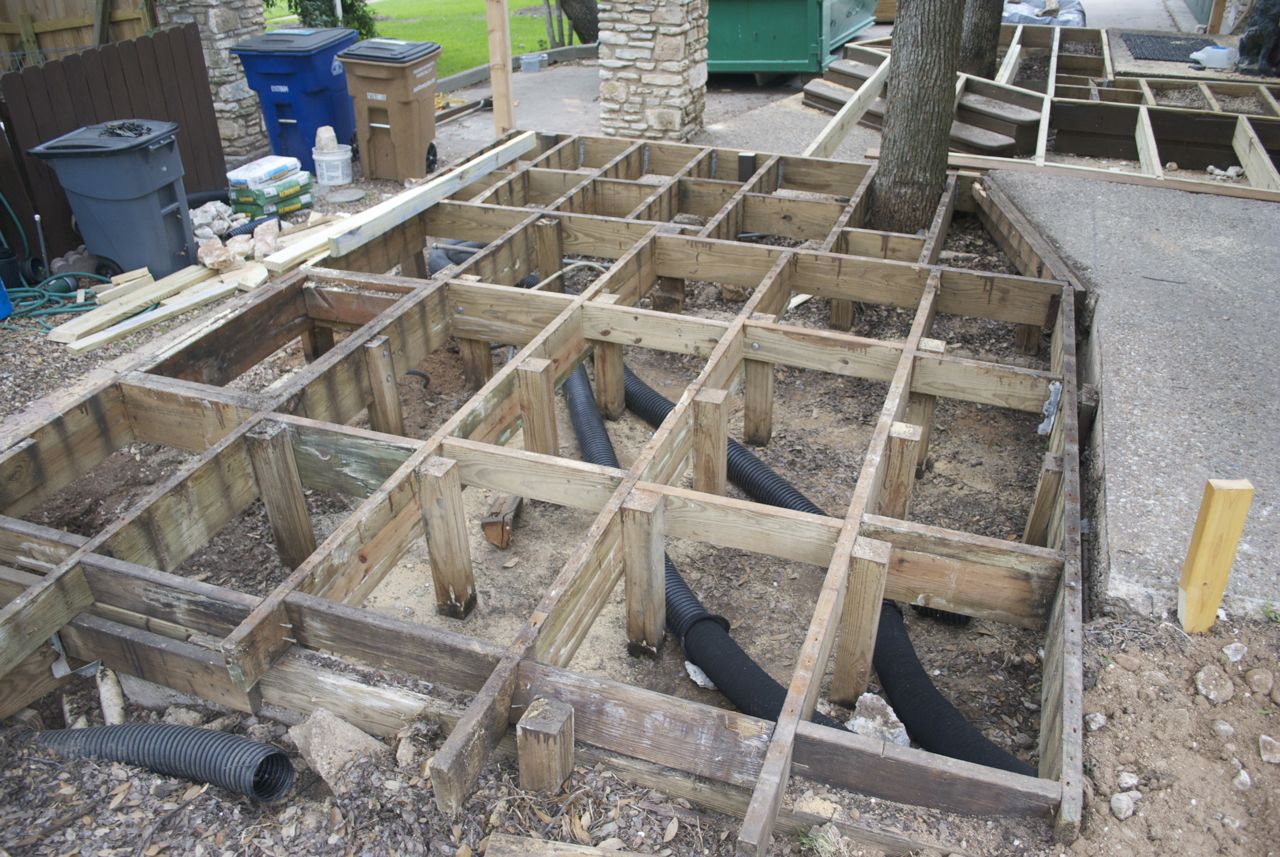
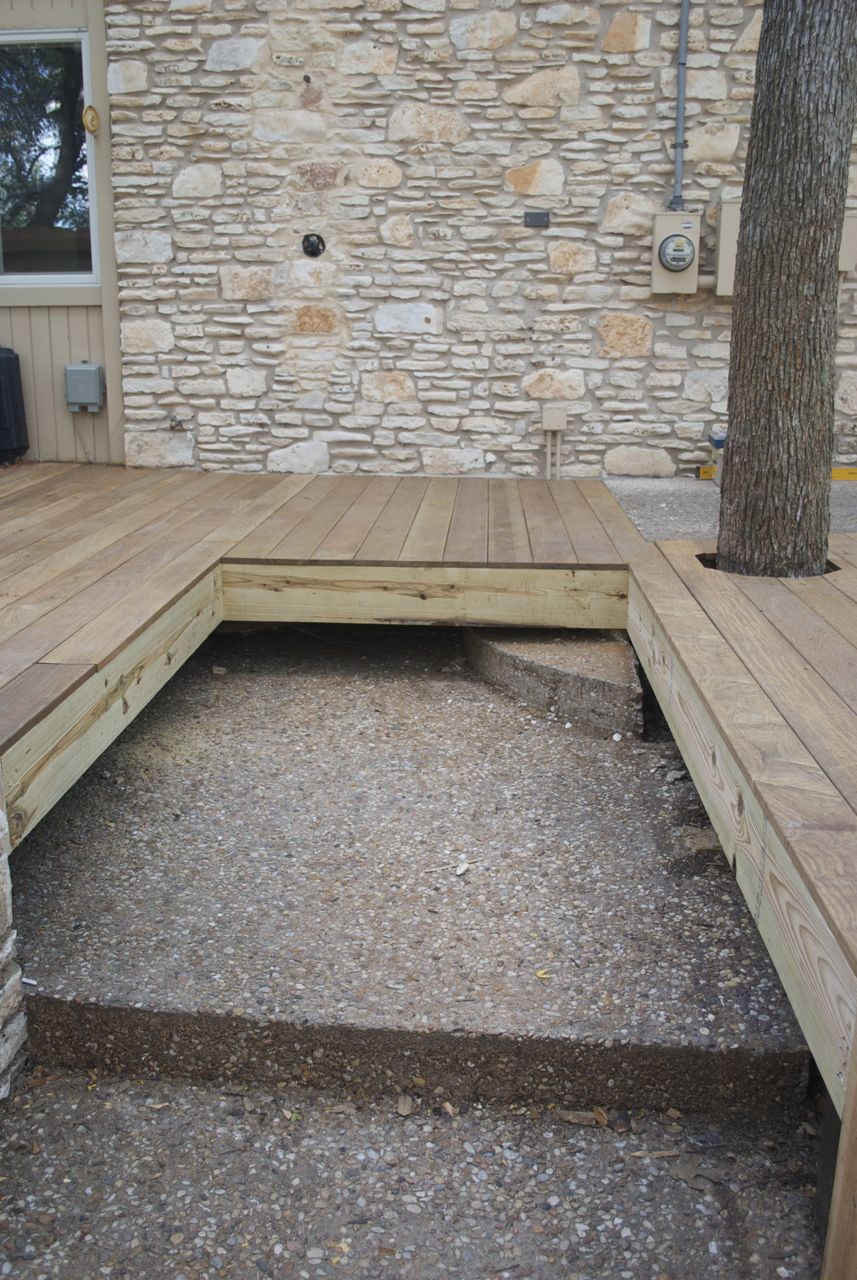
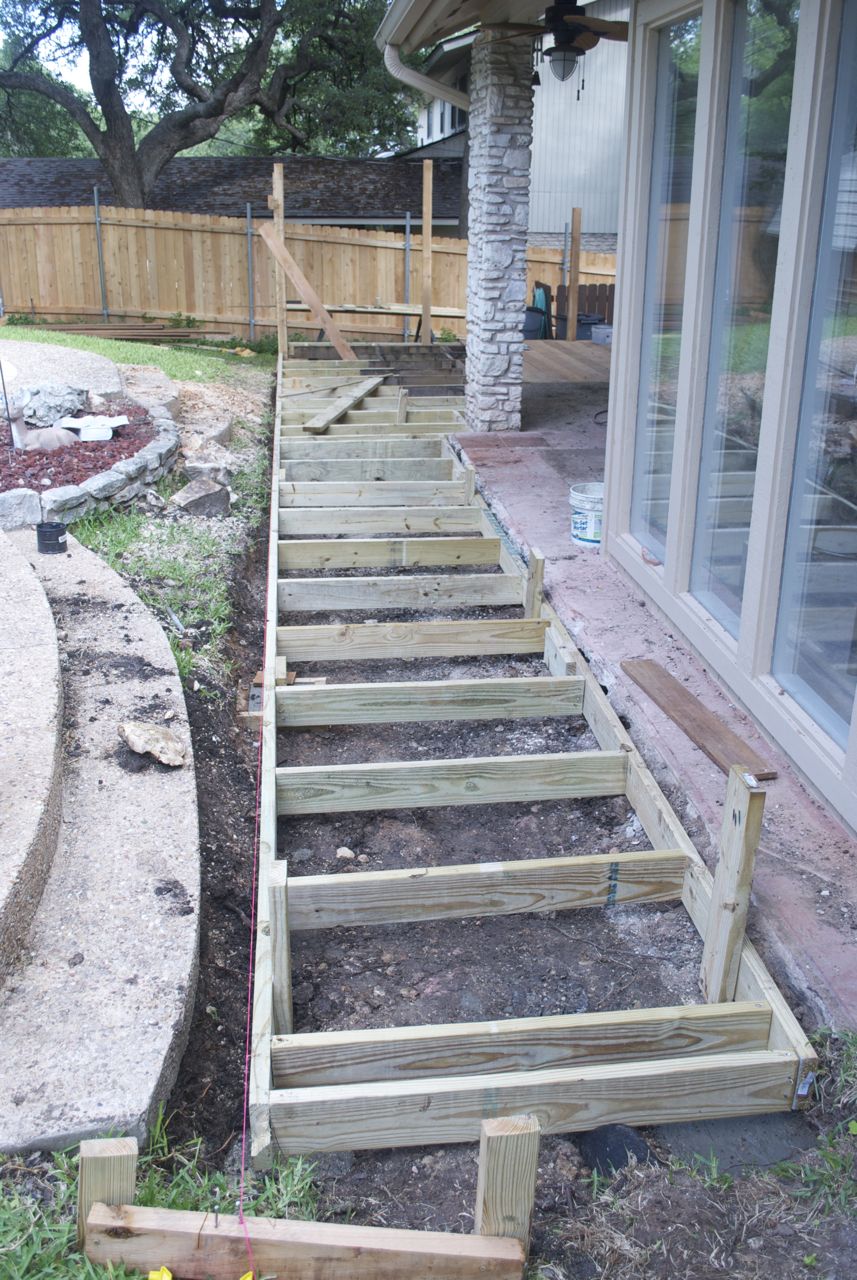
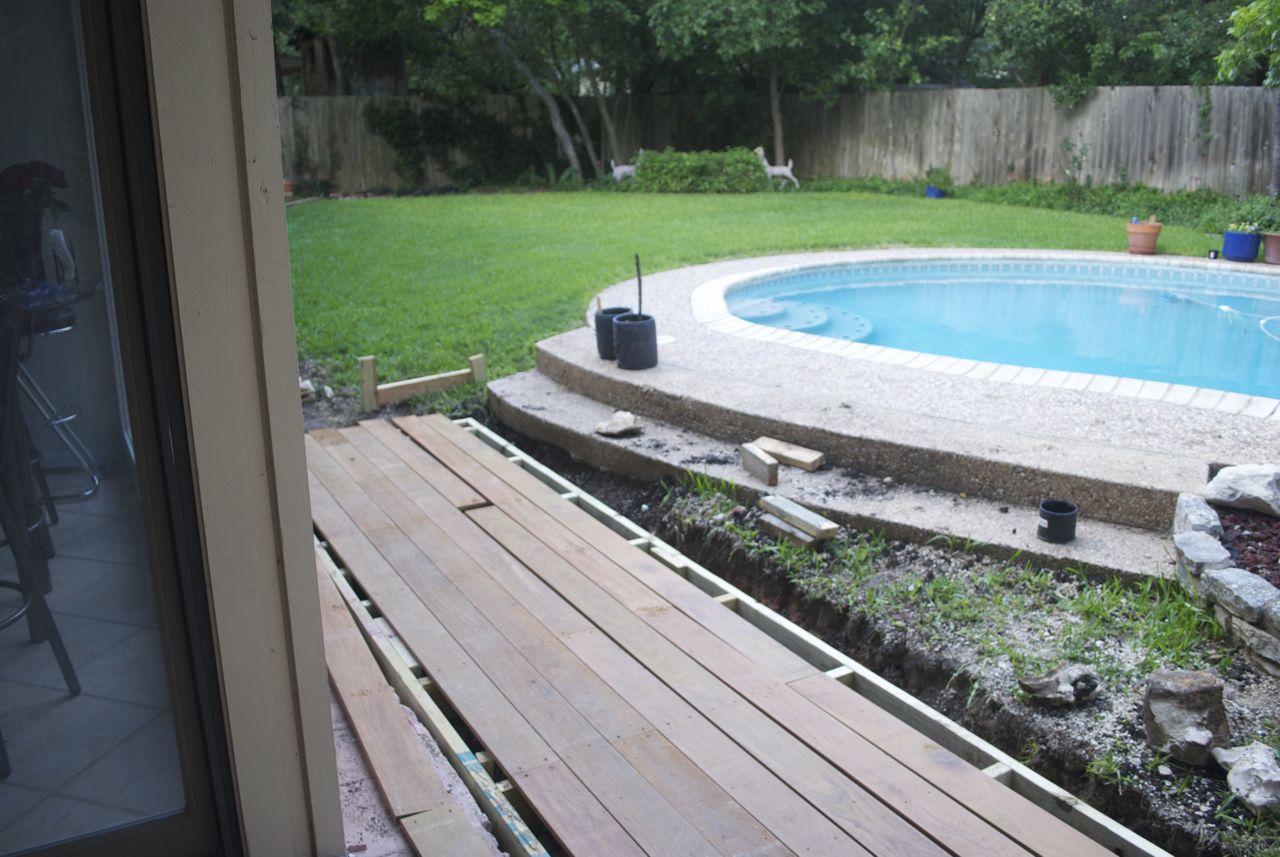
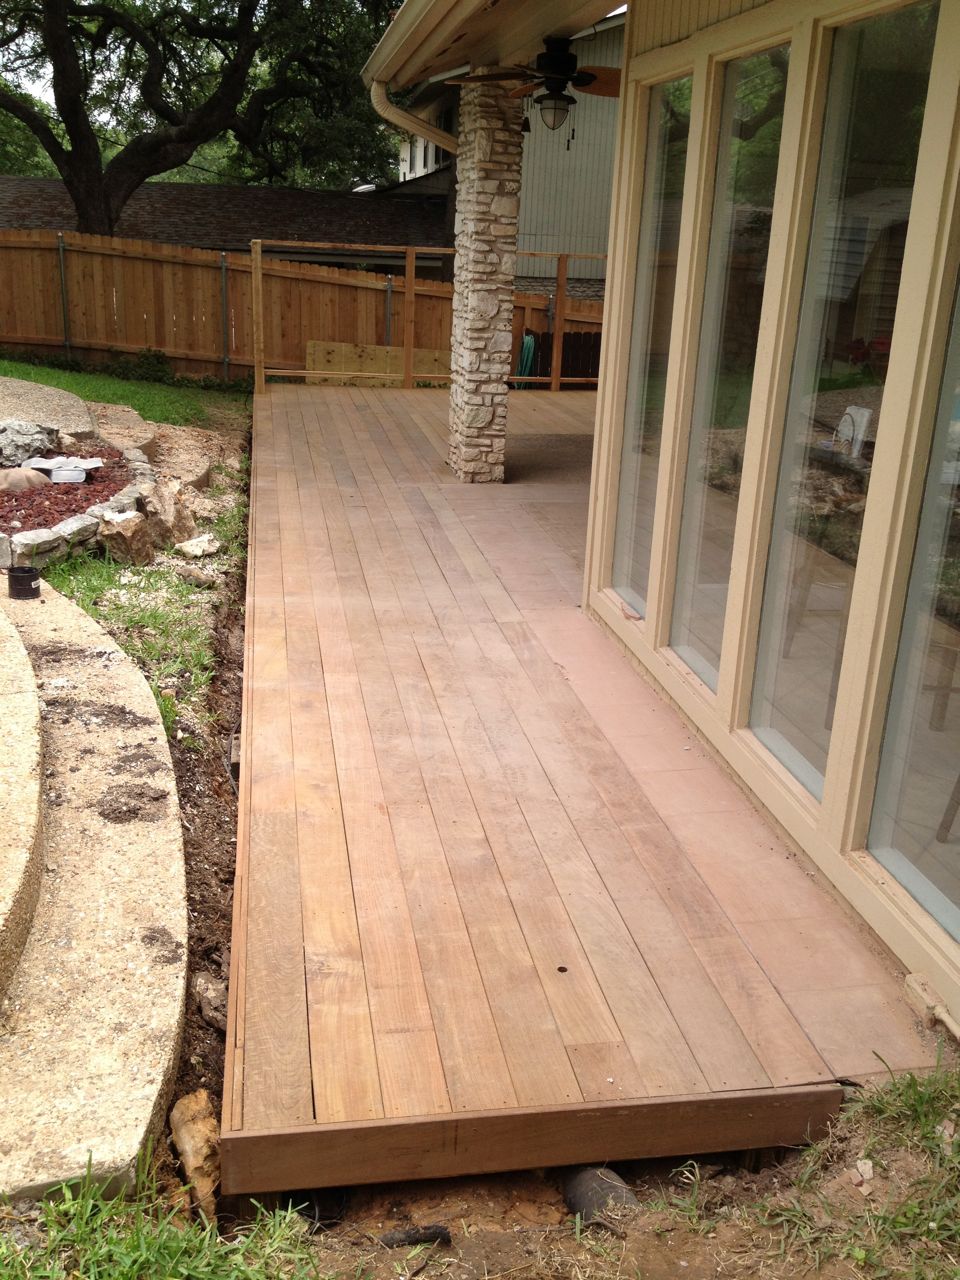
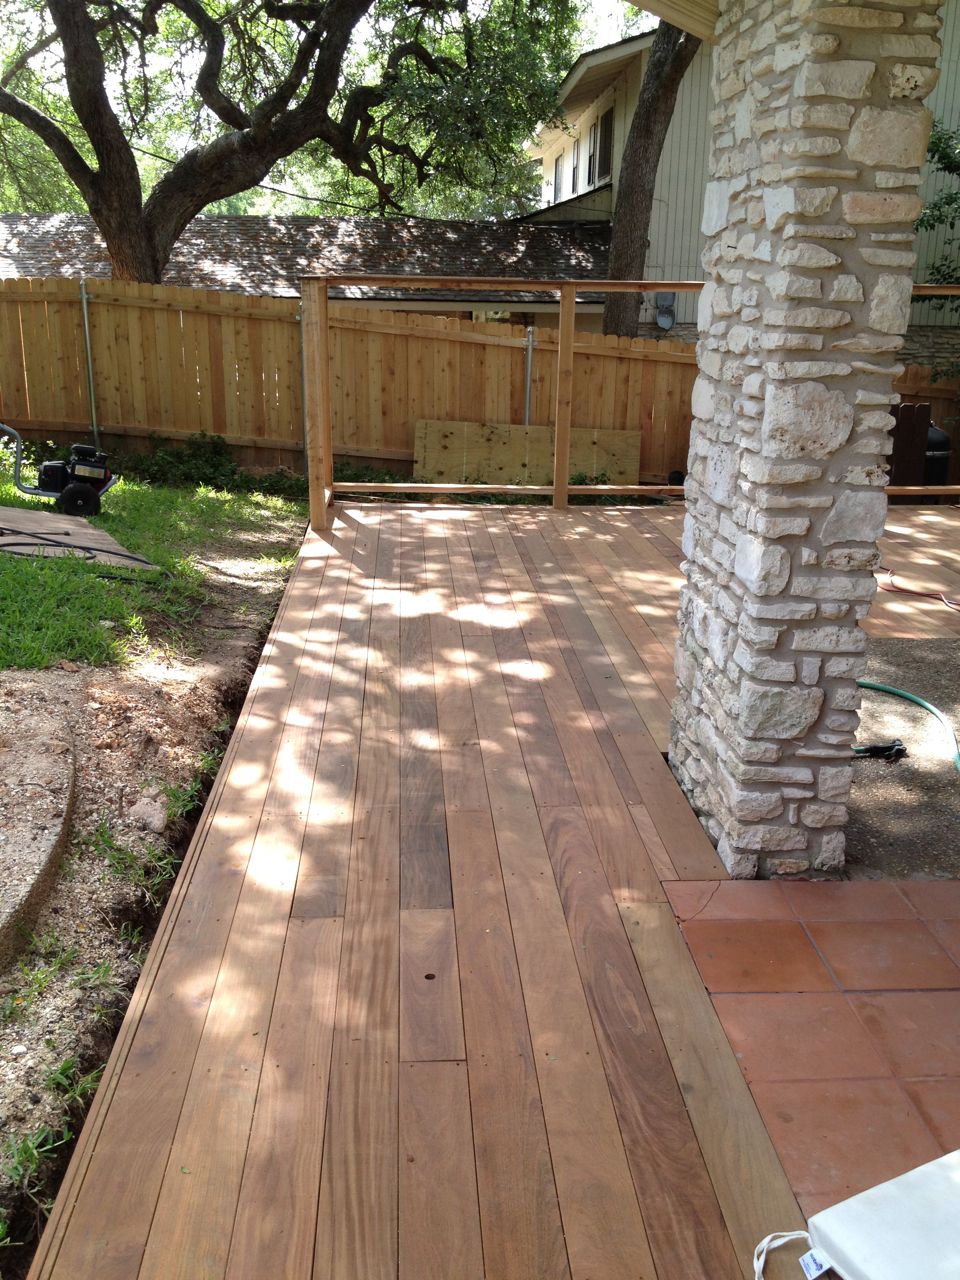
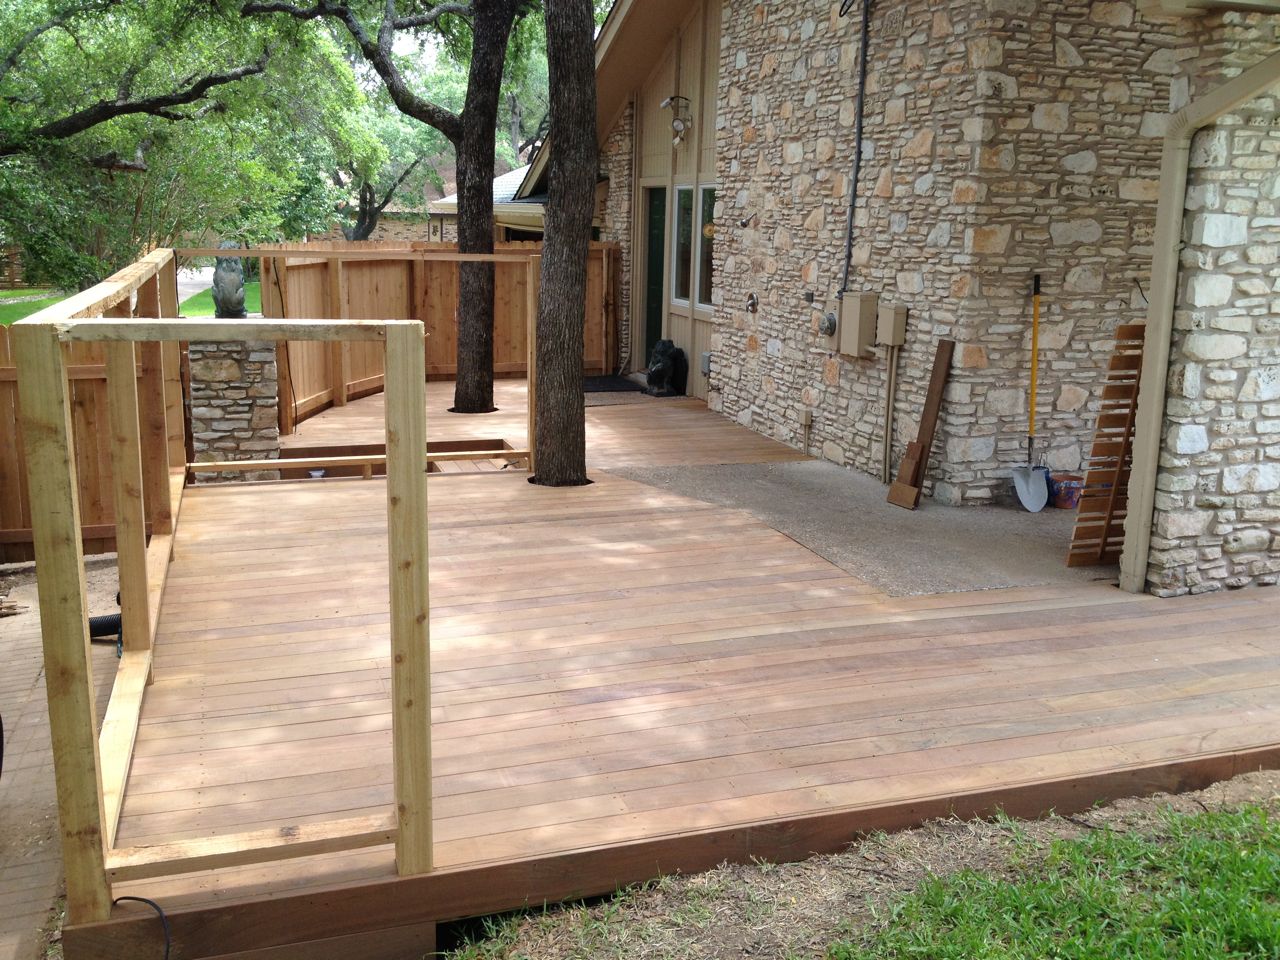
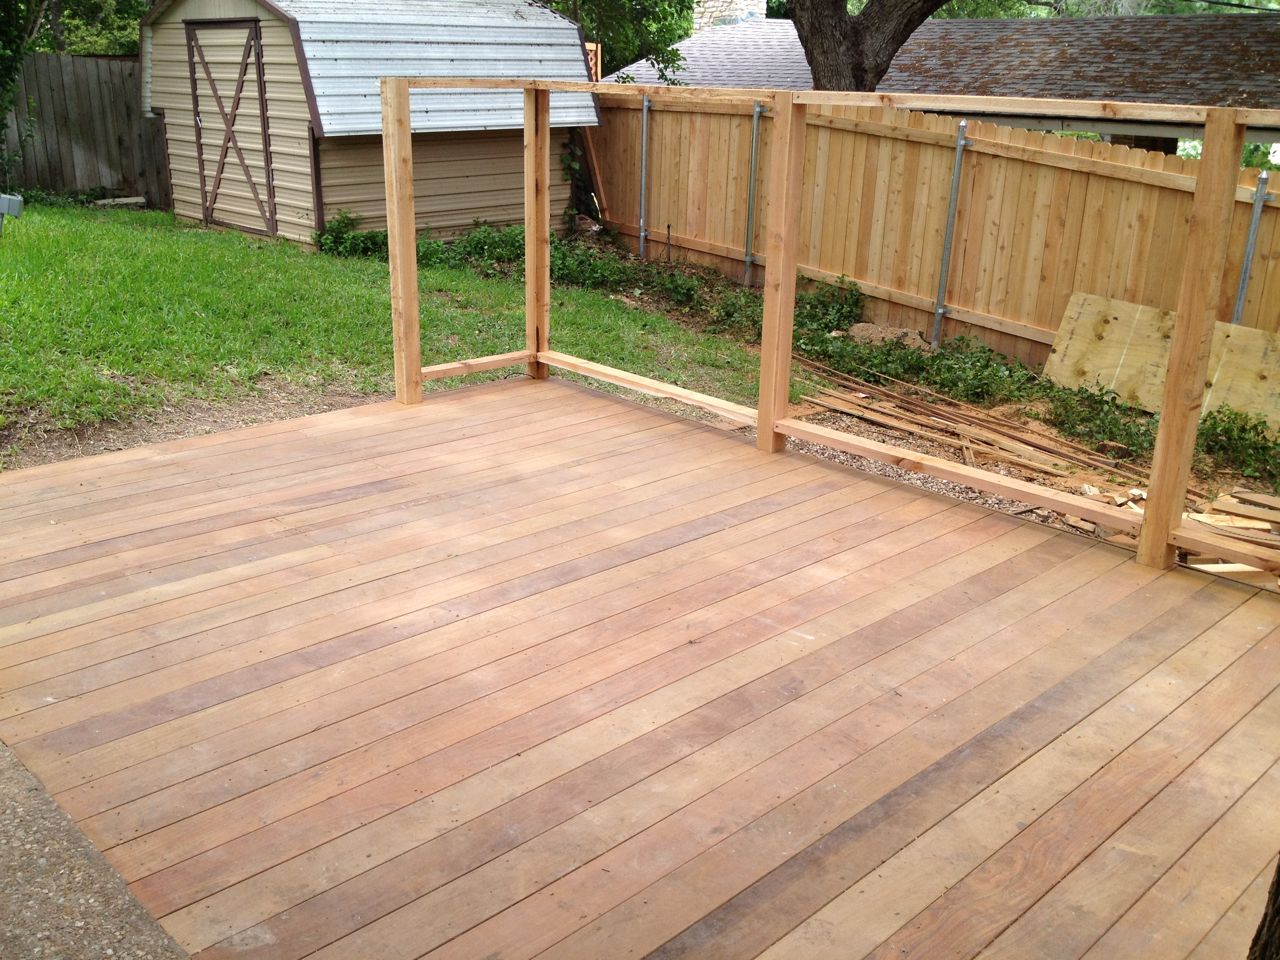
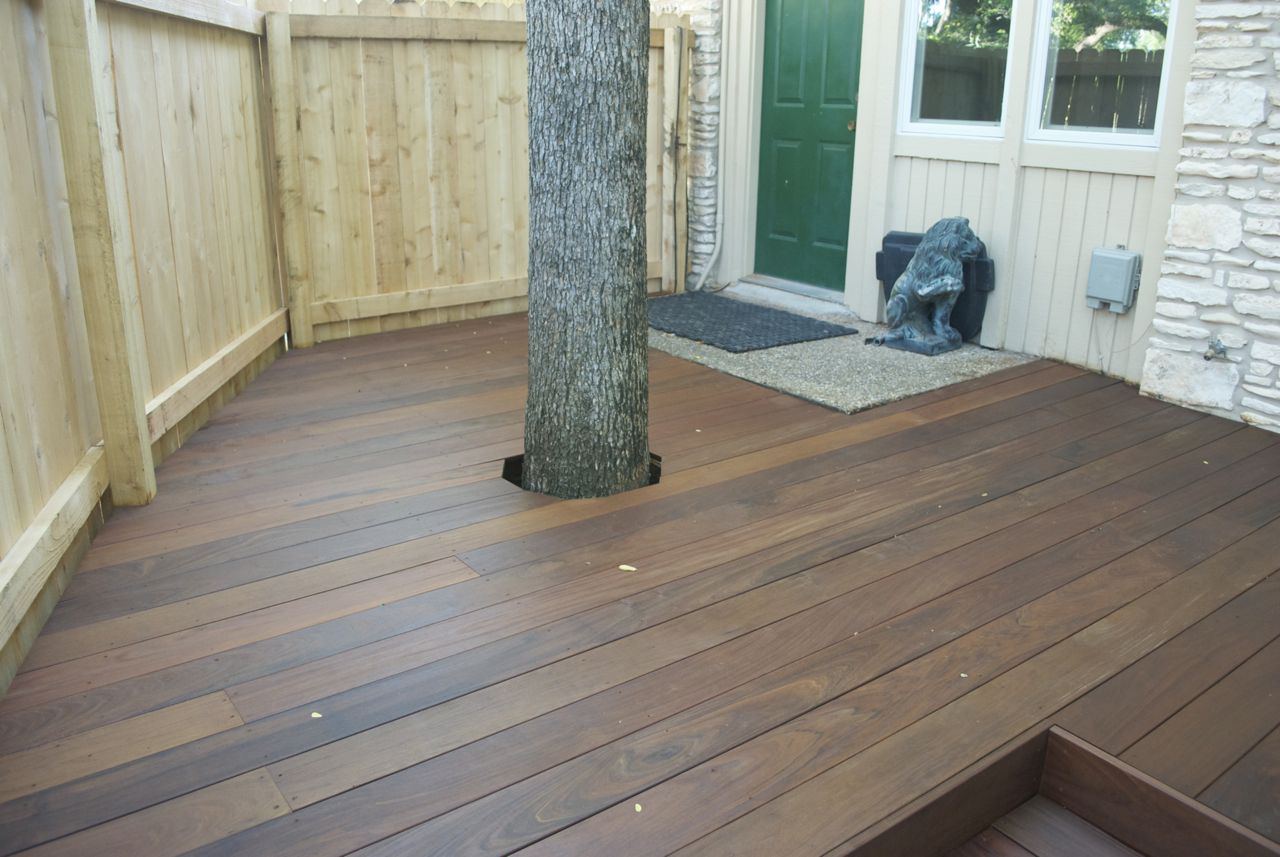
New Northwest Deck
The biggest unknown in the design was the new northwest deck that would
be along the back of the house and over the area where there was the
new drainage pipes. There used to be a concrete slab in this area,
bnut that was removed to help the drainage many years before. It was
unclear how the structure of the new deck and the drainage pipes would
interact, nor was it clear that it was possible to make the deck the
same height as the other decks. It was probably a week into the
project before the carpenters began to contemplate how to solve this
problem.
It was about this time when it became clear that the new drain pipes
would be in the way of the new deck structure. Rather than the 12
inch trench initially dug for the pipes, the entire area would need to
be dug out 12 inches deep to allow pouring some concrete footers and
adding some joists. Once that was excavated, the pipes would need to
be put under that, buried another 12 inches. I also had to make sure
there was enough gap between the ground and the deck joists so that
water could flow under it. I was very afraid that the deck blocking
water flow would be making my drainage issues worse, so I made sure
that there was enough clearance.
This new deck would be adjacent to a couple stairs that go up to the
pool. These stairs are very stylish curves shapes, which looks nice,
but complicates the deck to stair transition. My early designs
attempted to fill in as much of the nooks and crannies as possible.
Realizing that this could greatly complicate the structure, I decided
to keep it straight and deal with the leftover "nowhere land" at
alater date. So I told the carpenter to make the deck a rectangle that
was as wide as possible without running into the stairs.
Update from August 22, 2013: See the
Deck Perimeter Project Page for what
was eventually done with the left over "no man's land" next to the
northwest deck.
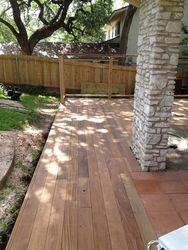
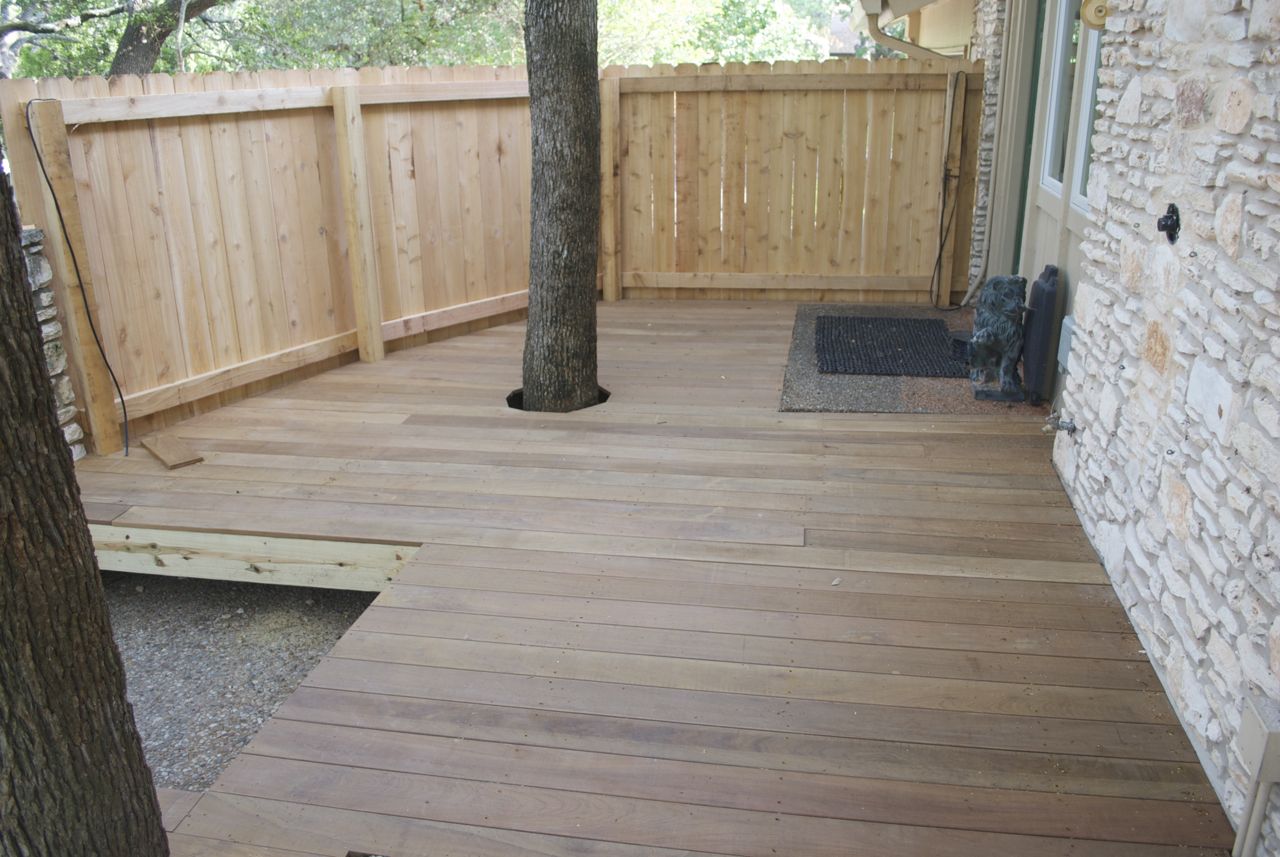
New northwest deck completed
Northeast Deck
Transition between northeast and new deck
Reconstructed frame on northeast deck
The northeast deck is where the hot tub used to be and would be the main
useful living area of the deck. Most of the existing deck frame could
be reused as it was built to support 500 gallons of water in a hot tub
(which is probably about 5,000 pounds of weight). However, at one end
there was some joists that needed replacing and this also was the area
adjacent to the new deck. The new deck framing thus flowed into this
new section of decking
Northeast and southeast decks
A nice result of all this was that the northeast deck wound up being a
bit larger than it used to be and than my designs called for. On the
south side, it was about 6 inches wider due to not needing stair hand
rails. On then north side, it was wider to align with the new
northwest deck width. Finally, on the east side, for some reason it
wound up being about 4 inches wider, I think this was due to the
vertical posts for the deck screen being on the outside, instead of the
inside of the outer-most joist.
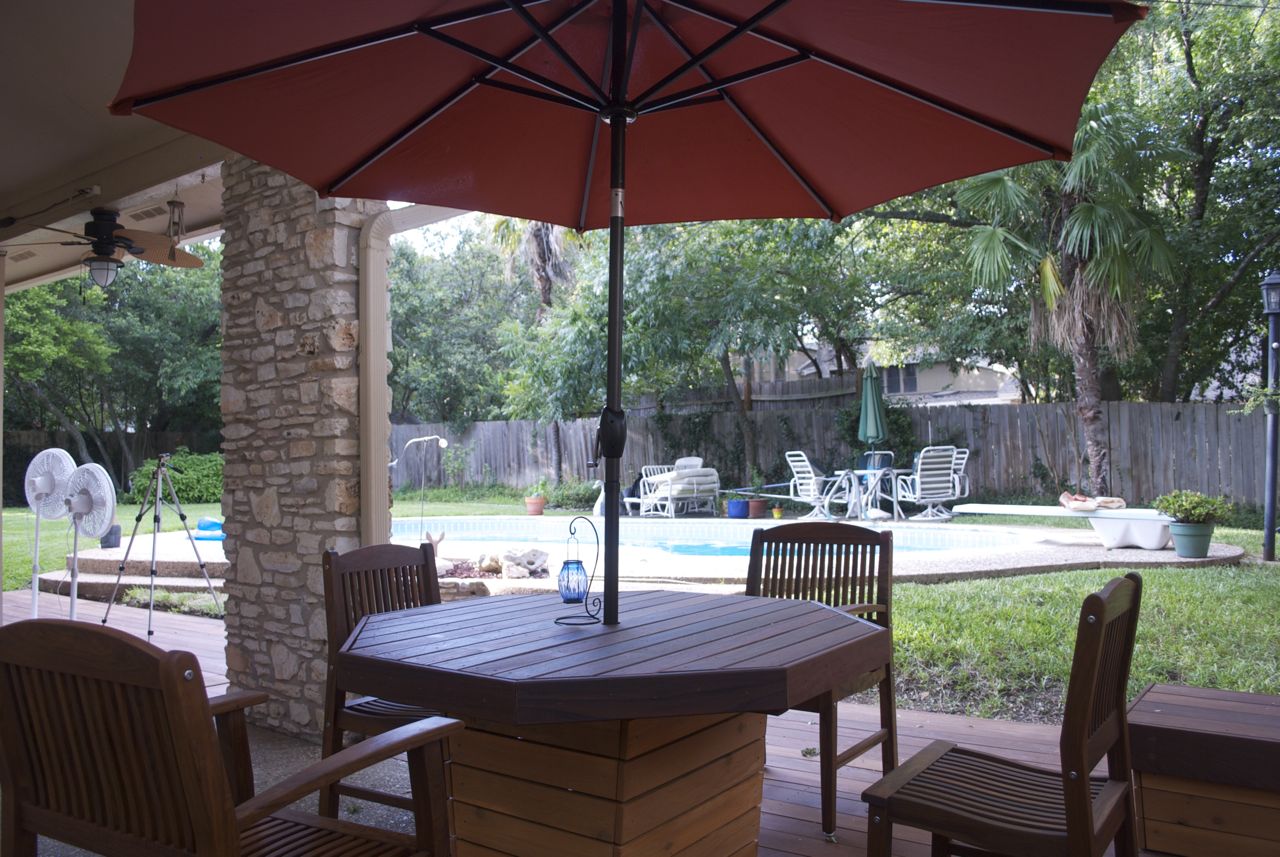
Electrical Work
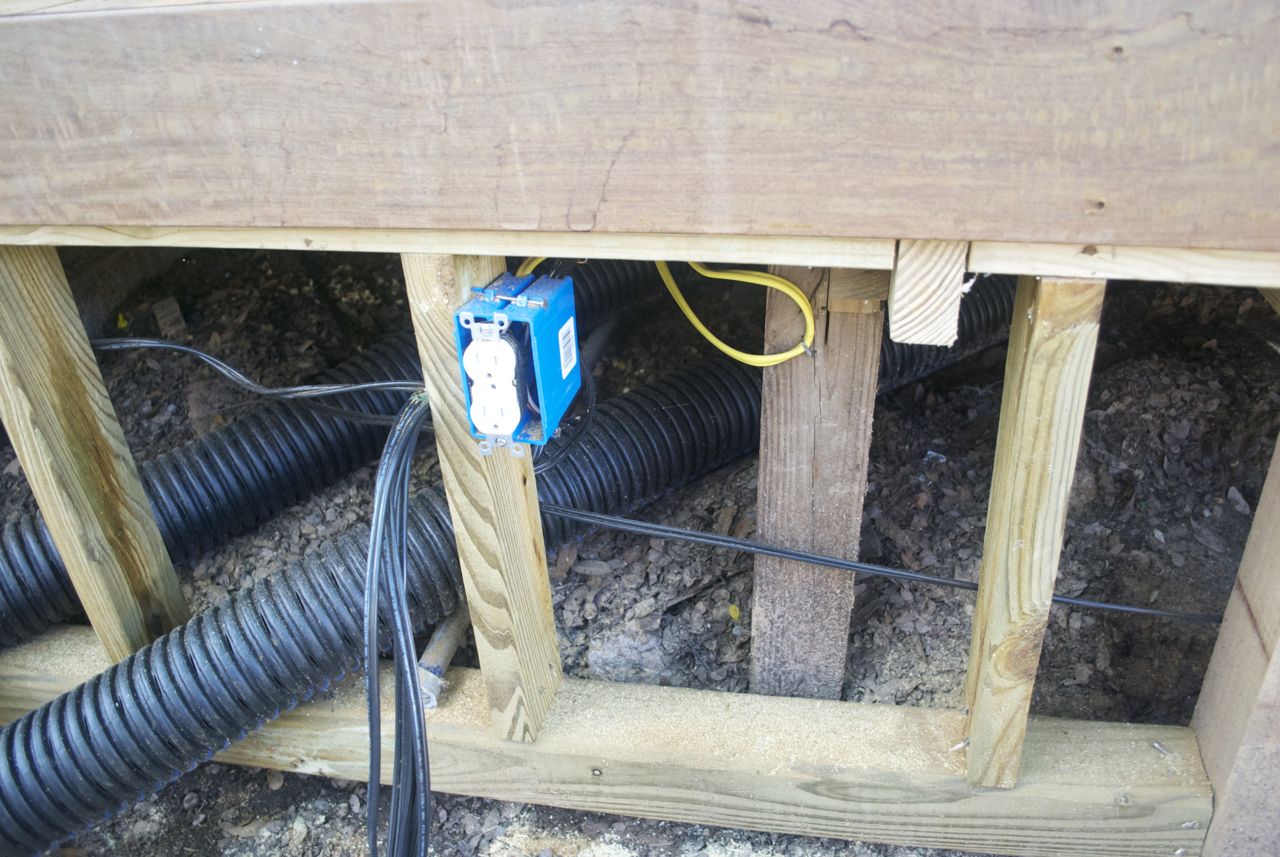
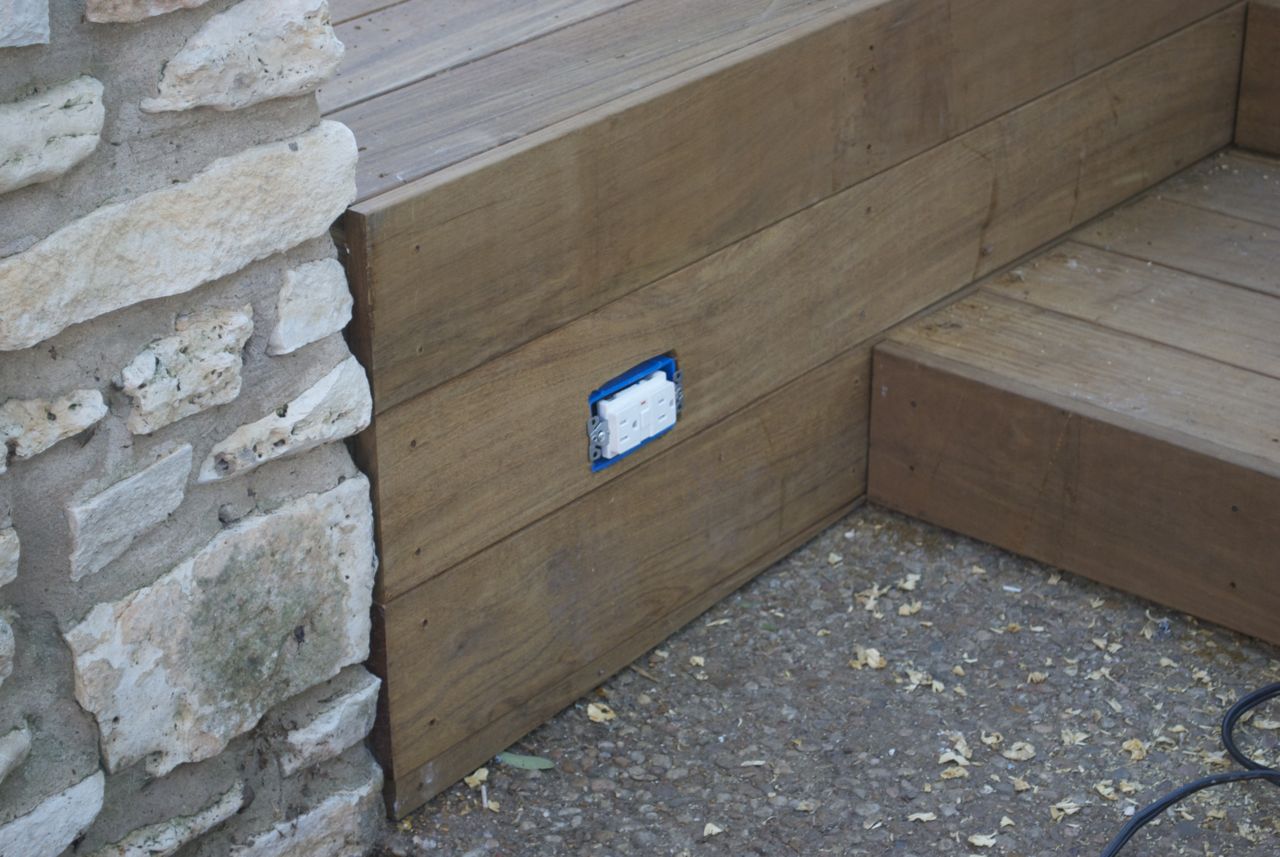
Outlet for proposed transformer
Out by stairs for working
The old deck had an outlet on one of the walls, which was handy at
times. I wanted to retain an outlet, but move it to the other side of
the stairs since that was where I would need it the most. I plan on
putting an outdoor table to serve as sort of a workbench for outdoor
projects. I'd rather not have cords running across the stairs while I
am working.
Although I had not decided the exact deck lighting, I decided to run a
ton of low voltage wire (12 gauge for safety) to ensure that I could
accomodate any solution. Thus, in each major corner is a wire and they
all run to a home location, which was planned to be the location of the
AC to DC transformer. This was on the lower back wall of the northeast
deck. Therefore, I would also need an outlet near where all the low
voltage wires terminated so I could plug in a transformer. I was still
not sure how this would work as a transformer in this location would
not make it easy to turn on and off. More about the lighting solution
follows below.
The other electrical work needed was terminating the 220V wires that
used to power the hot tub. I had disconnected the hot tub and had the
circuit breakers off, but I wanted these wires to be "professionally"
terminated in a junction box. I did not want to remove them as I might
find the need for 220V power for something else one day (car charging
station?) and wanted to leave my options open.
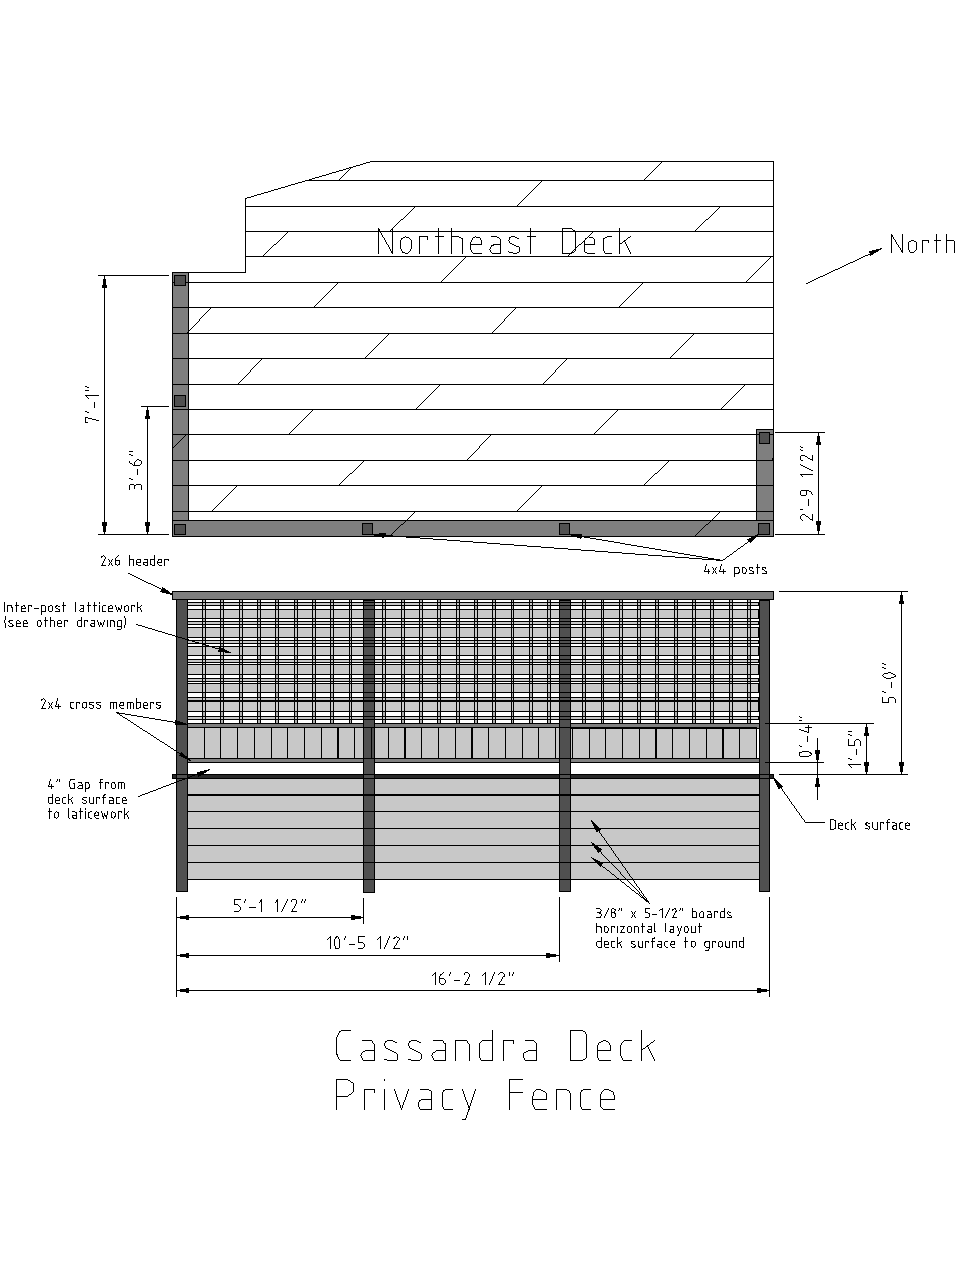
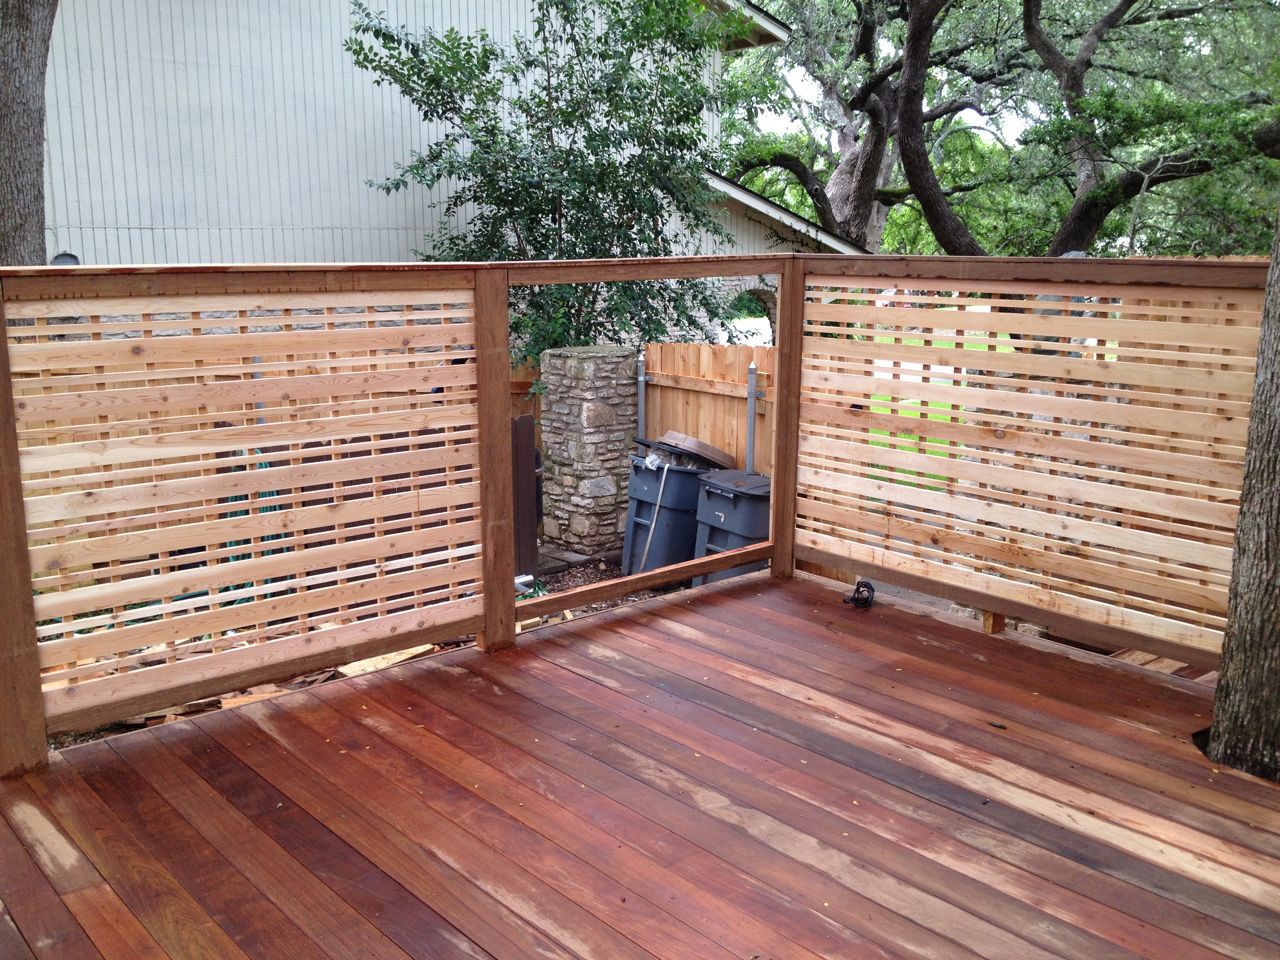
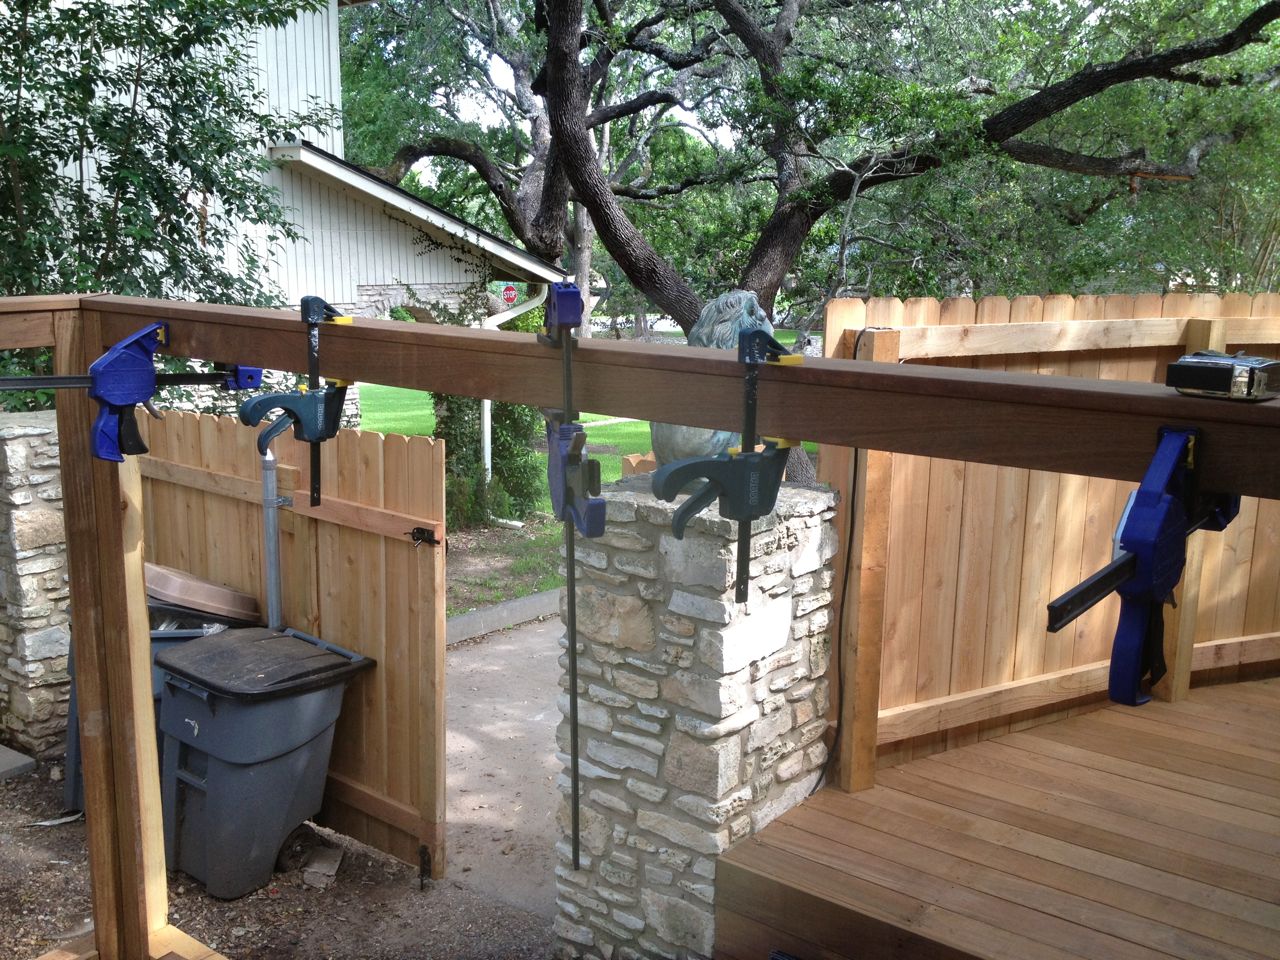
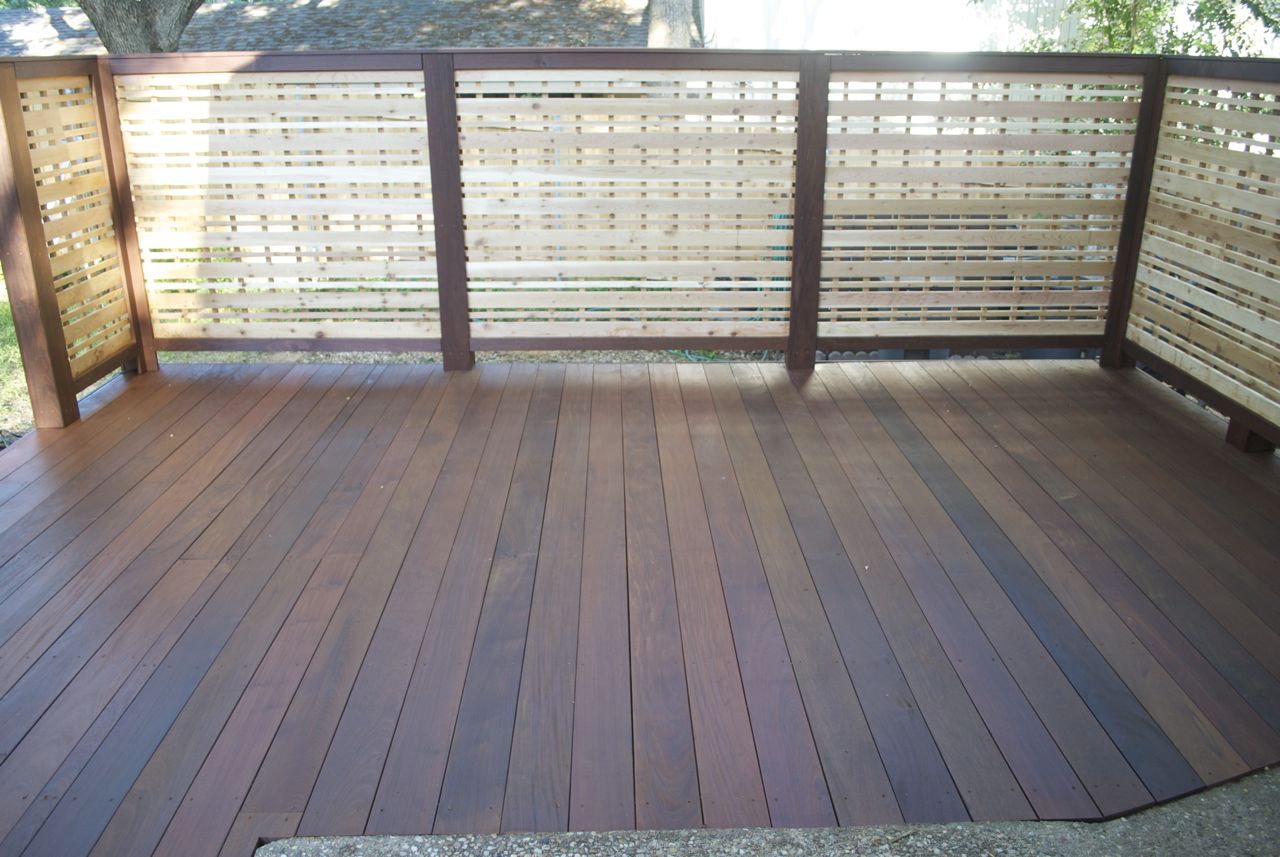
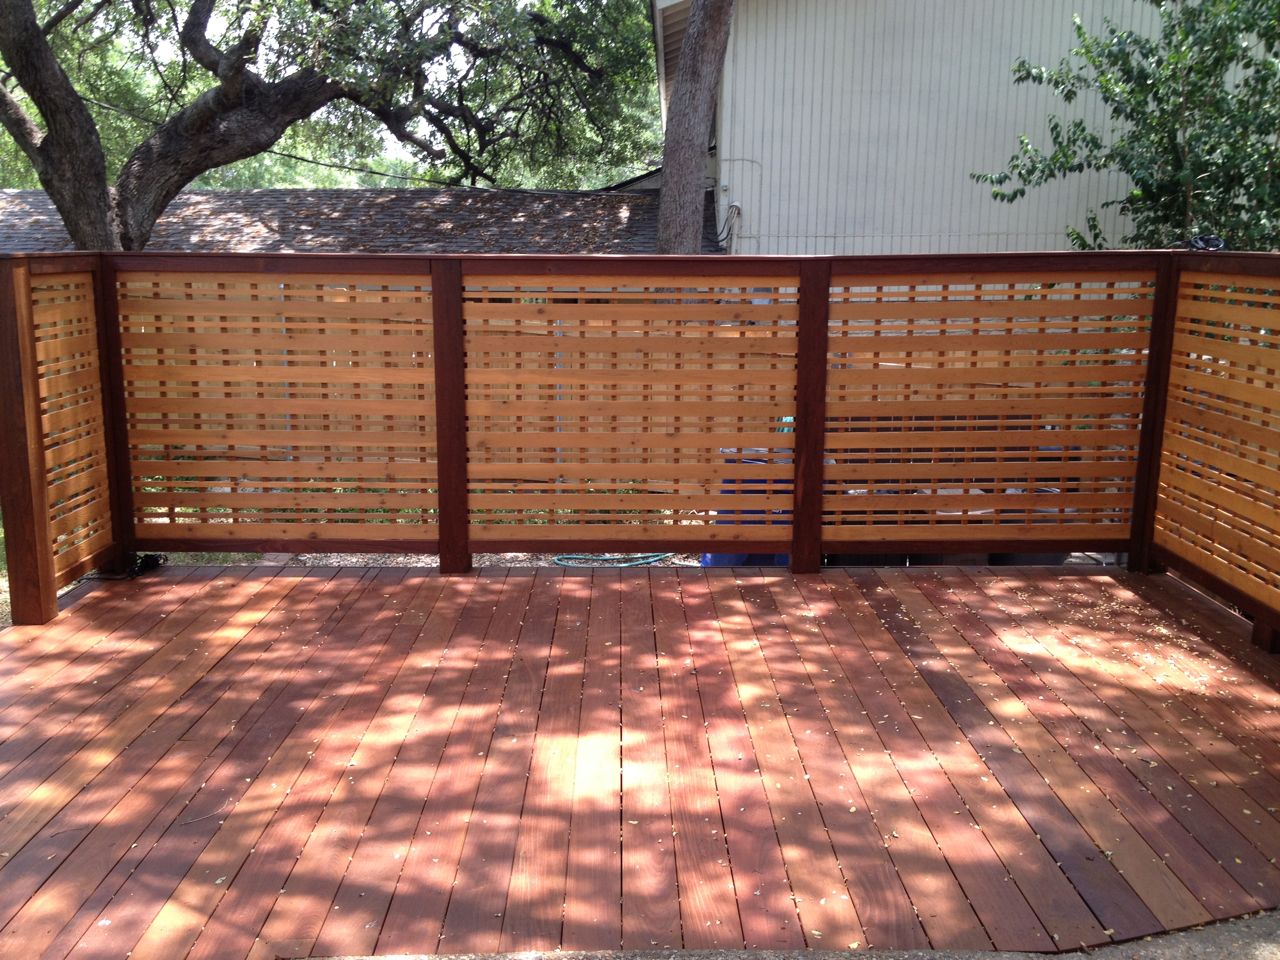
Deck Screen Installation
After 3 Screens Installed
As seen in the pictures above of the completed northeast deck, all that
the contractors did was to provide a 4x4 and 2x4 frame for me to finish
the deck privacy fence. The day after the carpenters finished I was
ready to install the trim and lattice work, but more about this work
can be found on the
Deck
Screen Project Page.
Deck Oiling
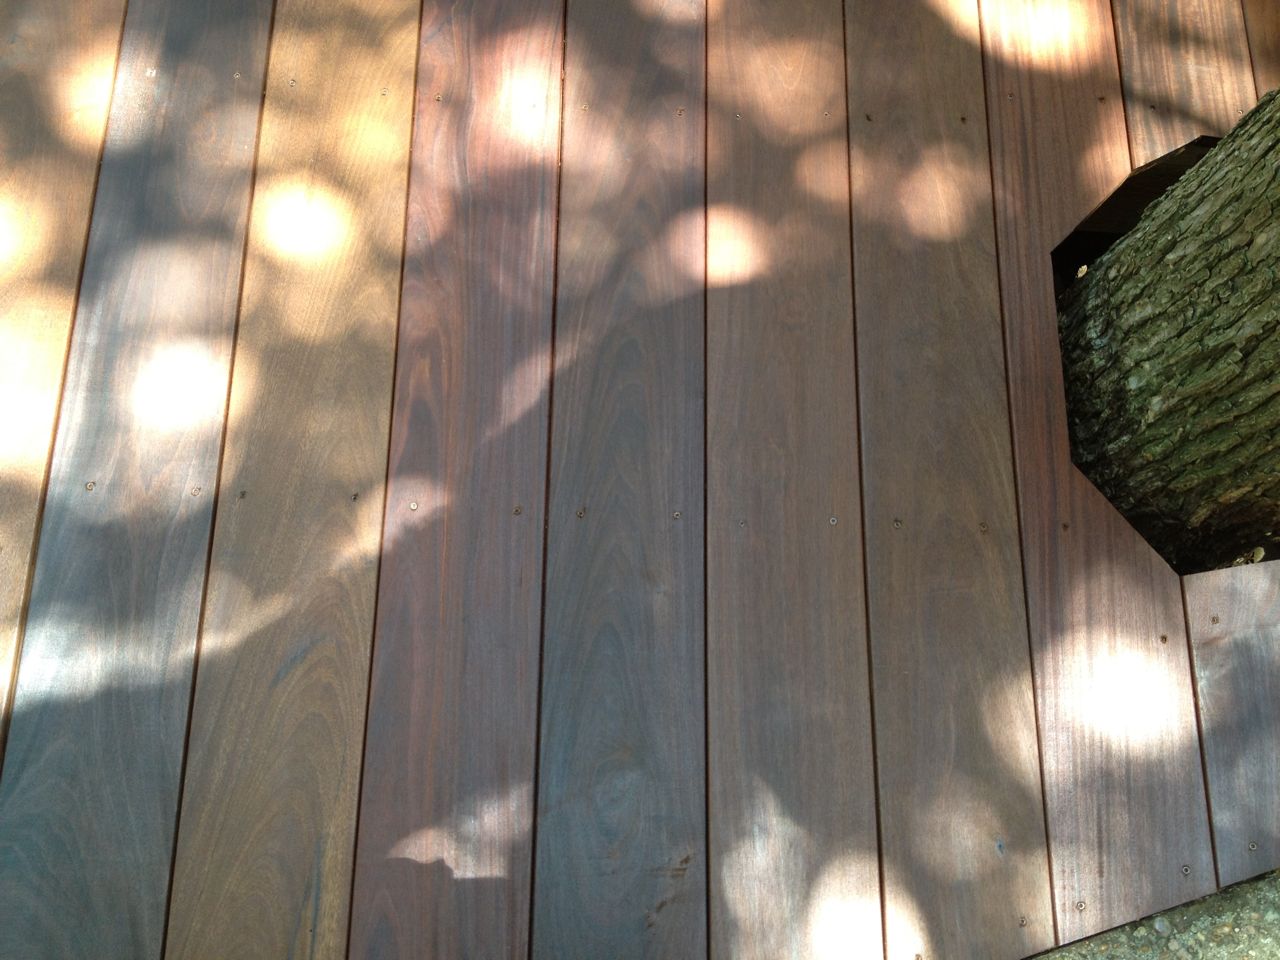
Post oiling Ipe color variations
Contrast: before and after oiling Ipe
With the Ipe deckboards and deck screen trim Ipe boards in place, it
was time to apply oil to the Ipe. You can leave Ipe unfinished and it
will weather to a grey color and last just as long (som say 70 years or
more), but if you oil Ipe, it takes on a much more elegant and pleasing
color. Thus, we decided we would oil the Ipe, which means this also
will need to be done about every couple years (as most wood decks need
to be).
Ipe also has the nice quality of not being monochrome in color. It can
vary from dark brown to light brown, and even be reddish or greenish.
The picture at right shows one area where there is a particularly rich
variation.
For me, I visually had an image in my mind of what I hoped the decks
would look like, and it was not until we finished oiling them that I
would be able to see that vision realized. I was very eager to oil the
decks, but had to wait for a window of time where there would not be
rain for 48 hours.
To apply an oil finish (in general) you put it on liberally, but
uniformly, and let it sit for a bit (about 15 minutes), then you wipe
off the excess. The more the wood absorbs the oil, the less critical
it is worry about wiping up the excess. However, Ipe is famously very
dense and does not absorb that much oil. Therefore, if you do not wipe
off the excess, you wind up with a very sticky surface that will act
like glue for all the dust and dirt. I have about a half dozen people
warn me about this, so I made sure we did not leave the oil sitting too
long.
Northeast and southeast decks
Backside of deck and stairs
Deck Screen and Fence Staining
Front fence after staining
Deck screens after staining
Next up was the staining or painting of the deck screen. I write
"staining or painting" because I am still not entirely sure what to
consider the product we used. Details of this, including how we came to
decide on this particular color can be found on the
Deck Screen Project Page.
Deck Lighting
The details on the deck lighting were the last thing that got settled
on and was not fully settled until the
Deck Furniture
Project was just about completed. I was eager to install the
furniture, but it would be in the way of installing deck lighting, so I
had to get that sorted out firts. You can read all about the details
on the
Deck Lighting Project
Page.
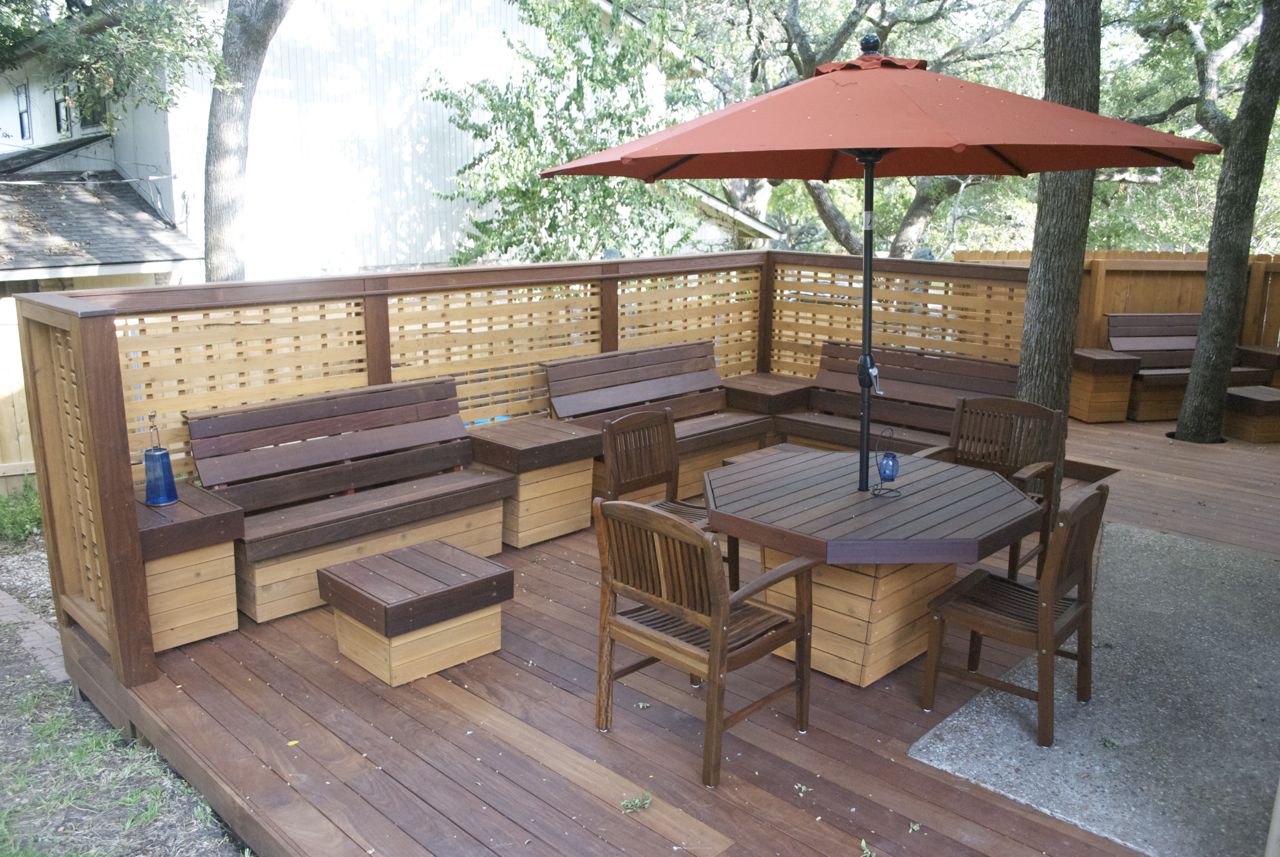
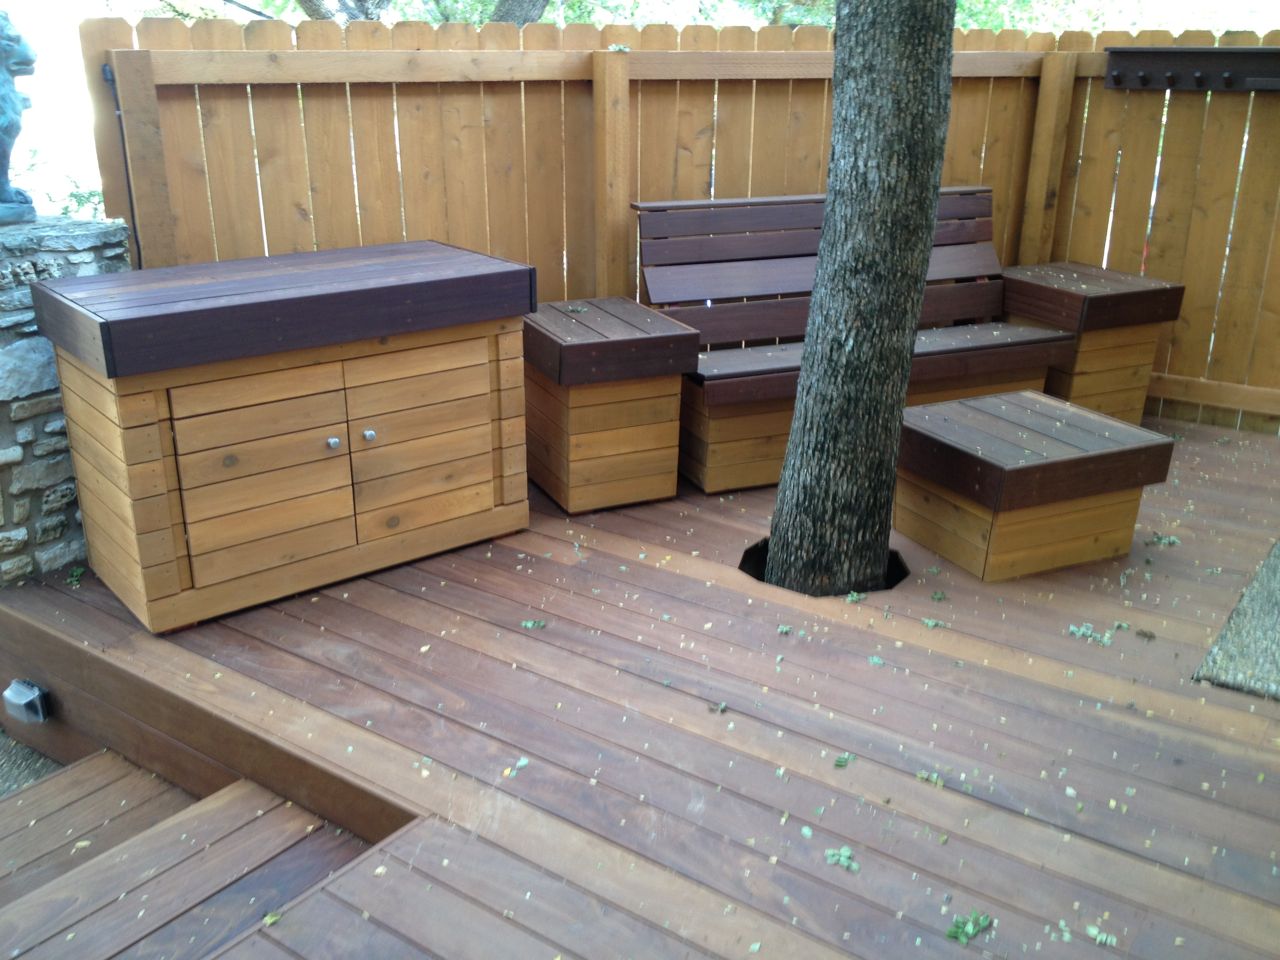
Deck Furniture Installation
Finally we come to the last step and the culmination of years of
planning and months of coordination, problem solving and work:
installing the furniture. This completed the grand, initial design.
The furniture was built with one large initial phase and then a series
of incremental work. Read about the details of all this on the
Deck Furniture Phase
I and
Deck
Furniture Phase II project pages.
Porch (adjacent to decks) furniture
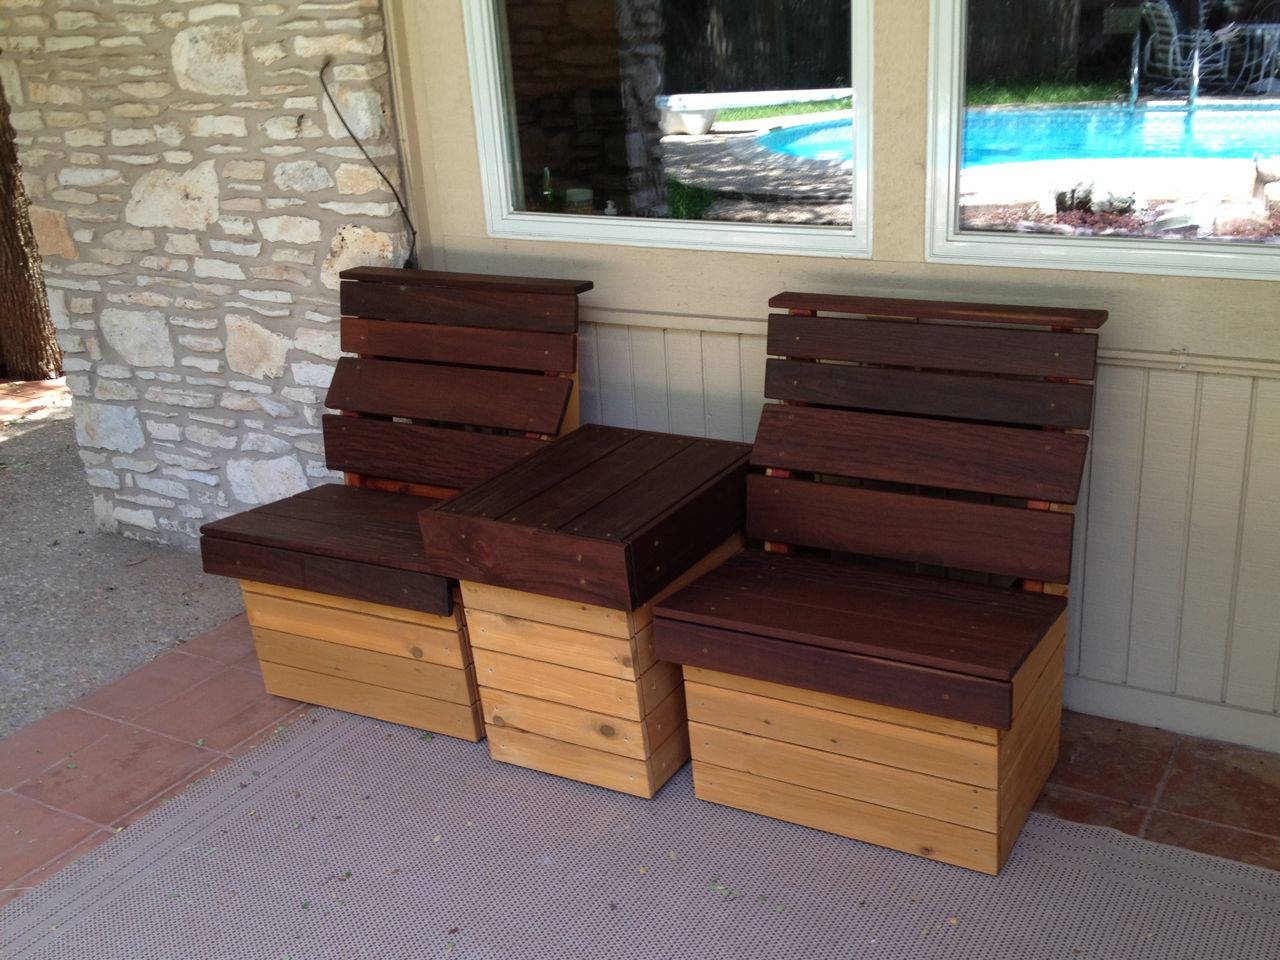
In summary, here is all the deck furniture that got built and
installed with the quanities in parentheses:
- (4) 5 foot long benches
- (2) 2 foot long benches (chairs)
- (4) Small side tables
- (2) Large side tables
- (3) Ottomans
- (1) Dining table
- (4) Dining chairs (store bought)
- (1) Work bench and cabinet
- (1) Clothes/towel drying rack
 Cassandra.org