 Cassandra.org
Work In-progress
Final Result
Story
In 2010 we still had a very old, not very good, and not very big
CRT-style TV. We do not have cable TV and the broadcast channels we get
from the antenna are certainly not worth upgrading for. However, there
are Netflix movies to watch, and I can stream every baseball game over
the Internet. So we definitely did not need a new TV, but we most
definitely did need a new computer with a very big screen. TV is very
20th century, and we like to think of ourselves as a modern family. The
nicest part about this plan was that we could get rid of the clunky thing
that back in the day was known as a "TV stand", and hang the large
computer screen on the wall like any self-respecting 21st century family
would do.
A key part of the plan was to reduce the clutter that usually
accomplishes a "home entertainment system". A TV stand is clutter. A
receiver is clutter. Speakers are clutter. And the requisite computer
to drive the screen is also clutter. Worst of all are those unsightly
an mischievous wires that can absolutely ruin a room's feng shui. These
are things that should not be seen, but do their job in some out of the
way location. Therefore, instead of the simple plan of purchasing some
equipment and plugging it all in, we are now in the realm of a serious
house reconfiguration project. Wires need to run through the walls,
speakers need to be in the walls, TV has to hang on the wall, and the
equipment has to be elsewhere in a closet, but controllable from a cozy
sofa position.
Construction Phase
Prior to the "work" part of the project is the research, planning and
purchasing of all the equipment. The section following this one has
details about those phases, but first let's overview what happened with
some pictures.
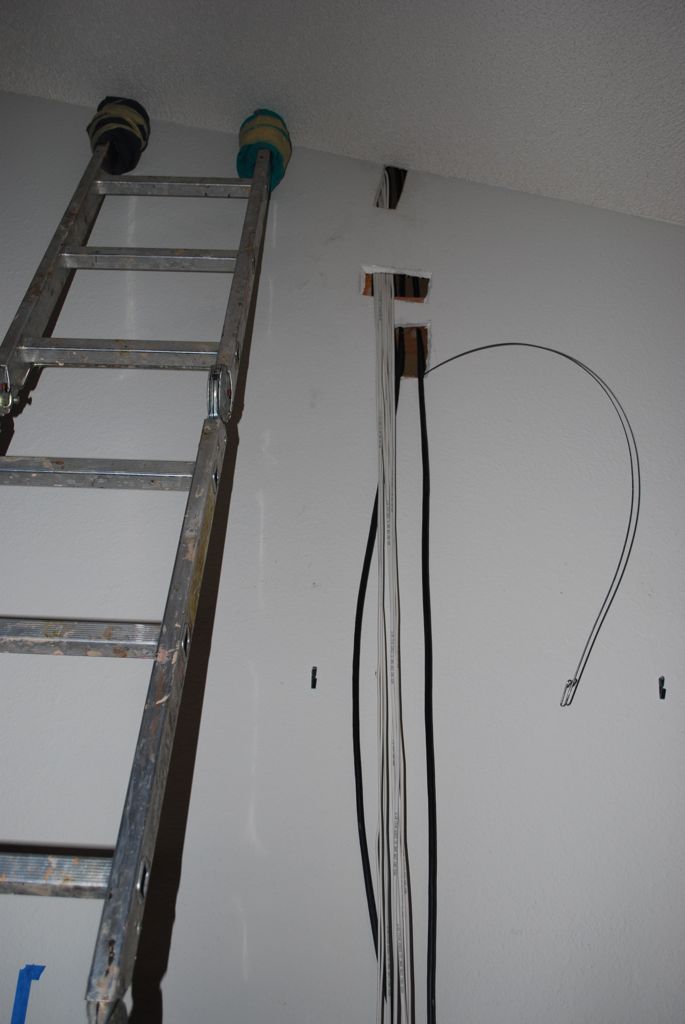
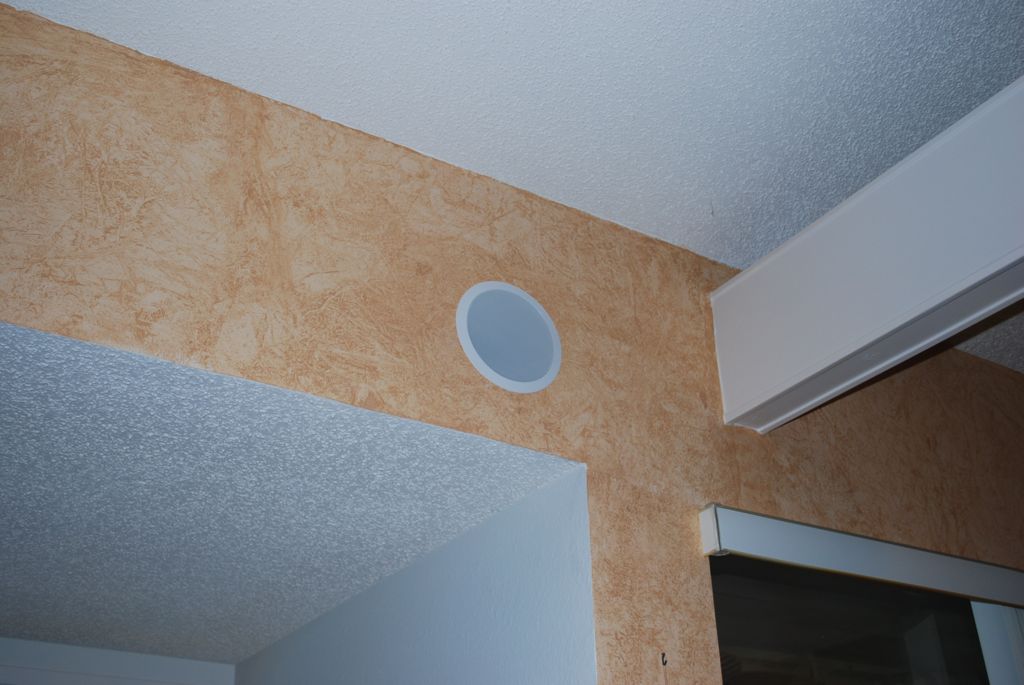
Closeup of Wire Portals
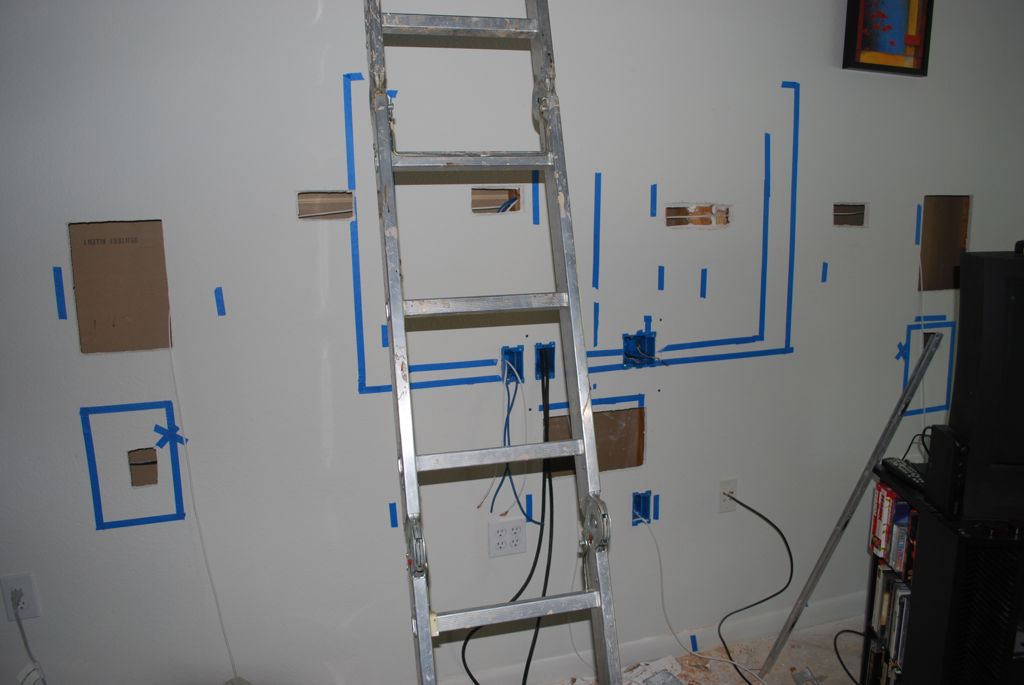
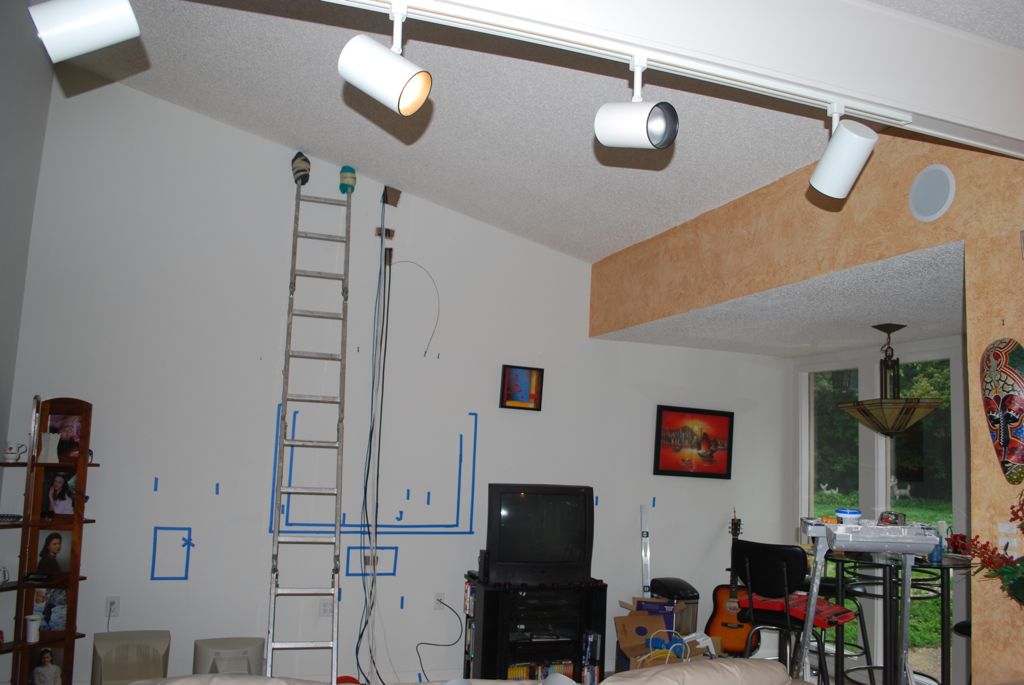
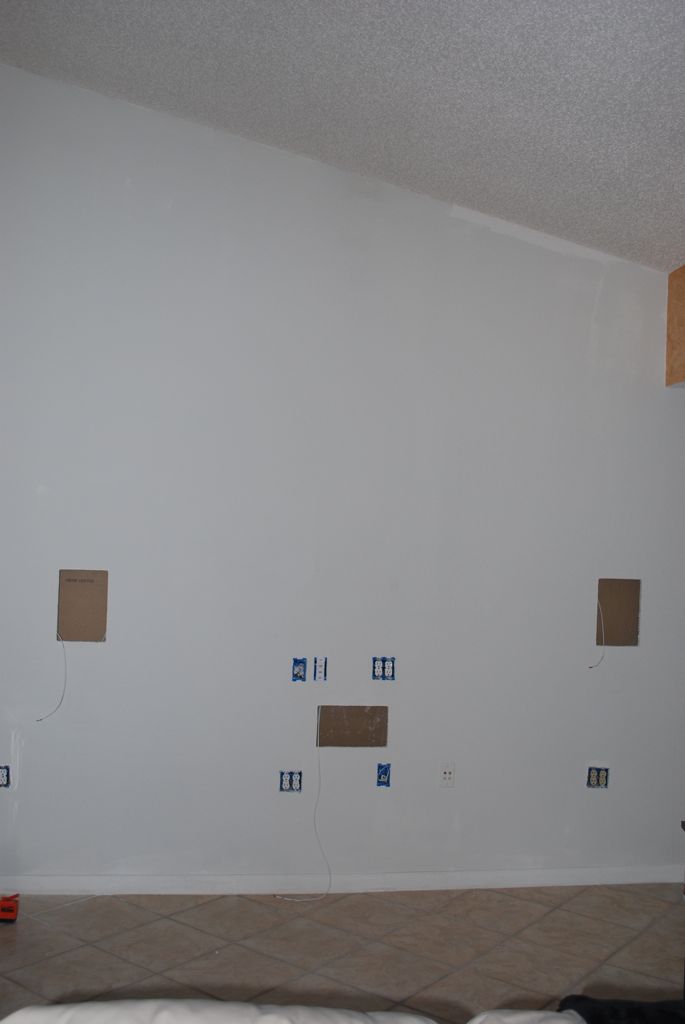
Layout and Main Wire Portals
I began by using blue masking tape to mark where everything would go
and I also used vertical strips of tape to marke where the wall studs
were.. You want the screen at the optimal height, and there's actually
formulas for the perfect height and angular distance for the left and
right speakers. Due to wall studs, I had to compromise on the ideal
angle since the speakers can only be installed between studs and it was
more important to me that the speakers be symetrical around the
screen. You can see the 'X" in the picture where the "ideal" center of
the speaker should be vs. where I had to put it to accomodate the wall
studs. Note that the plans call for all 3 front speakers want to be at
ear level as recommended. I explain later why I had to eventually
compromise again due to constraints.
I did all this research, performed the calculations and measured it all
as you can see in the pictures at right. You'll notice a double line
where the TV screen was to go. This is marking the extents of both a
48" and 55" screen, since I had not yet purchased the TV when this
project was started and was unclear what size to choose.
You can also see the access points (wire portals) where I opened up the
walls and the "fish tape" coming through one of the holes.. In the
closeup of the portals, you'll notice there are 3. The first at the
very top was first made, and I expected to encounter a beam there, but
did not. The lower two straddle a double beam header. My drill bit
was not long enough to go through both, so I had to drill from both
sides.
Right-rear Speaker Installed
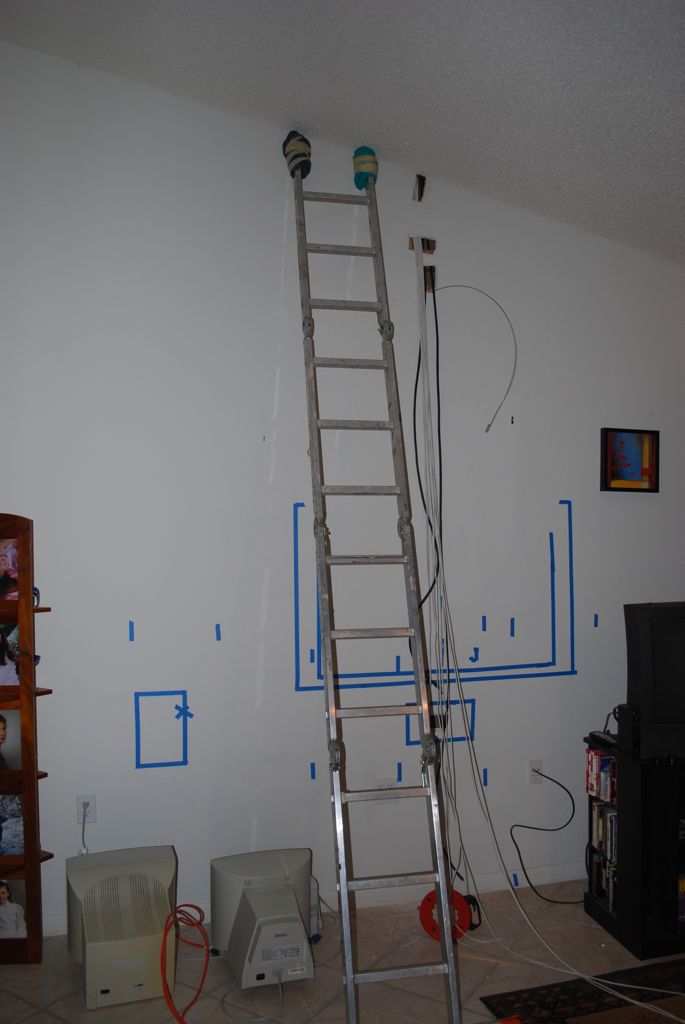
Wide View of Project
The main wire portals lead up into the attic, but it is a crawl space
that normal humans cannot get in. The closest you can get is about 8
ft, so I enlisted a friend to help. Using apole, some coat hangers and
a lot of patience and trial and error, we were finally able to get the
fish tape in the portal and accessible from the attic so we could pull
all the cables through. There would be 10 cables in all: 2 HDMI
(thick), 2 CAT-6 (kind of thick), and 6 speaker cables (left, front,
center, subwoofer and 2 extra)..
As tough as fishing for the wires were for the main portals, the right
rear speaker was 10 times harder. The attic access above the wall it
was going in was to that same unreachable space, but now there was a
good 15 feet from the nearest accessible spot in the attic. We doubled
up on the pole length, which added a lot of flex. My friend struggled
mightily in the attic, while I was feeding the fish tape upwards,
hoping he could see and latch onto it. After lots of frustration, a
couple close tries and ones that got away, my friend did the impossible
and hooked it up. This was the first speaker we installed which you
can see in the pictures on the right in the upper right..
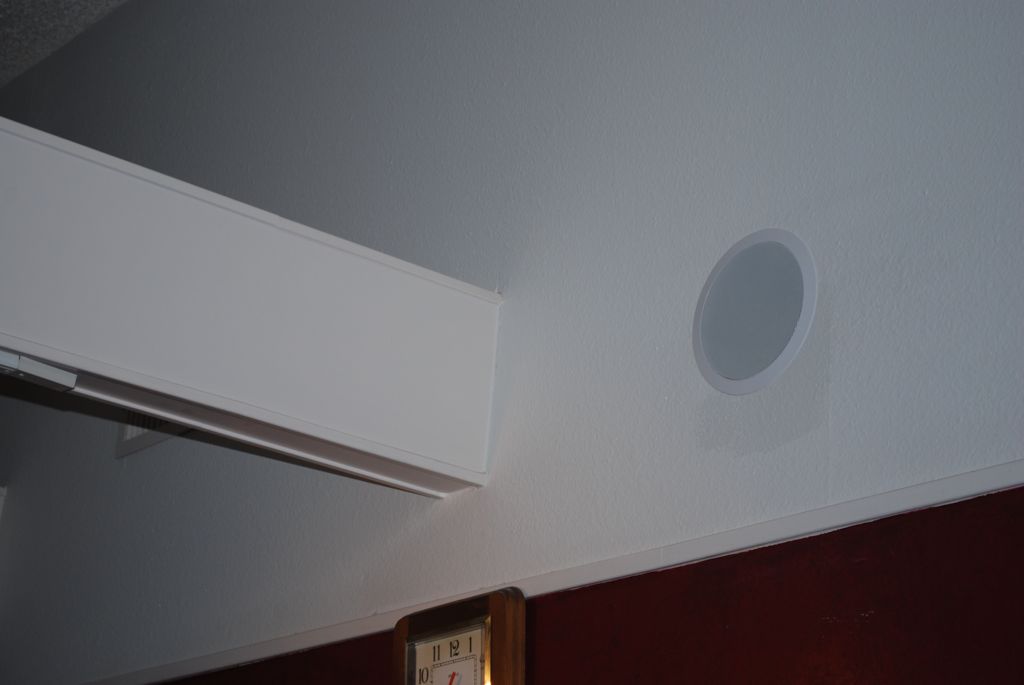
Left-rear Speaker Installed
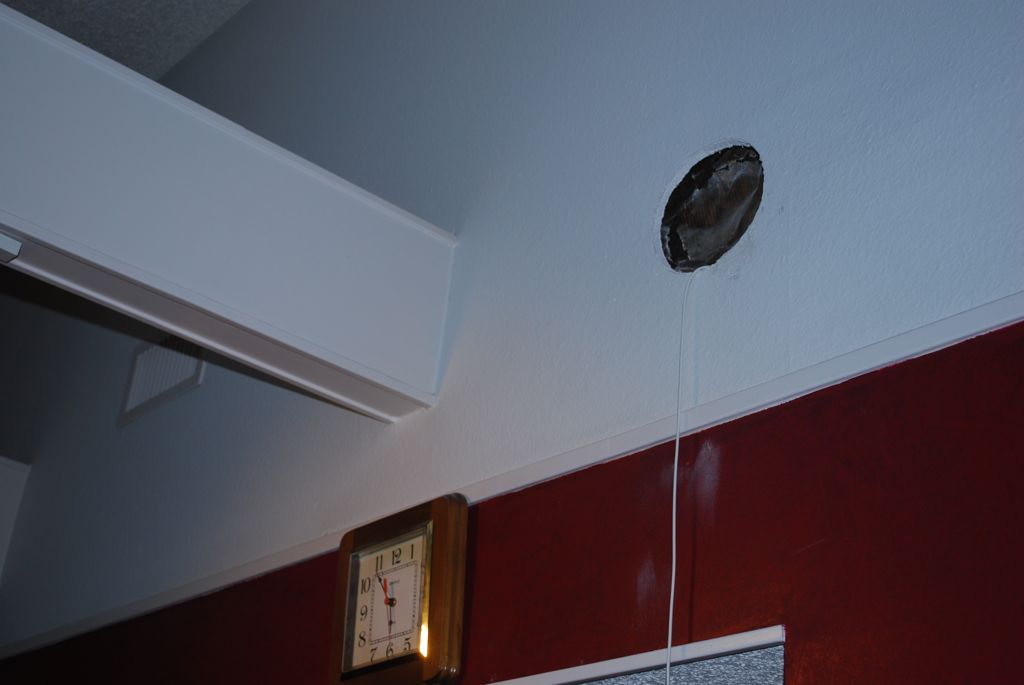
Left-rear Speaker Hole
The left-rear speaker was the complete opposite of the right-rear install:
simple as can be. The wall it mounted on is directly accessible from the
attic: right in your face when you get up there.
You might notice that the paint to the lower right of the speaker
(picture at right) is not exactly matching the old paint. This was a
bum paint mix job at Home Depot. We had to eventually go back and have
it re-mixed to get a better match, since we did not want to have to
paint the entire wall..
Cutting the holes for the two rear speakers was not very risky. I knew
there would be nothing encountered when cutting the hole. But the den wall
where the front speakers went was a whole different situation. That
particular wall has all sorts of history and weirdness: you never know what
surprising await you. But at a certain point, it was time to take the
plunge, albeit as carefully as possible.
In my effort to be cautious and allow myself as many options as
possible, I started with the left front speaker, but only cut out a
small rectangle directly in the center of where the speaker should go.
I figured this would allow me to look to see what was there, and if I
needed to move the speaker up or down slightly to accomodate any
electrical wiring, I could do it and most likely the small cutout could
still become part of the bigger speaker cutout. I hit the worst
possible luck: the electrical wire was running dead-center across the
hole I made: no matter what, I would now need to patch this hole as the
speaker could not possible cover it.
Speaker and Wire Holes Cut
Moving the left front speaker to be below the electrical wire would put
it way too low, so the only way to go was up. I wanted to get
sufficiently above the wire to ensure no electromagnetic interference.
However, before opening up the hole, I wanted to see what the right
front speaker had at that height. So I did the same trick of cutting
asmall hole in the center of where I wanted it to be (in the newly
revised height). More bad luck, another electrical wire. This was
running just above the test hole, so I had to move the speakers up even
further to avoid the wires on both sides. You can see this sorry
situation in all the details in the picture at right: where they should
have been, the test holes and the final cutouts for the ultimate locations..
In the picture you can also see the line of horizontal holes I needed
to make to run the wires from the main center channel, where they
dropped down from the attic, through the studs to their left and right
locations. This was a bit of a pain, especially at the point in the
wall that contains 4 studs all ganged together with an added layer of
1/2" sheetrock between them (I told you this wall was full of surprises).
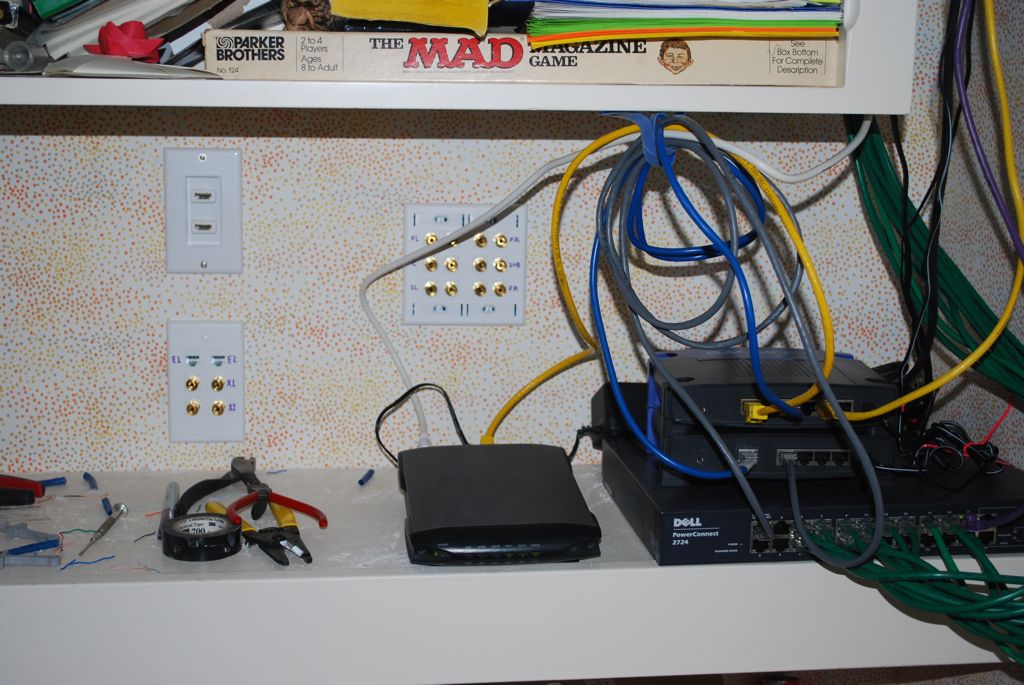
Final Closet Outlets (and computer network equipment)
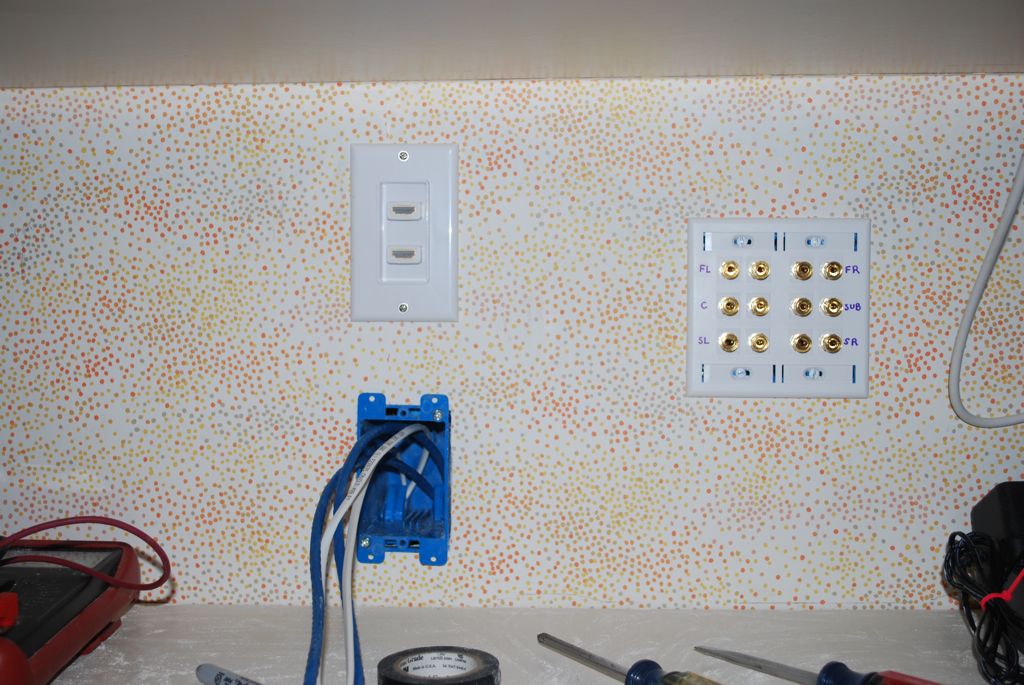
Closet Outlets in Progress
With all the wires running from the den, I dropped them down into the
closet, opened up a few holes for the wall boxes and began wiring up
the outlets and installing the face plates. The in-progress picture
shows the HDMI and main speaker outlets completed, and the CAT-6 and
extra speaker wires still being worked on.
You'll notice the computer networking equipment in the picture at
right. This is where the cable modem, firewall and internal house
network switch are located. All the cables for that run through to
each room in the house, but that was part of a previous house wiring
project.
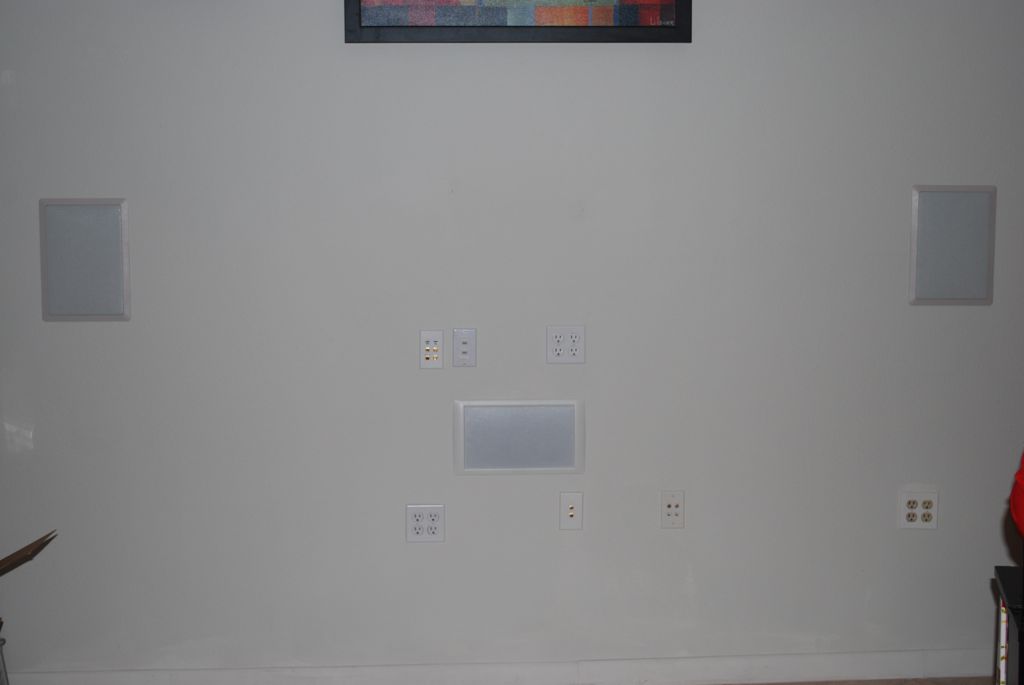
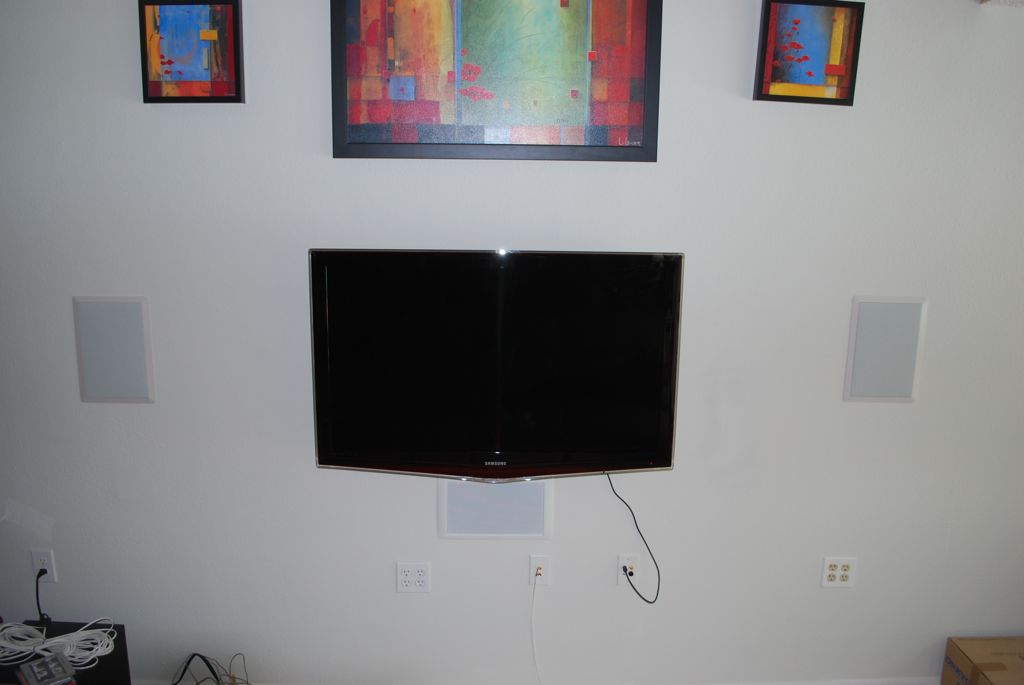
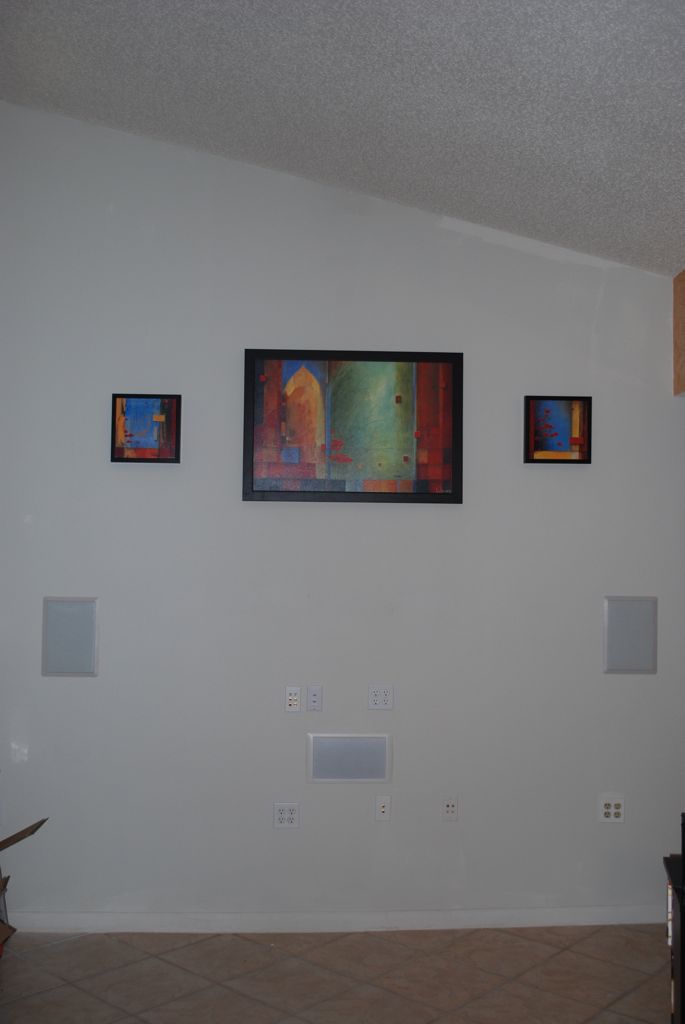
Final Wall minus TV
Prior to Speakers and Cover Plates
We closed up all the holes, did the obligatory spackling, sanding and
painting and could reinstall our paintings. At this point, we were
still waiting for the TV and its mounting bracket to arrive (they were
ordered though).
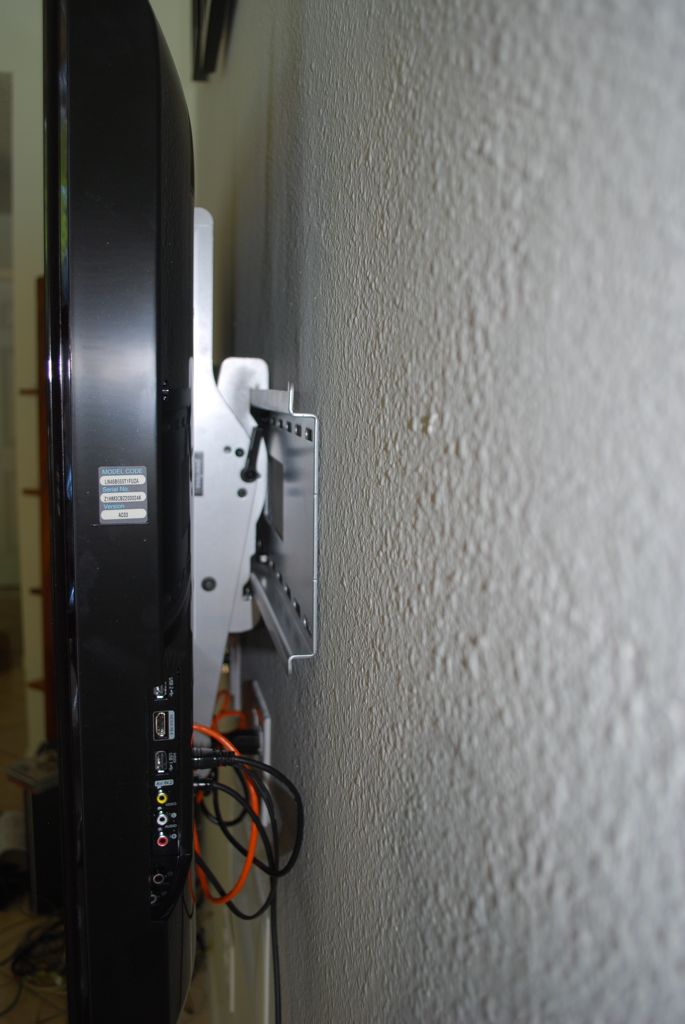
Closeup of Bracket behind installed TV
Final Result (temporary coax connected)
Everything but TV
Figuring out the TV bracket was way more complicated that it should
have been. There was a screw that was supposed to be tight, but still
pivot. We did not know this, and because it was overly tight, we
though it was a stationary thing. This made the instructions confusing
and would not allow us to do the things they told us to do. Finally,
being less tentative due to frustration, I accidentally got the thing
to pivot and finally fgiured out how the thing was supposed to work.
One of the key features I looked for in the TV bracket was a minimal
clearance from the wall so that it stuck out as little as possible.
This seems like a good idea right? Well, the reality of that deicsion
is that it is very difficult to get at all the ports ands hook it up
once it is installed. I had a beefy short HDMI cable to connect the TV
to the outlet, but it would not flex enough to fit behind the TV. I
had to buy another and use this one on the closet side where there was
more clearance.
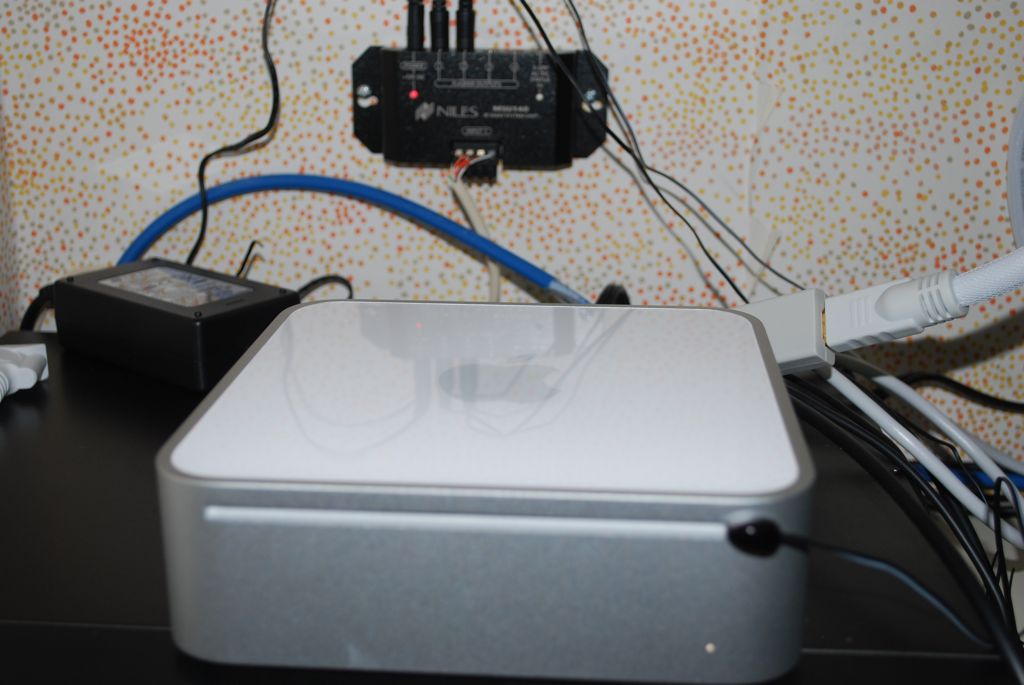
Mac Mini and IR Repeater
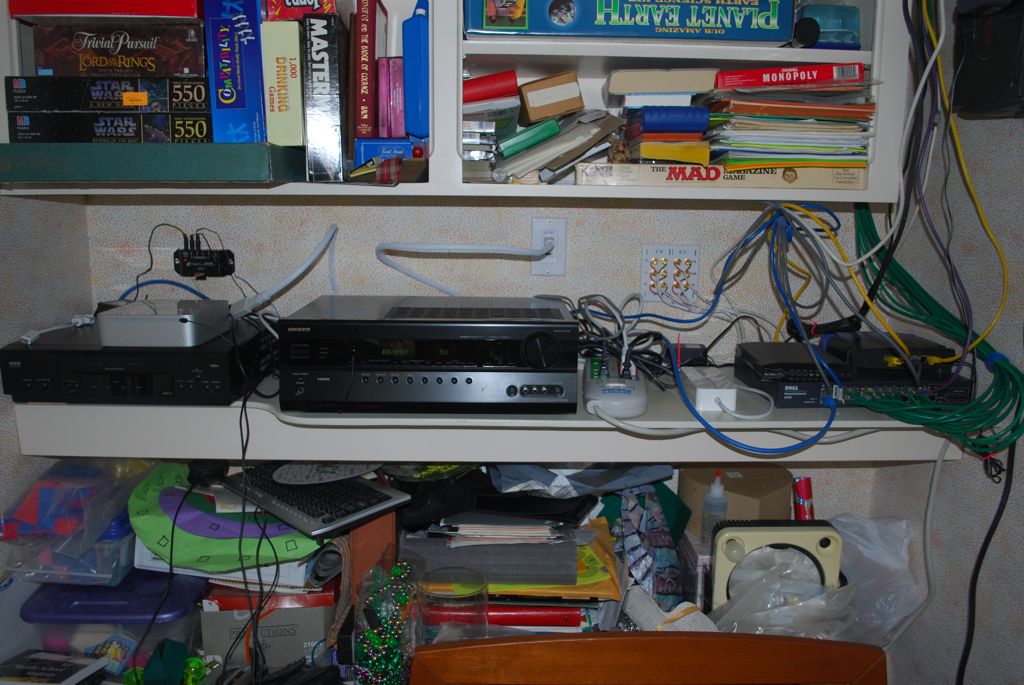
Final Closet Shelf
At right you can see the final configuration of the equipment closet.
From left to right is the computer sitting on top of a VCR (don't ask),
then the Onkyo home theater receiver, power strip and computer
networking equipment. Mounted on the wall to the left, above the Mac
Mini is the IR repeater.
Project Details
There's a lot of research that can (and did) go into designing a home
theater system, especially when you want to have in-wall speakers,
remote receivers and wiring in the wall. Luckily, there's more
information that you could possibly ever read on the Internet to help
you. I spent some time researching all the various areas of the types
of things you need and the brands and models of equipment that would be
best. I had started with a budget, but blew past that pretty quickly,
costing us twice as much as first planned. My desire for having quality
components during the planning phasewas not meshing well with my
economical mindset from the prior budgeting phase.
Let's start with a list of the equipment we need before we start
opening up the walls. I add some notes to each that summarizes the
important research points and reasons for needing the item. I bought
most of this from Amazon.com, with some additional smaller things from
the local Home Depot and Lowes.
- LCD Monitor/TV : What type, plasma, LCD or LED? Plasma was easy to eliminate, and the LEDs are nice but were not worth the cost difference at the time. What size? The 55" screens had just moved out of the ridiculous price range, and the 48" seemed to be the sweet spot of the size-cost curve. How big you want vs. how big you need is an interesting thing I found out. When the screen is bigger, the resolutions is no different, so the "dots" (pixels) are bigger. If you get a big screen and sit too close, you see dots, so you want to be far enough back that your retina is not seeing individual dots. You can find calculators that will tell you at what point a bigger TV is a waste of money. Our den is somewhat narrow, so the viewing distance is only about 10 ft. When you do the calculation, it tells you that a 55" screen is actually too large, so we went with the more reasonably priced 48" screen from Samsung. After this, there's a bazillion technical details and features to watch for. I kept this all in my brain for a few hours, decided on a TV and then forgot it all. It'll all be different in a year anyway, so no need to reatin that sort of trivia.
- TV Wall Mount : This was the most confusing one for me. How do I know what brackets will work with my TV? How do I know I'll have wall studs where I'll need them to support the weight? How much weight should it hold? It turns out that there is a standard for TV mounts, so as long as you get a TV that adhere's to the standards, you are ok. But then you find there are a bazzilion different wall mounts out there and it is really unclear why there needs to be so many. Some tilt up and down. Some can even swivel left and right on a arm. However, outside of that, there's really no need to any manufacturer to make more than 3 models. After too much work I finally found one that looked the most solid and this thing can hold over 200 lbs, while my TV only weights about 40 lbs. I tend to over-engineer things when it comes to structural decisions.
- Home Theater Receiver : TVs have built in speakers, but that will not do for this project. We need full-out Dolby 5.1 surround sound, so that means you need a home theater receiver. Like researching the TV itself, this was a task to understand all the features and pros and cons of the various models and brands. I finally settled on a middle of the road Onkyo.
- Mac Mini Computer : Everything that goes on the screen will come from the computer. Whether it is a DVD in the drive, content over the internet, or even broadcast TV, they will all be served from the computer. There was a little bit of a decision about going with a GNU/Linux machine or a Mac OS X machine. The size and quietness of the Mac mini was appealing, and I was not looking for a "project" and or a maintenance burden, which is what a GNU/Linux system would have been. The infrared remote control muilt into the Mac Mini was also a big plus, and would be one less thing to worry about.
- Computer Remote Controller : Having to use a mouse and keyboard just to put something on the TV or pause and restart a movie is definitely not wanted for this setup. The Mac Mini nicely has a IR receiver and the system itself has a lot of media-related software that can be controlled using the Mac Remote controller, which is a tiny little thing with not very many buttons. Overall, a nice way to control things.
- Wireless Keyboard and Mouse : Though the main mode of operation of the computer was to be the small remote control, there would be a need for a real keyboard and mouse for installations, setups and administrative things. The main plan was to do this via remote desktop software, since there's always a laptop around, but that would require the computer network to be functional. For the worst case scenario I got a wireless (bluetooth) keyboard and mouse. I have used this just once so far, so this may have been my over-engineering a solution to a barely existent problem.
- Speakers : This is a 5.1 surround sound setup, which means 6 speakers. Nowhere did I get the budget more wrong than my estimate for what speakers cost. I had no idea speakers cost so much. Because I was installing them inside the walls, I was relucant to by anything that I was not sure would last some time, since replacement would more than likely mean sheetrock and paint work. Also, once you narrow your search to in-wall speakers, your choices become severely limited. I finally settled on the brand Polk for all 6 speakers.
- 500 ft, 18 gauge speaker wire : The speakers are a maximum of 50 ft from where the receiver will be and that dictates needing a heavier gauge wire. This distance is when you count the indirect path through walls, up and around the attic: they are physically only about 20 ft. away form the equipment closet. I learned that all the speakers wires should be the same length no matter how far the individual speakers are so that the signal propogates down the wires at the same time so the channels are properly synchronized. I will also planned to run a few extra wires since this is the cheapest it will ever be to add more wires and you never know when they might come in handy. Finally, I found out that according to the building codes you have to get specially rated (CL3) wire, when you run them inside a wall.
- 50 ft. HDMI Cable: I ran two of these because the trouble of runing wires is significant and I do not want to have to go through the trouble to tear things up if there's a bad cable, either immediately or in the future. The nice thing about this "digital age" is that the cable between the point the signal is generated and the display (TV) can be much longer than in the old CRT-days. 50 ft is about the maximum for HDMI though, and you have to do some special boosting/repeating if you need longer than that.
- 50 ft. CAT 6 Cable: CAT 6 cable is the best choice for running in-home computer hetworks, but it can also be used for other purposes: control wires, phone wires, etc. If I was goingh throuhg all this trouble to open up walls and run cables, I might as well run a pair of these to the TV location, since TVs are becoming obsolete and computer networks are the future of home media. While I will not need them initially, for TVs that hook directly up to the Internet, I will be covered.
- Electrician's Fish Tape : Since I'll be snaking wires everywhere, and since I do not want to open any more of the wall than I have to, I invested in "Fish Tape" which is a 50 ft long, semi-rigid, retractable flat metal "snake". You run it where the wire should go, you attatch the wires to the endpoint, then you pull it back the same route to put the wires in its place.
- Electrical Outlet : If I just hung the TV on the wall, I would need to run the power cord to the outlet which is lower than the TV. This means you would see the wire runing down the wall: a big no-no for this project. Thus, the plan was to put a new electrical box in a place that was behind the TV, out of sight. The trickest part of this is that I really was not sure how the back ot the TV was configured and how the wall mount would lay out. The TV and the wall mount were the two items I did not order up front, since I figured I had many weeks before I'd actually need to install them and I had not researched or decided on these components yet. I wound up taking my best guess and trying to leave as many options open as possible.
- HDMI Wall Plate : I needed two of these: one to be hidden on the wall behind the TV and one in the closet where the receiver would be. Also, since I was running two cables, it had to be a double wall plate.
- Speaker Wire Wall Plate : All the speaker wires would terminate in the equipment closet, so I wanted a wall plate of terminals so things could easily be connected and disconnected. I also needed a wall plate out in the den for the subwoofer, which is the only speaker that would not be installed in the wall. Finally, I added an plate on both ends to support the extra speaker wires I was running. One use of the extra speaker wires is to have the TV speaker out jacks go back to the receiver. I did not plan to use this, but it would allow the TV sound to be routed to the main in-wall speakers.
- Wall boxes : For all the connection wall plates (HDMI, speaker, electrical outlet) I needed wall boxes to mount on the studs/sheetrock to hold the wires and everything in place. In all, I used a total of 7 boxes: 2 HDMI, 2 speaker, 2 speaker/CAT-6, and 1 electric.
- IR Relay System : Both the receiver and the computer will
ultimately be controlled by remote controls using infrared. However,
the equipment is not in the "line of sight" if you are watching the
TV, and is in a closet, behind closed doors. What to do? I had
thought I was going to need to do something clever, but then found
out that folks have already solved this problem in a few different
ways. The method I found looked to the the most flexible and
reliable is to "relay" the IR signal from a point in the direct line
of sight to the closet. This requires 3 components:
- Infrared Sensor : This mounts in the line of sight, on the wall just below the TV. It is what you point the remotes at. It is connected (via wire in the walls) to the closet. I used an existing CAT-5e cable that was already run in the wall and just replaced the RJ-45 connector on the wall plate with this very small sensor. Installed the CAT-5e cable throughout the house was another previous project that I undertook (with some help from my friends) many years back.
- IR Repeater : This is what relays the signal. It takes the signal sent from the sensor and re-broadcasts it to the IR Flashers which are...
- IR Flashers : These are tiny little things with a wire connected to the repeater and that have an adhesive on them. You mount them directly over the IR receivers of the devices (computer and receiver). The main trick here is finding where the IR receivers are since the manufacturers of the devices tend to make them hard to see. Holding them up to a bright light helps.
- SiliconDust HDHomeRun : We do not have cable TV with no plans to ever get any, but we do have an antenna in the attic with pre-existing coaxial cable running around the house. There are some things where broadcast TV is very useful, such as the World Series and other big sporting events. I did not want to have a situation where you have to switch from computer to TV and back and have to know the difference, with multiple remote shuffling, so ideally I wanted the computer itself to be able to serve up broadcast TV from the antenna. Further, the thought occurred to me that it would be nice to view whatever the antenna picked up anywhere in the house on any computer. I found a magical device that solves both these problems: SiliconDust's HDHomeRun. Your coaxial cable goes in (could be antenna or cable TV) and what comes out is an IP stream over your computer network. Now, any computer can see this signal like any other Internet broadcast. This is a very neat device.. Unfortunately, I had to do some extra work to make this work without using a keyboard and mouse. The only downside to this device is that it is not really suitable for channel surfing. Like most Internet video streams, it has to buffer some data up to ensure smooth playback, and that adds a significant delay when moving between channels. Still, if you know what you want to watch, this is a great little device. I got the one that has two tuners, so you can actually stream 2 different channels.
A Follow-on Project
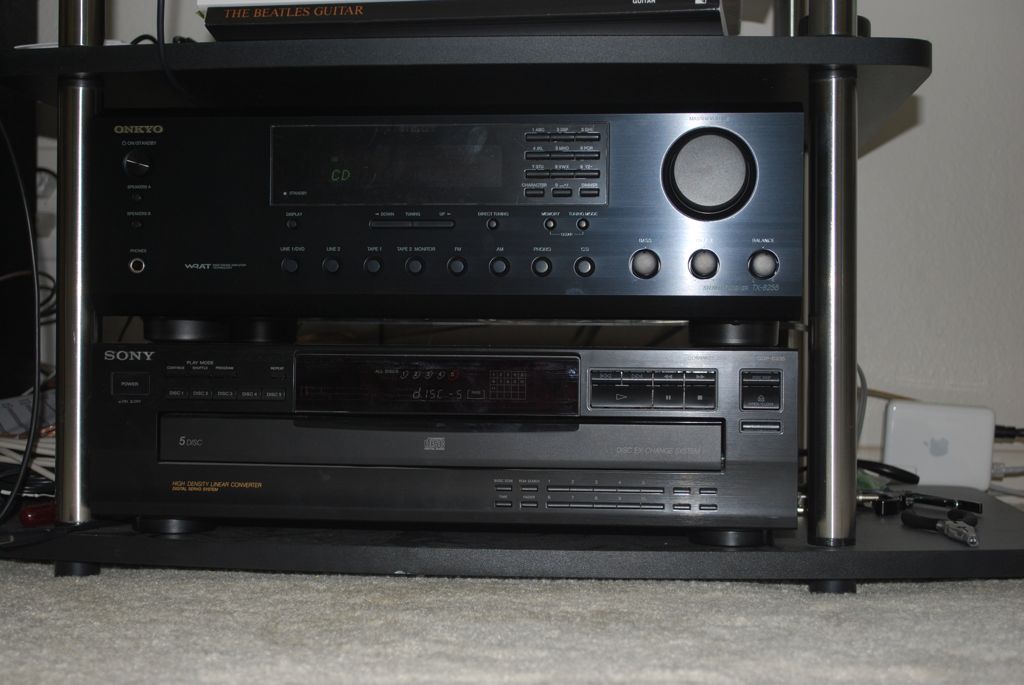
New Receiver, Old CD Player and Mac Airport
On the topic of home entertainment, the home theater setup will satisfy
the den area, but there's also the need for music in the living room
and outside on the porch. We had a very, very old and semi-broken
stereo receiver in the living room that controlled the living room
speakers/subwoofer and a pair of outside patio speakers. We wanted to
replace this, but we also want to upgrade to a 21st century setup where
we can stream our music from computers or the Internet to be played
there..
We replaced the broken stereo receiver with a new one, and we used a Mac
Airport hooked to the reciver to be able to set music from computer to
it. However, the Mac Airport is not soley for piping music to that
receiver. Our main wireless access point is at the far end of the house
since it also is a print server. This means terrible coverage at the other
end of the house which is more than 80 ft. and many walls away. So we
really needed another wireless access point to cover the other half of the
house. That is really the main purpose of this Mac Airport, but it has this
nice side benefit of allowing itself to be hooked up to a stereo receiver..